
 Facebook
  Twitter
  LinkedIn
 Minimum Billing Automation – Arez Operate
Overview
Minimum Billing Automation allows you to define a minimum number of billable hours for a client and automatically apply that rule when preparing invoices.
If the actual worked hours are below the configured minimum, Arez calculates the difference and adds the required uplift hours to the invoice.
This helps ensure agreed minimum billing commitments are applied consistently without manually adjusting individual shifts.
Important: Minimum Billing affects billable hours only. The worker's actual worked hours and pay hours are not changed.
For example, if a worker completes 6.92 hours but the client's minimum billing rule is 8 hours, the system can add 1.08 additional billable hours to bring the invoice quantity up to 8 hours.
What is Minimum Billing Automation?
Minimum Billing Automation is a client-level billing rule used when a customer must be billed for a minimum number of hours, even where the actual worked time is lower.
The automation compares the applicable worked hours against the configured minimum when a draft invoice is prepared.
If:
Worked Hours < Minimum Billable Hours
the system calculates:
Additional Hours = Minimum Billable Hours − Worked Hours
Those additional hours are then added to the invoice when Minimum Billing is applied.
Example
A client has a minimum billing rule of 8 hours per worker per day.
A worker completes:
Actual worked hours: 6.92 hours
Minimum billable hours: 8.00 hours
Additional hours required: 1.08 hours
After applying Minimum Billing:
Worked hours remain 6.92 hours
Billable hours become 8.00 hours
Additional billed hours are 1.08 hours
The additional amount depends on the rate configured for uplift hours.
Part 1: Configure Minimum Billing for a Client
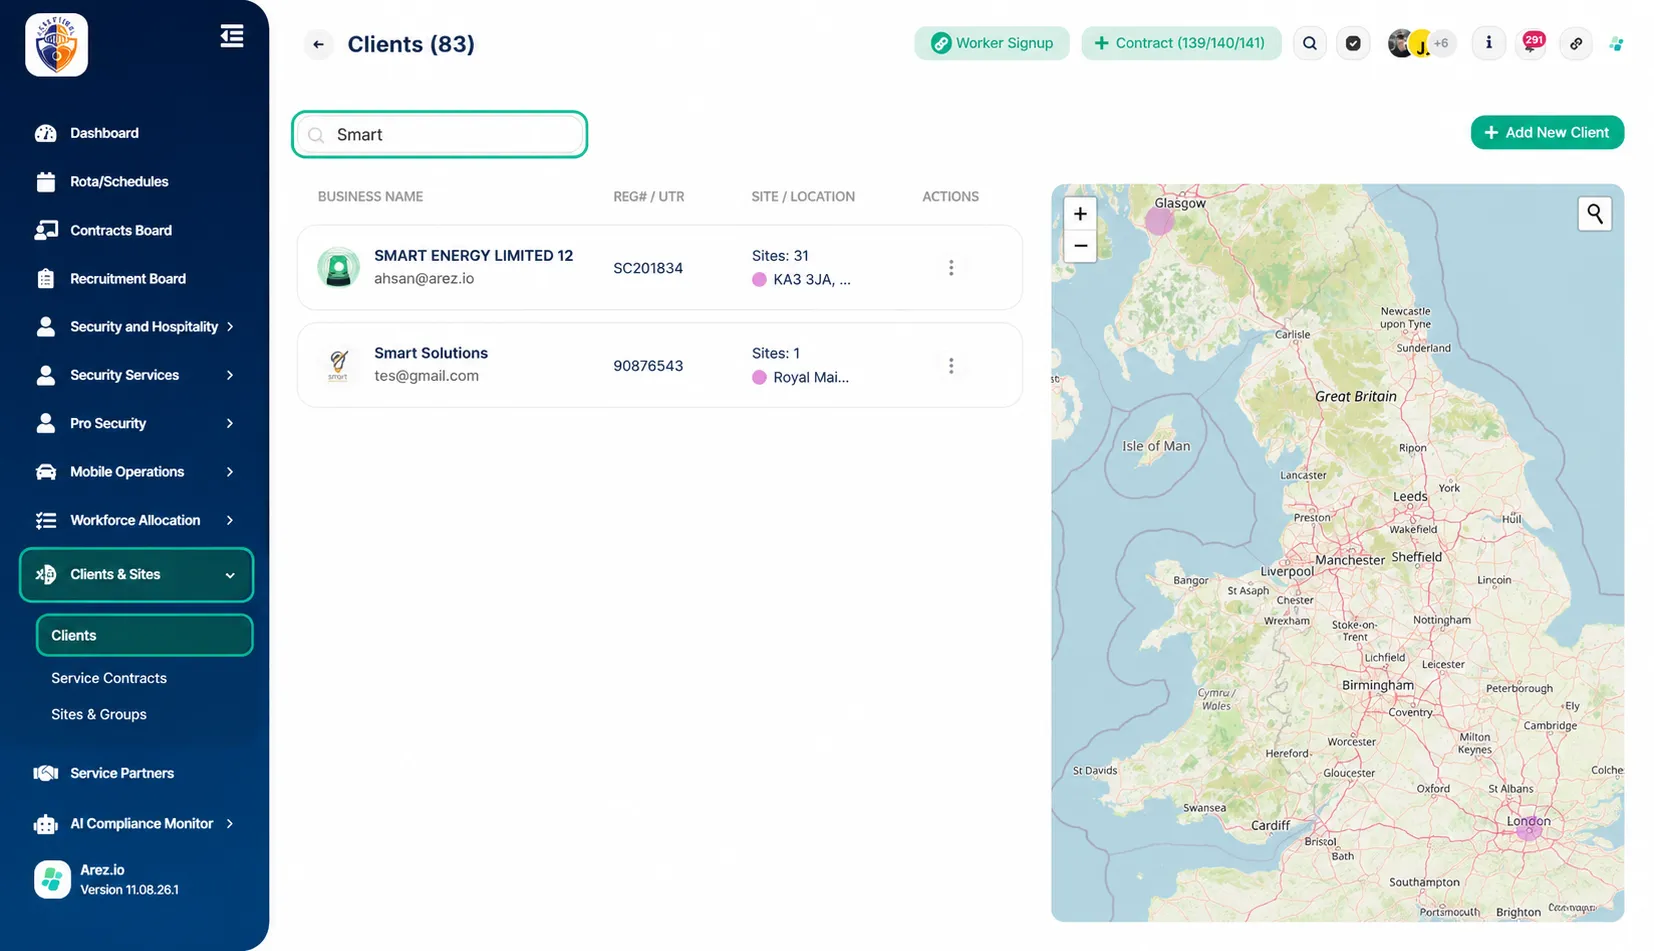
Step 1: Open the Client
From the left-side navigation menu:
Click Clients & Sites.
Select Clients.
Open the client for which you want to configure Minimum Billing.
The selected client's Client Information page will open.
Step 2: Open the Minimum Billing Tab
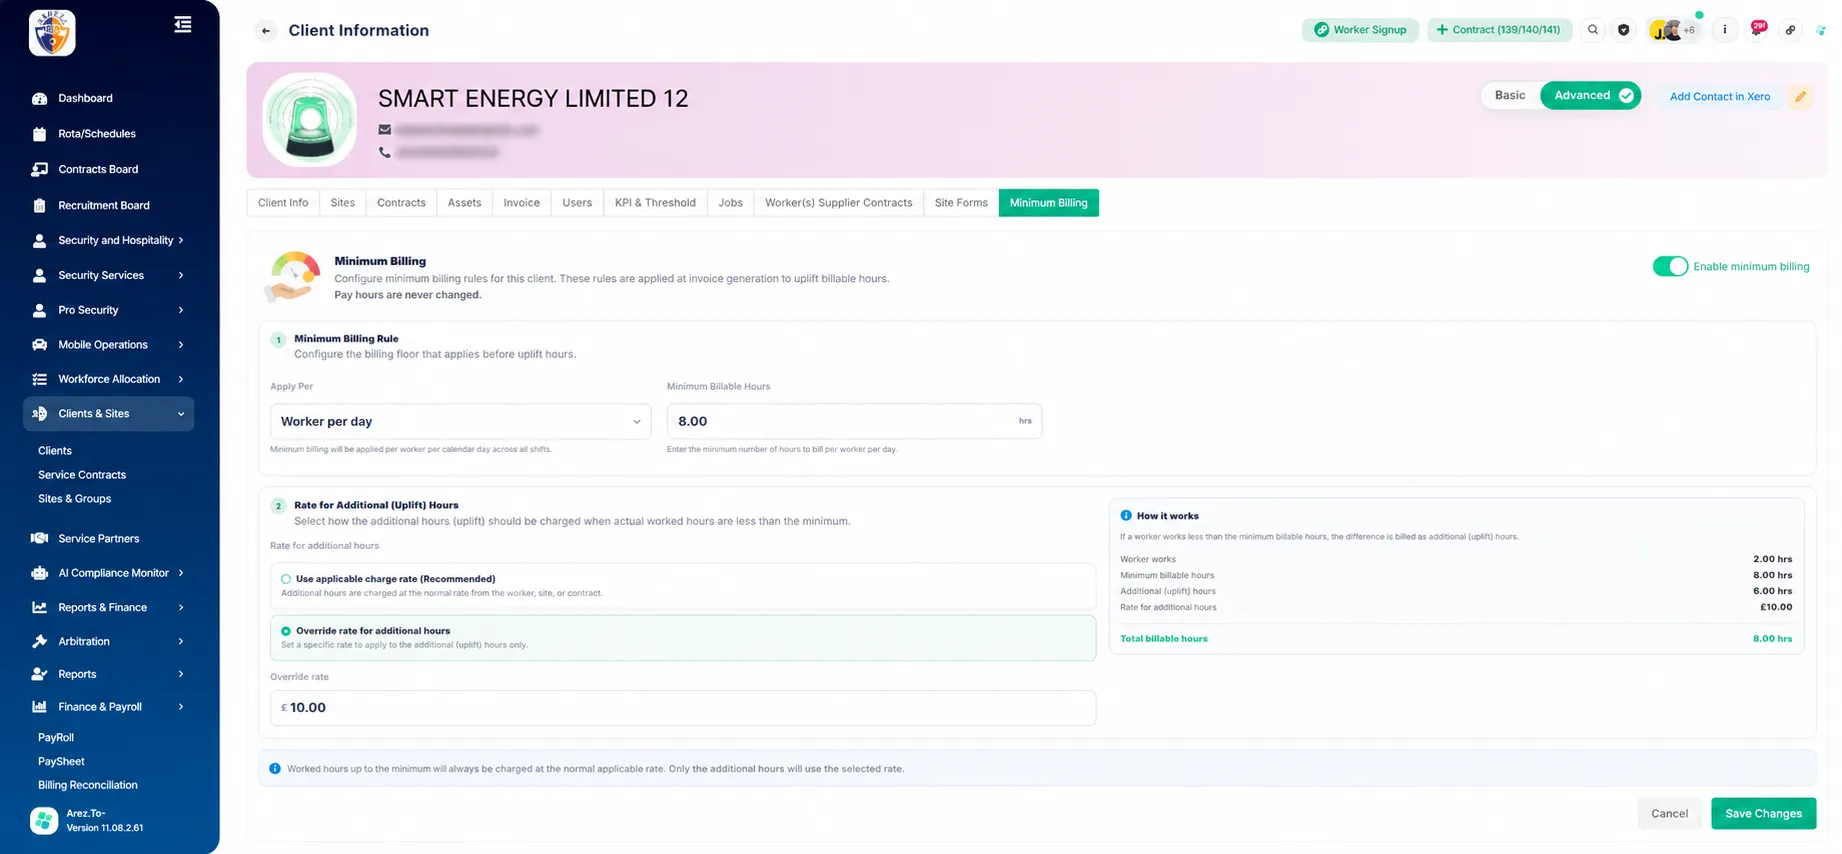
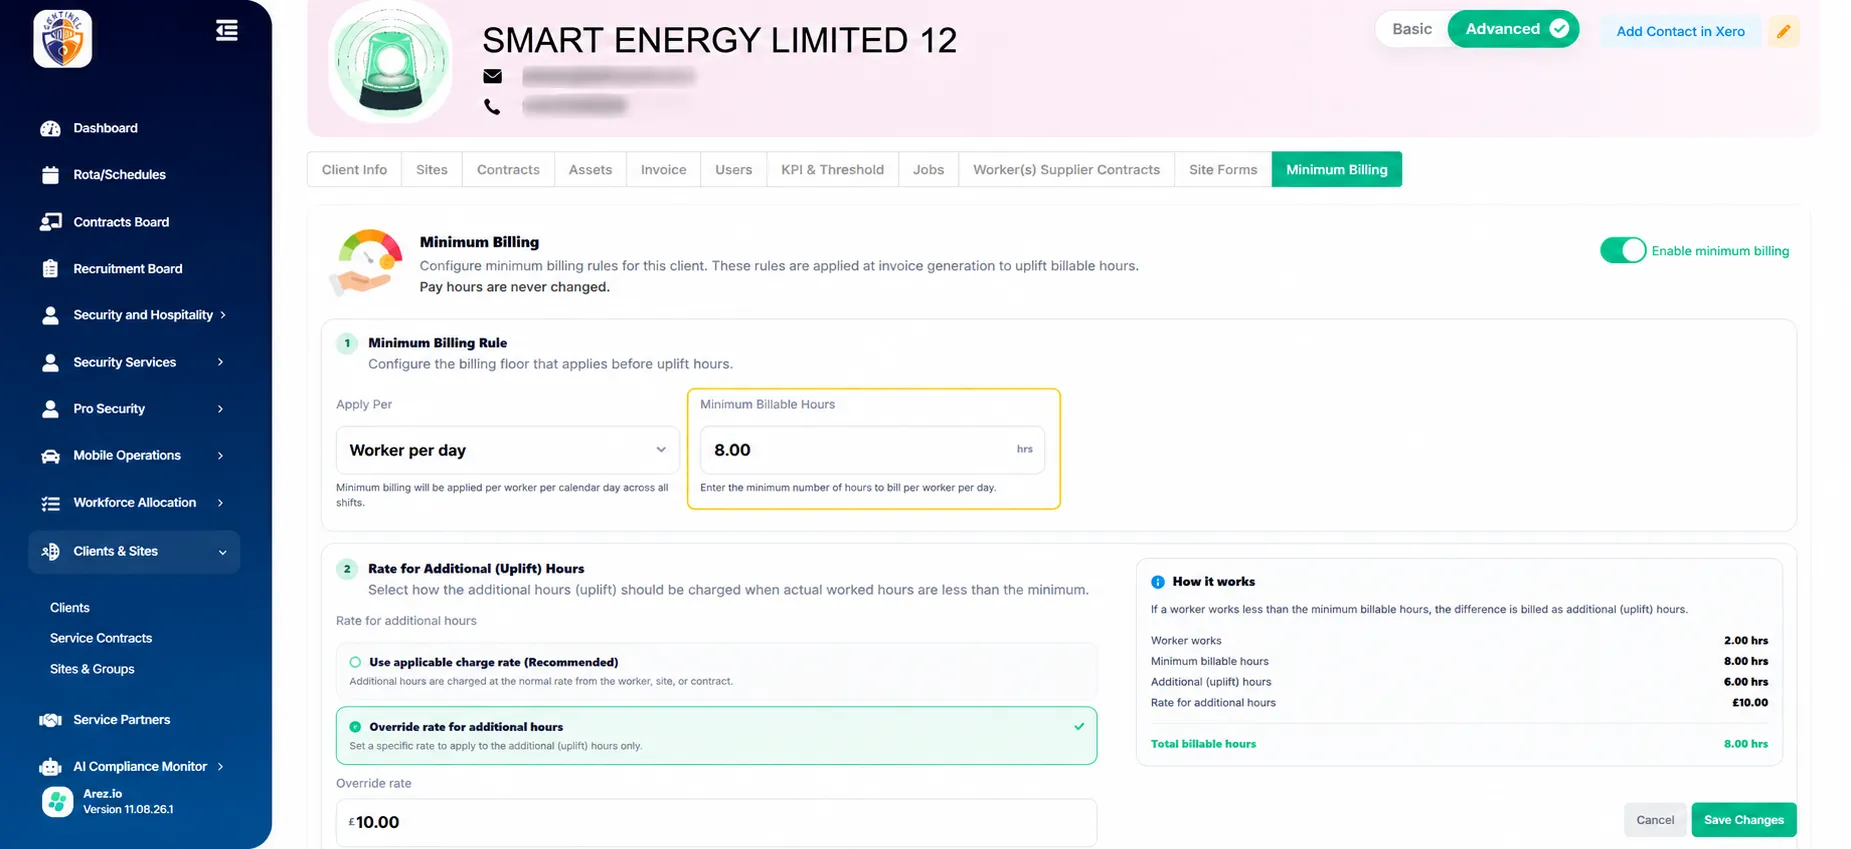
From the tabs displayed on the Client Information page, select Minimum Billing.
This page contains the billing rule and uplift-rate configuration for the selected client.
Step 3: Enable Minimum Billing
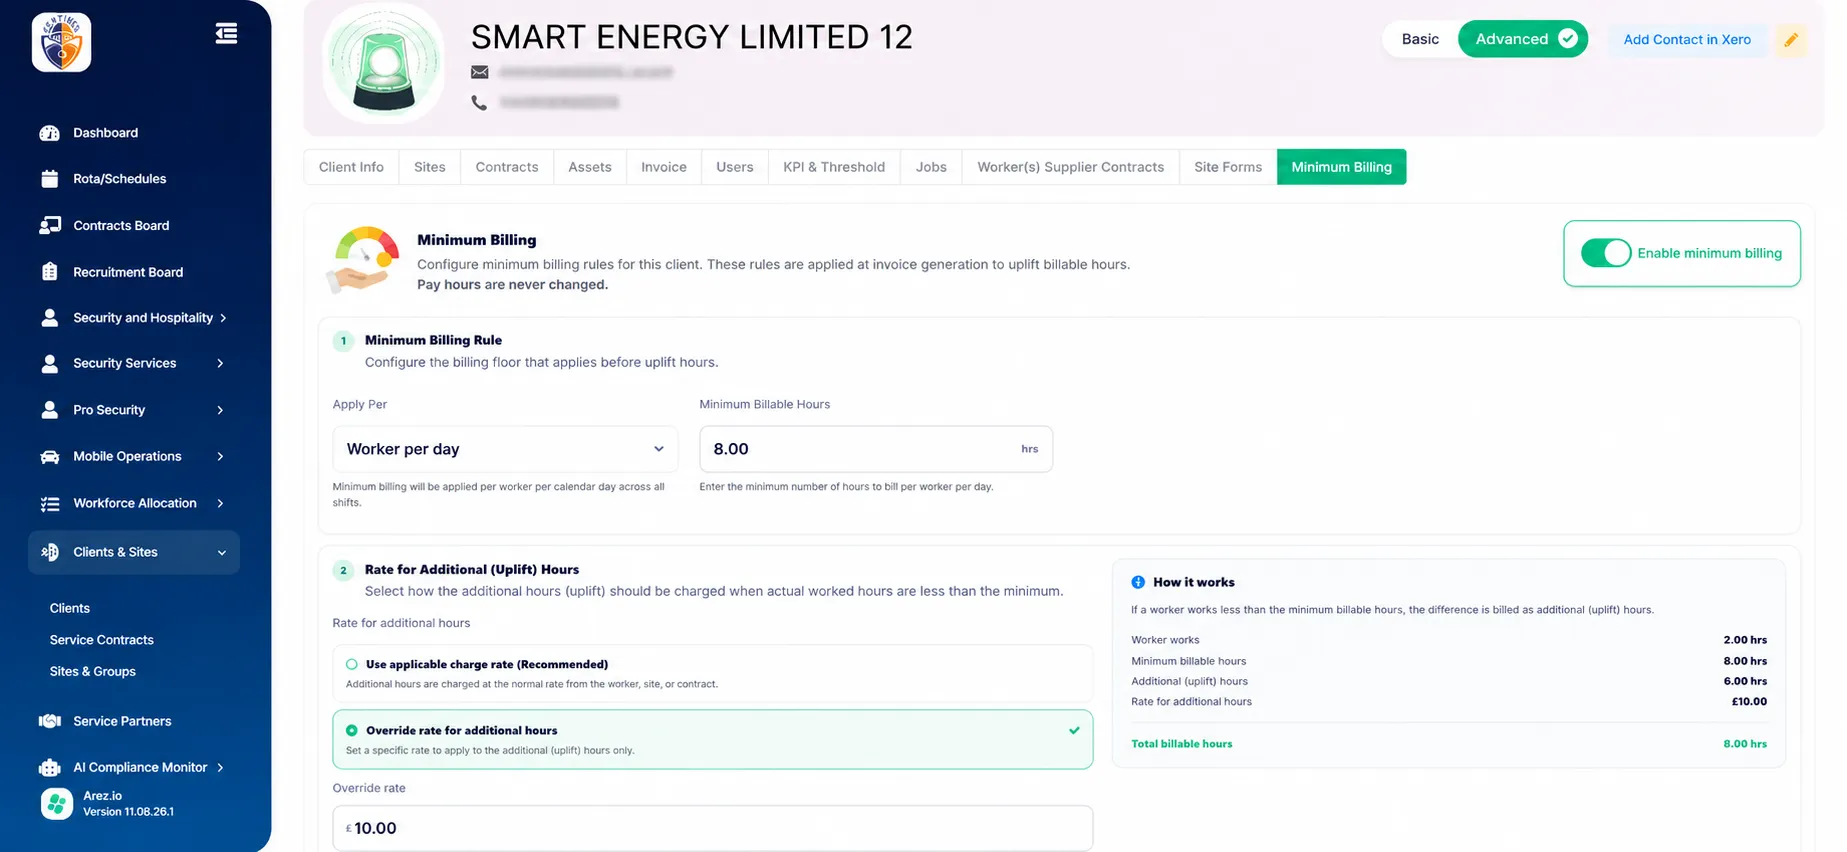
Turn on the Enable minimum billing toggle.
When enabled, the configured rule becomes available when draft invoices are generated for this client.
If Minimum Billing is disabled, no uplift will be offered during invoice preparation.
Configure the Minimum Billing Rule
Step 4: Choose How the Minimum Should Apply
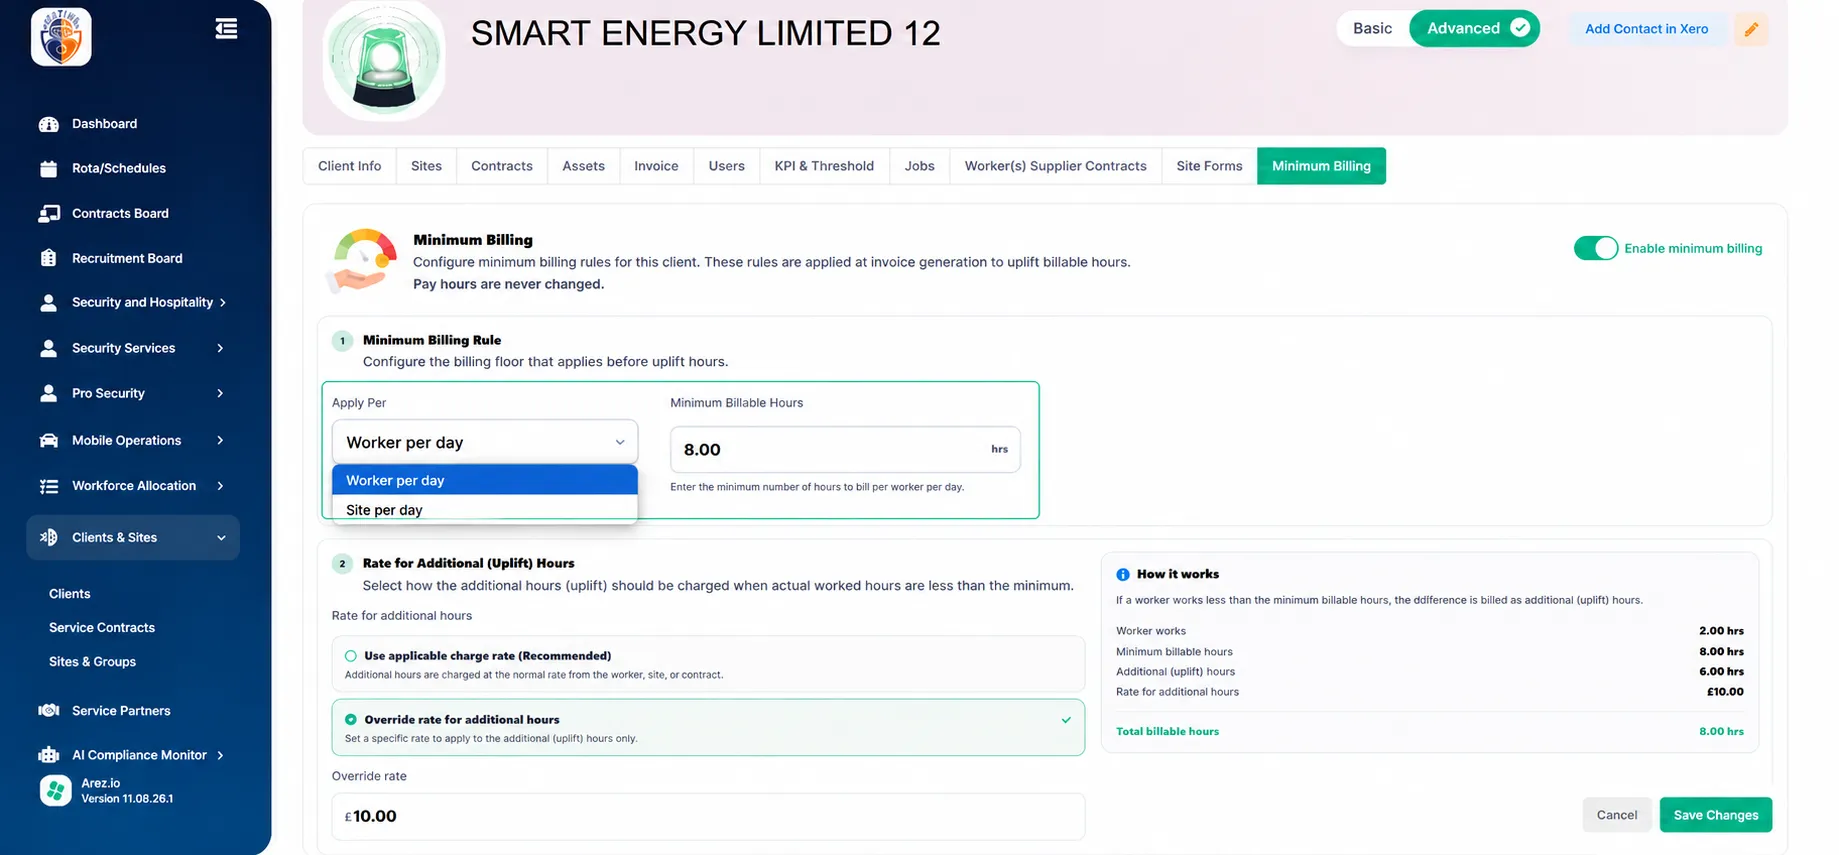
Under Minimum Billing Rule, use the Apply Per field to define how Arez should evaluate the minimum.
The available options include:
Worker per day
The minimum is evaluated for each worker on each calendar day.
For example, with an 8-hour minimum:
Worker A works 6 hours → 2 uplift hours may be added.
Worker B works 8 hours → no uplift is required.
This option is useful where the billing agreement guarantees a minimum charge for each individual worker per day.
Site per day
The minimum is evaluated against the applicable site-level activity for the day.
Use this option where the minimum billing commitment relates to the site rather than an individual worker.
Select the option that matches the client's commercial billing agreement.
Step 5: Enter the Minimum Billable Hours
In Minimum Billable Hours, enter the minimum number of hours that should be billed.
Example:
8.00 hours
When the applicable worked hours fall below this value, Arez calculates the difference as additional uplift hours.
Configure the Rate for Additional Hours
Step 6: Choose How Uplift Hours Should Be Charged
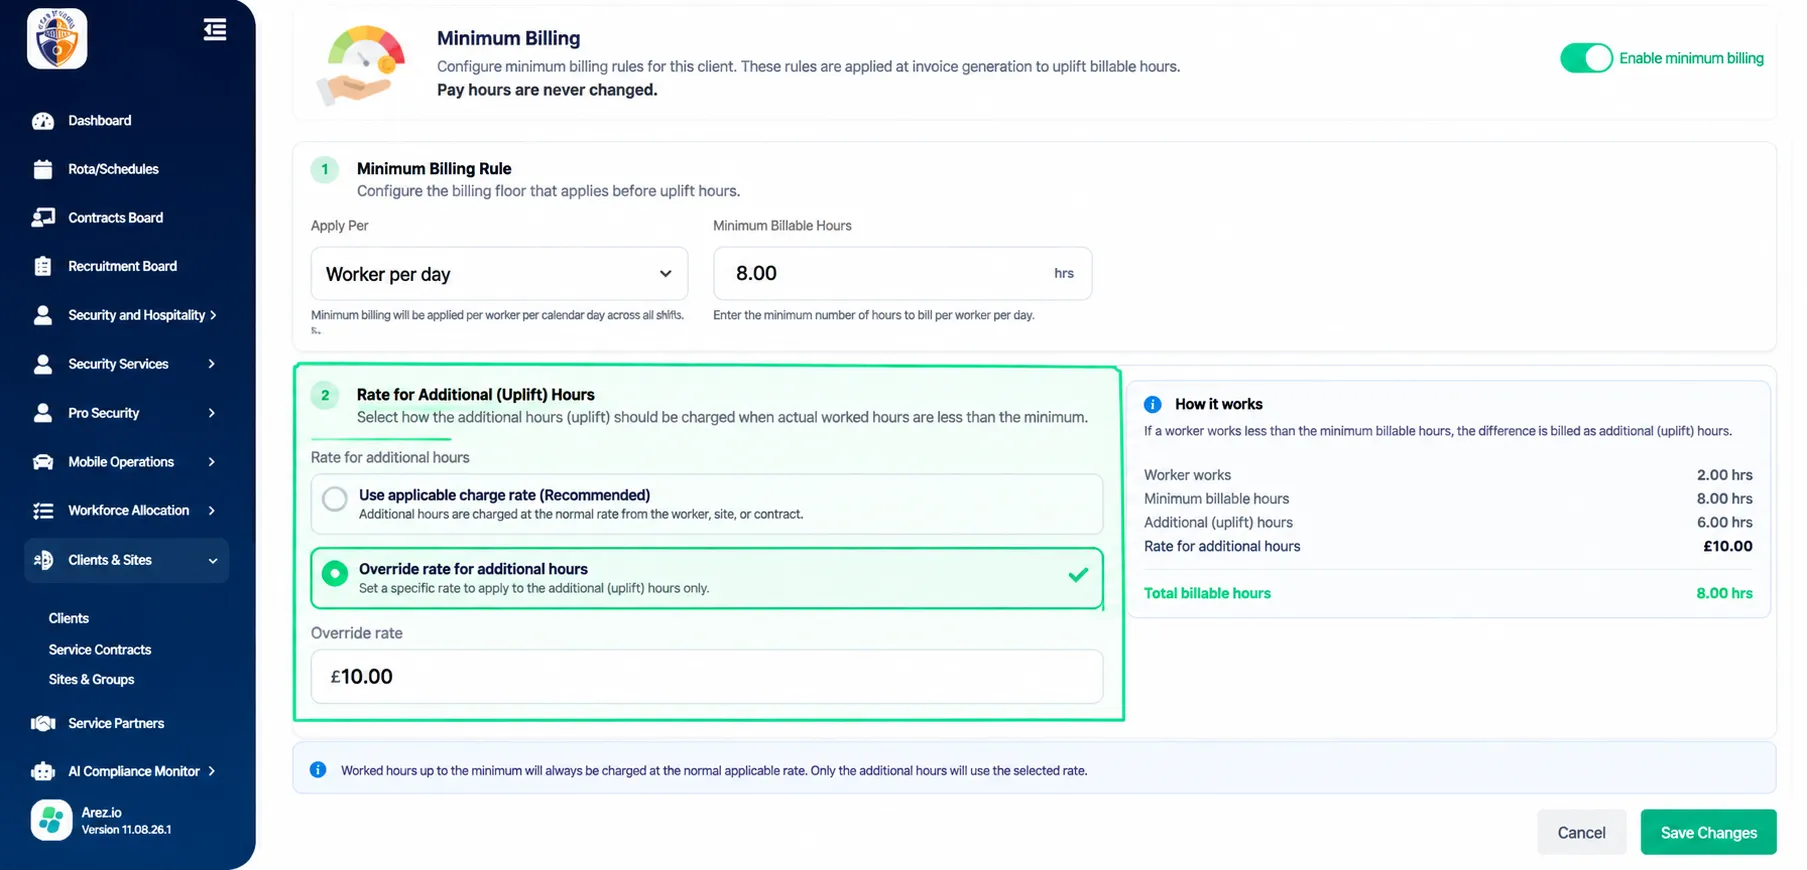
Under Rate for Additional (Uplift) Hours, select how the additional hours should be priced.
There are two options.
Use Applicable Charge Rate — Recommended
Select Use applicable charge rate if additional hours should use the worker, site, role, or contract's normal applicable charge rate.
This keeps the uplift aligned with the normal billing rate already associated with the shift.
Override Rate for Additional Hours
Select Override rate for additional hours if uplift hours should be charged at a specific rate.
When selected, the Override Rate field appears.
Enter the required uplift rate.
Example:
£10.00
With this option:
Actual worked hours continue to use their normal applicable charge rate.
Only the additional uplift hours use the override rate.
Understanding the “How It Works” Panel
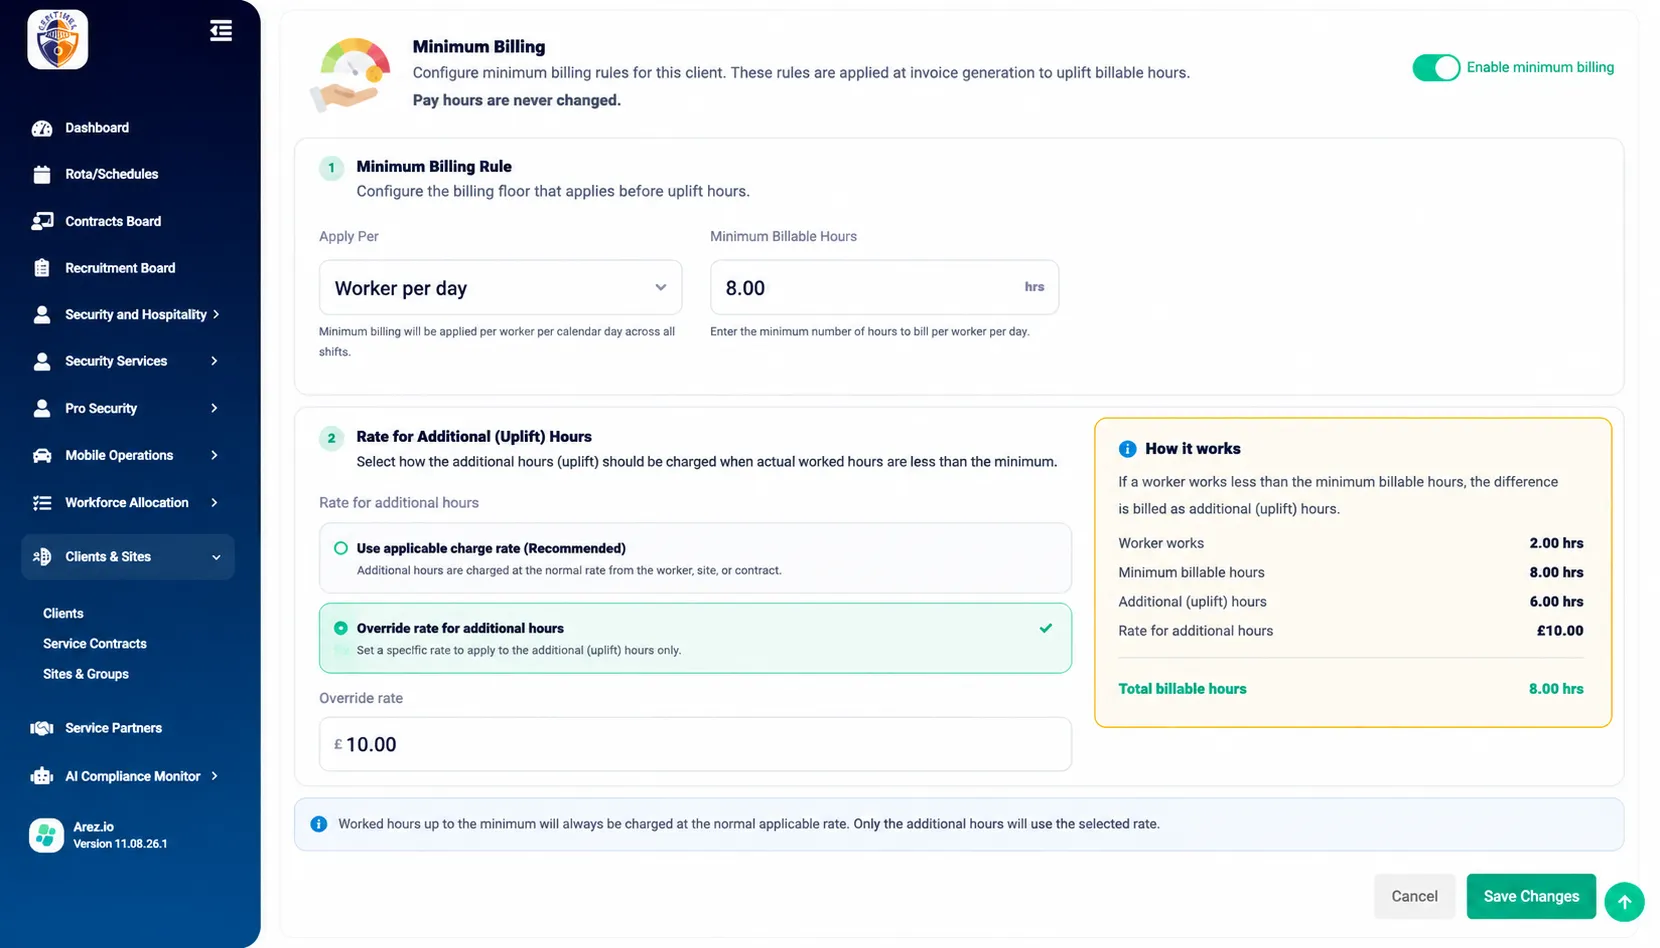
The How it works panel provides a live example of the configured rule.
It shows:
Worked hours
Minimum billable hours
Additional uplift hours
Rate for additional hours
Total billable hours
For example:
Worker works: 2.00 hrs
Minimum billable hours: 8.00 hrs
Additional uplift hours: 6.00 hrs
Total billable hours: 8.00 hrs
Use this preview to confirm that the configuration matches the intended billing rule.
Step 7: Save the Configuration
Once the minimum rule and uplift rate are configured, click Save Changes.
Minimum Billing is now configured for that client and can be applied when preparing eligible invoices.
Part 2: Create a Draft Invoice
After configuring the client's Minimum Billing rule, create a draft invoice for the relevant billing period.
Step 8: Open Invoices & Billing
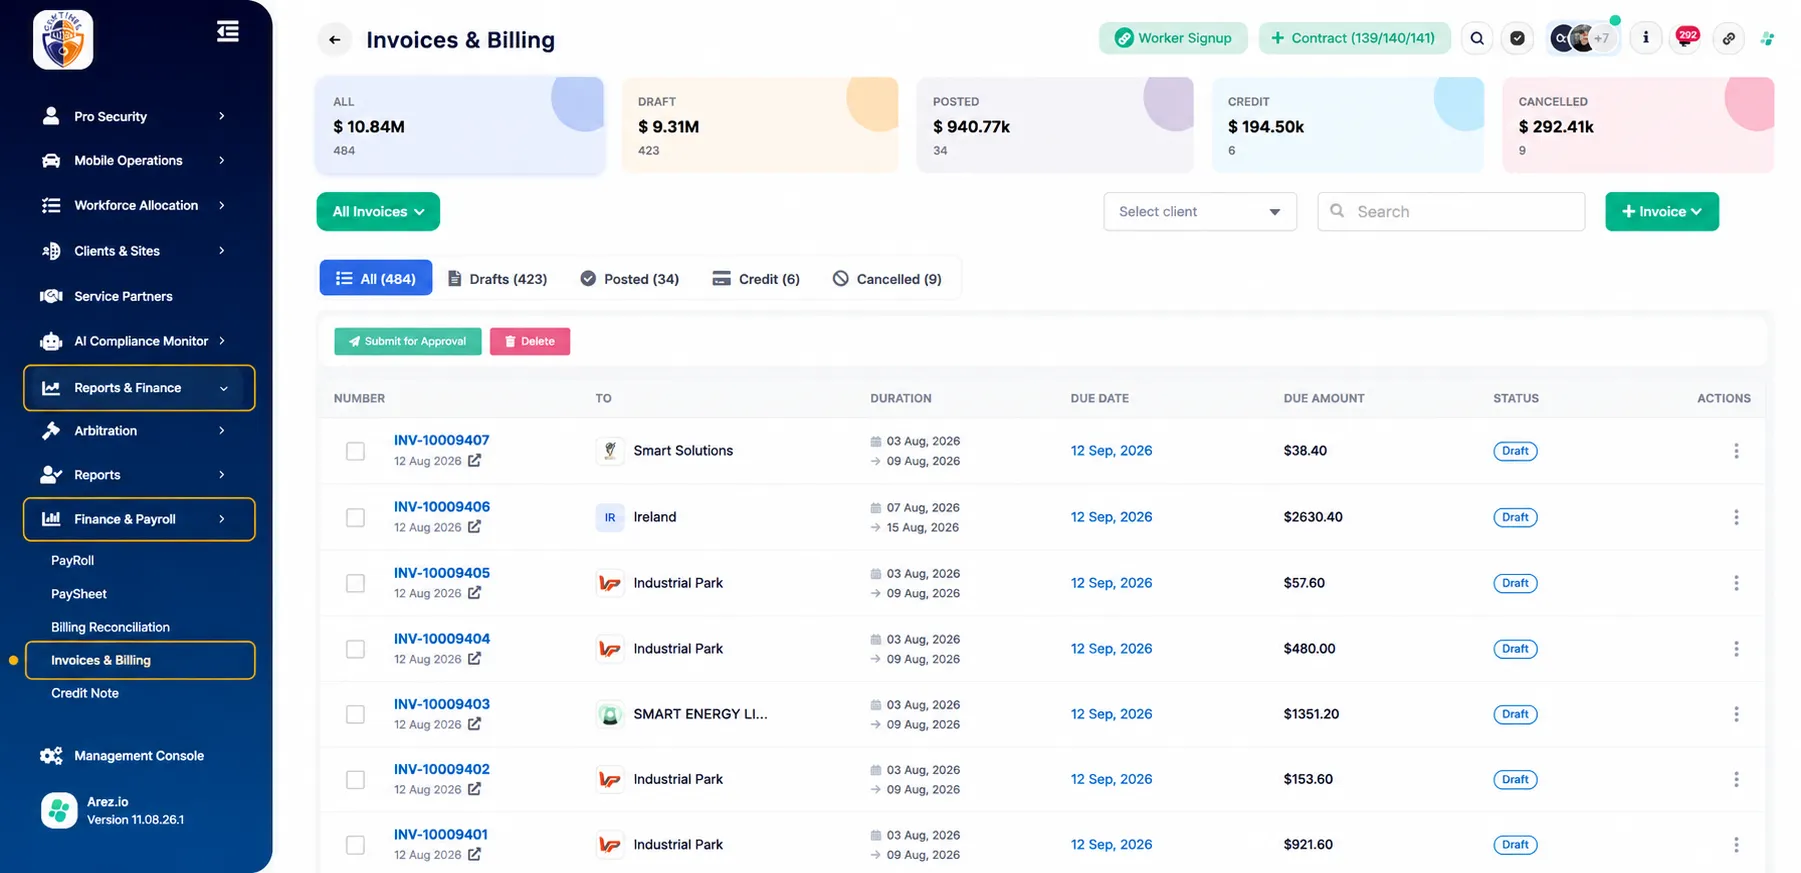
From the left-side navigation menu:
Open Reports & Finance.
Navigate to Finance & Payroll.
Click Invoices & Billing.
The Invoices & Billing page displays existing invoices and their current statuses.
Step 9: Start a New Invoice
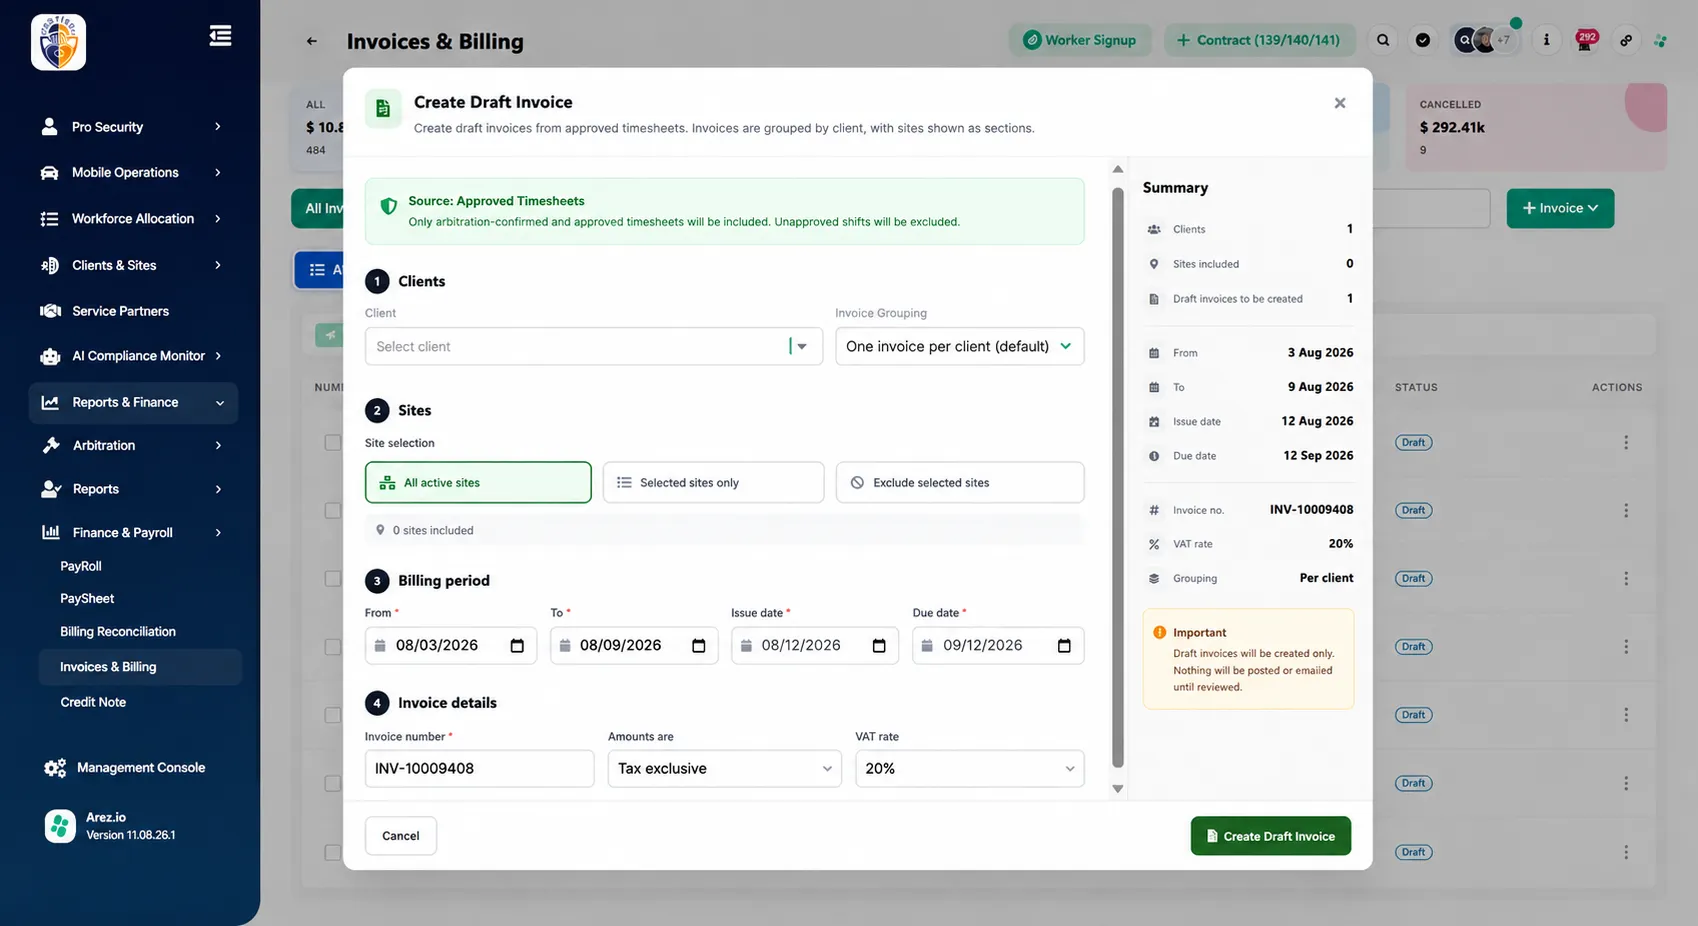
Click the + Invoice button in the top-right corner and begin creating a draft invoice.
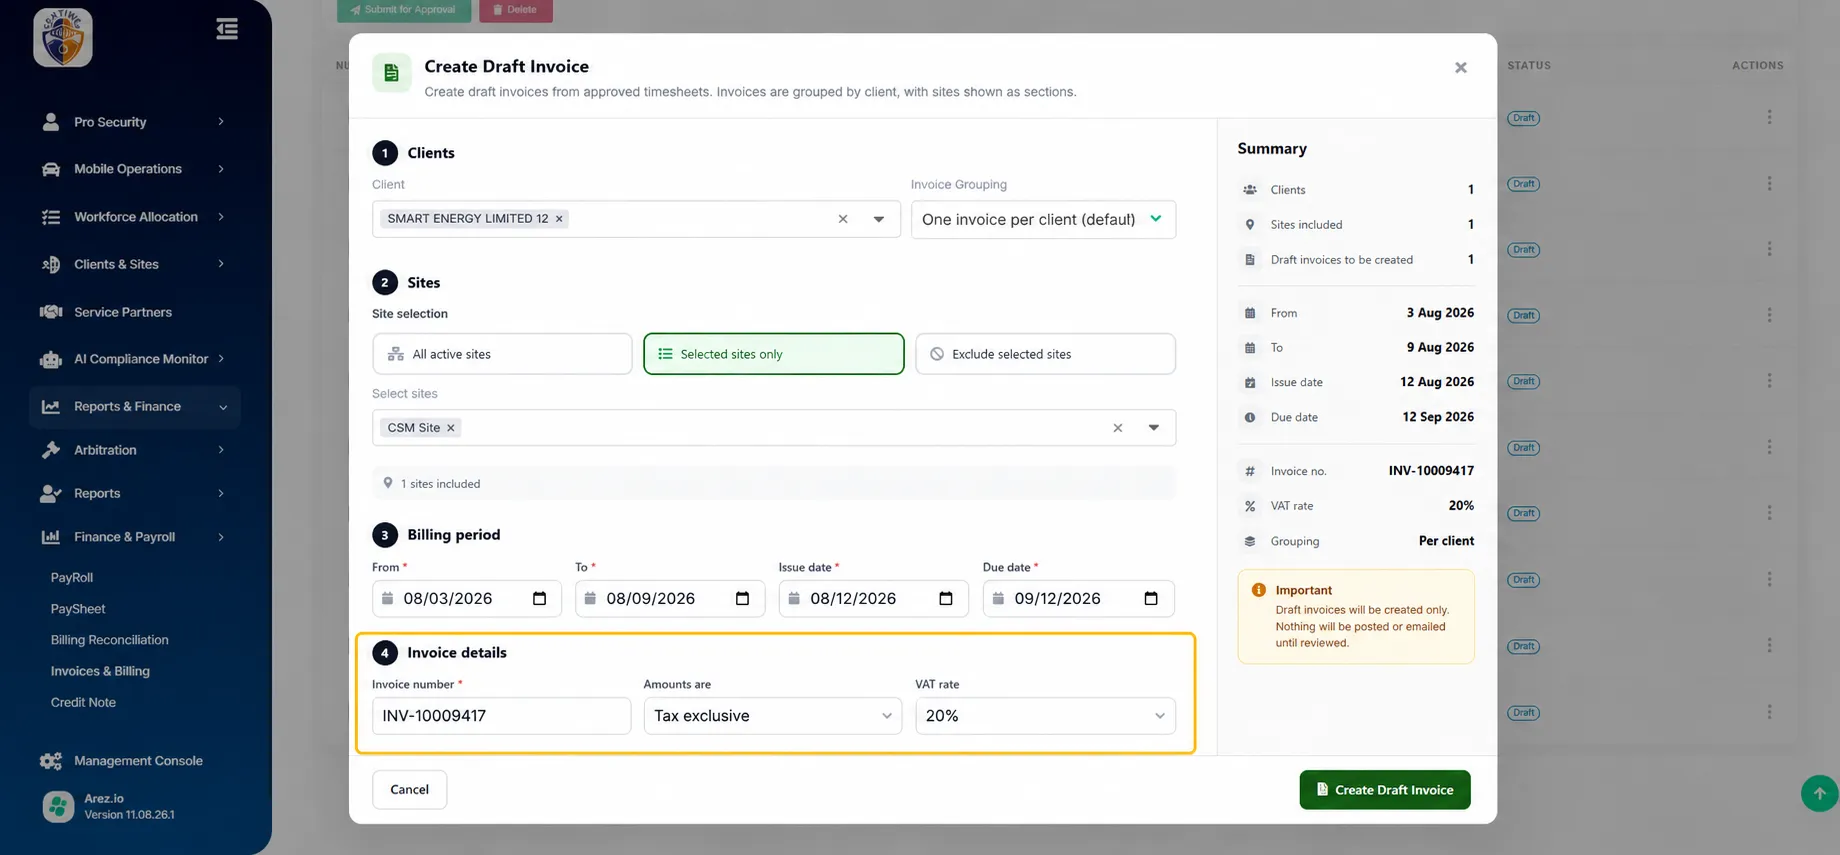
The Create Draft Invoice window will open.
Configure the Draft Invoice
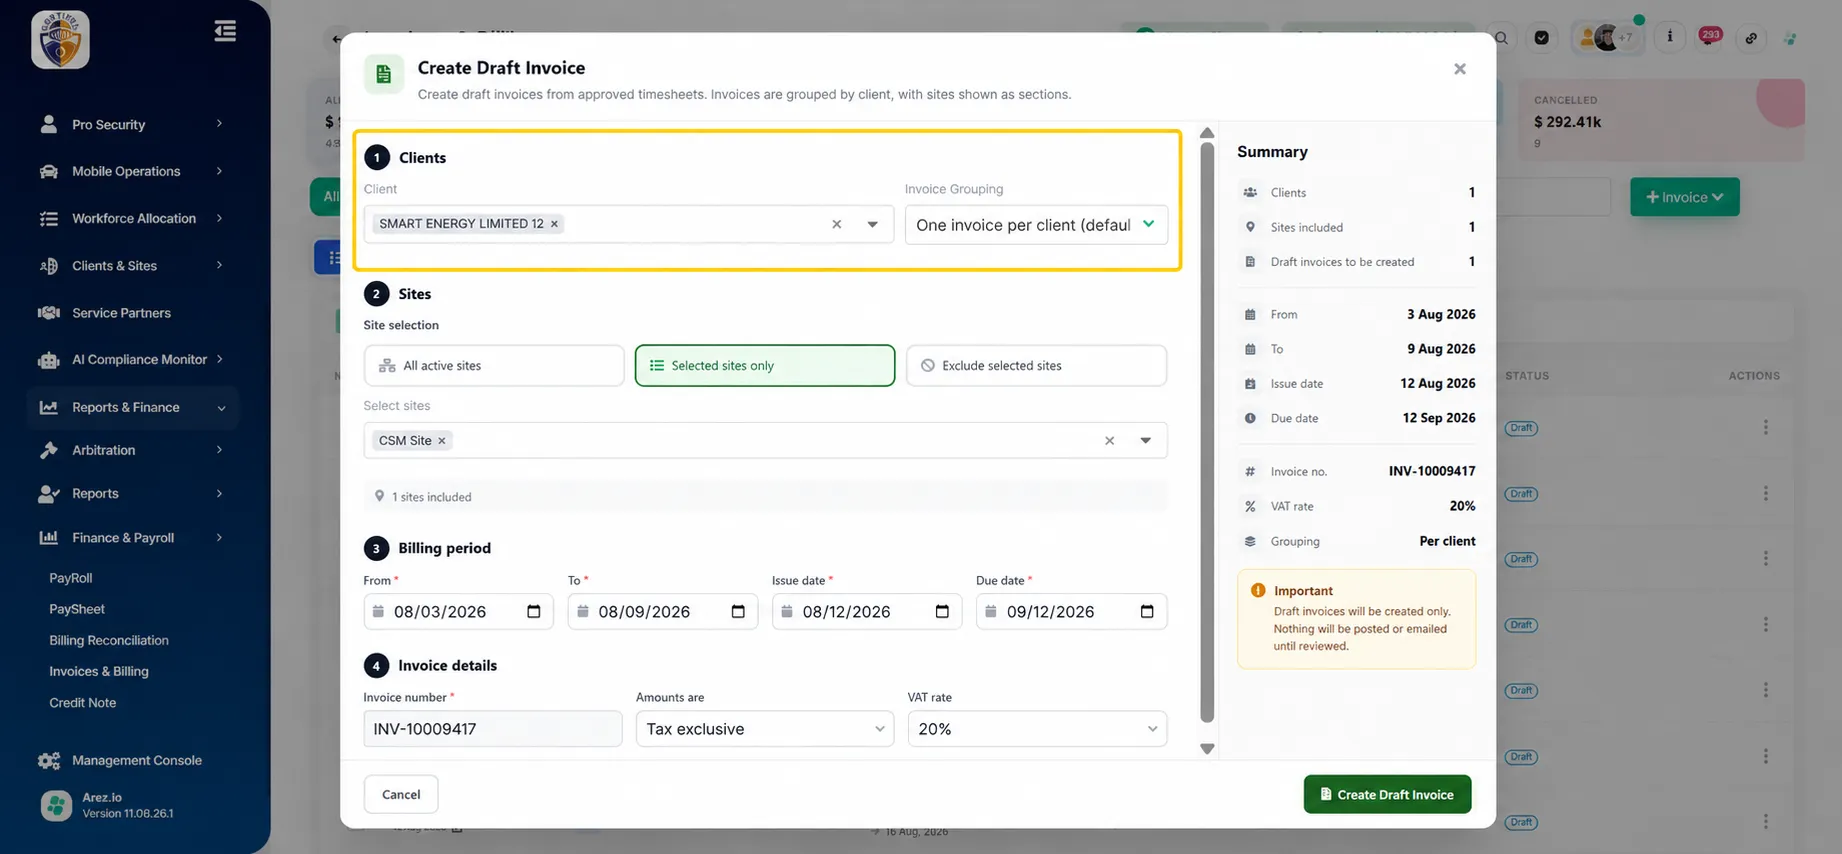
Step 10: Select the Client
Under Clients, select the client for which Minimum Billing was configured.
You can also select the required Invoice Grouping option.
For example:
One invoice per client
Step 11: Select the Sites
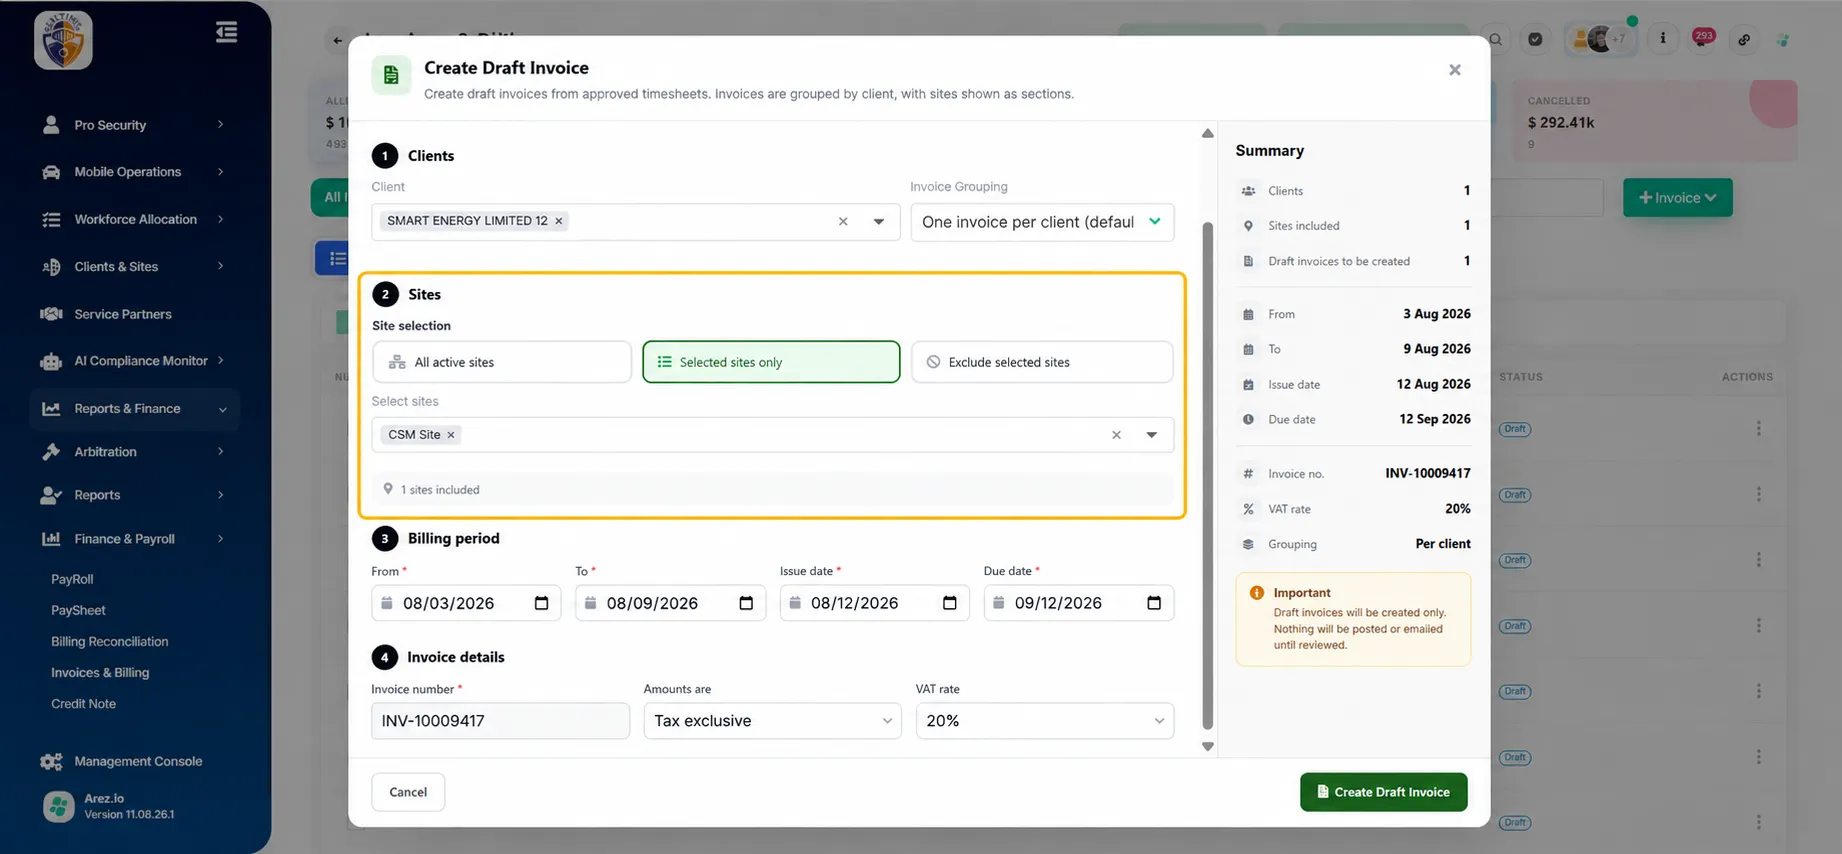
Choose which sites should be included in the invoice.
Available options may include:
All active sites
Selected sites only
Exclude selected sites
If using Selected sites only, choose the specific site or sites to include.
Step 12: Define the Billing Period
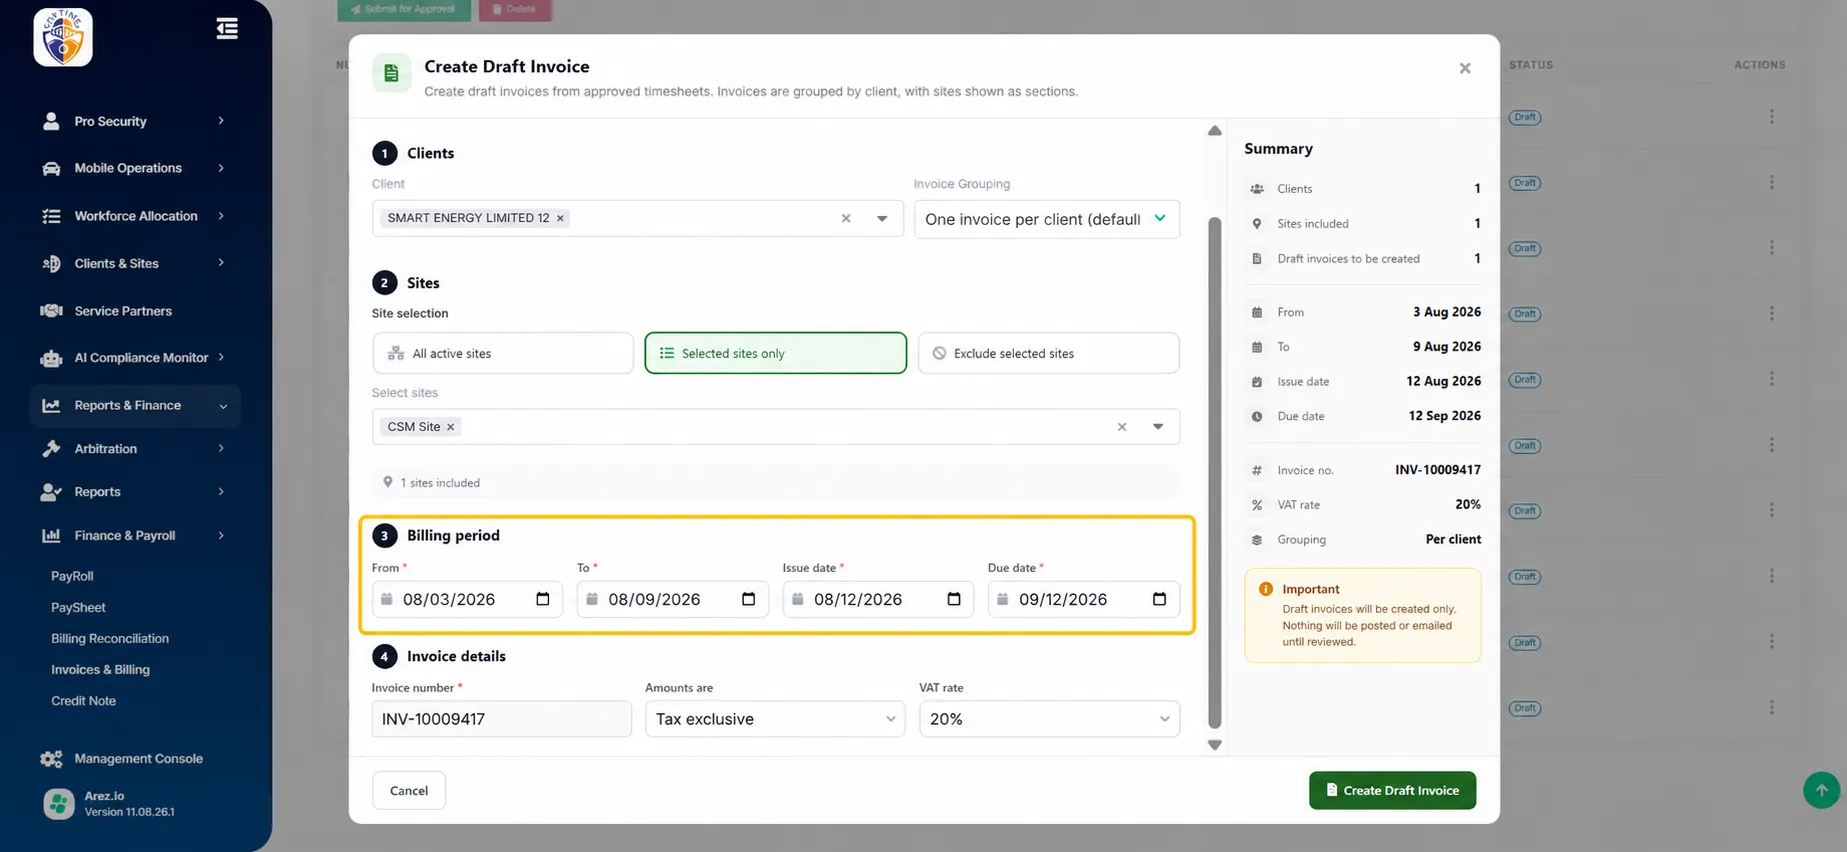
Enter the required:
From date
To date
Issue Date
Due Date
The billing period determines which approved timesheets are included in the draft invoice.
Step 13: Complete Invoice Details
Review or enter:
Invoice Number
Amount basis, such as Tax exclusive
VAT Rate
Check the summary displayed on the right before proceeding.
Step 14: Create the Draft Invoice
Click Create Draft Invoice.
The invoice is created in Draft status.
Minimum Billing is not automatically applied at this point. You can first review its impact before applying it.
Part 3: Preview Minimum Billing
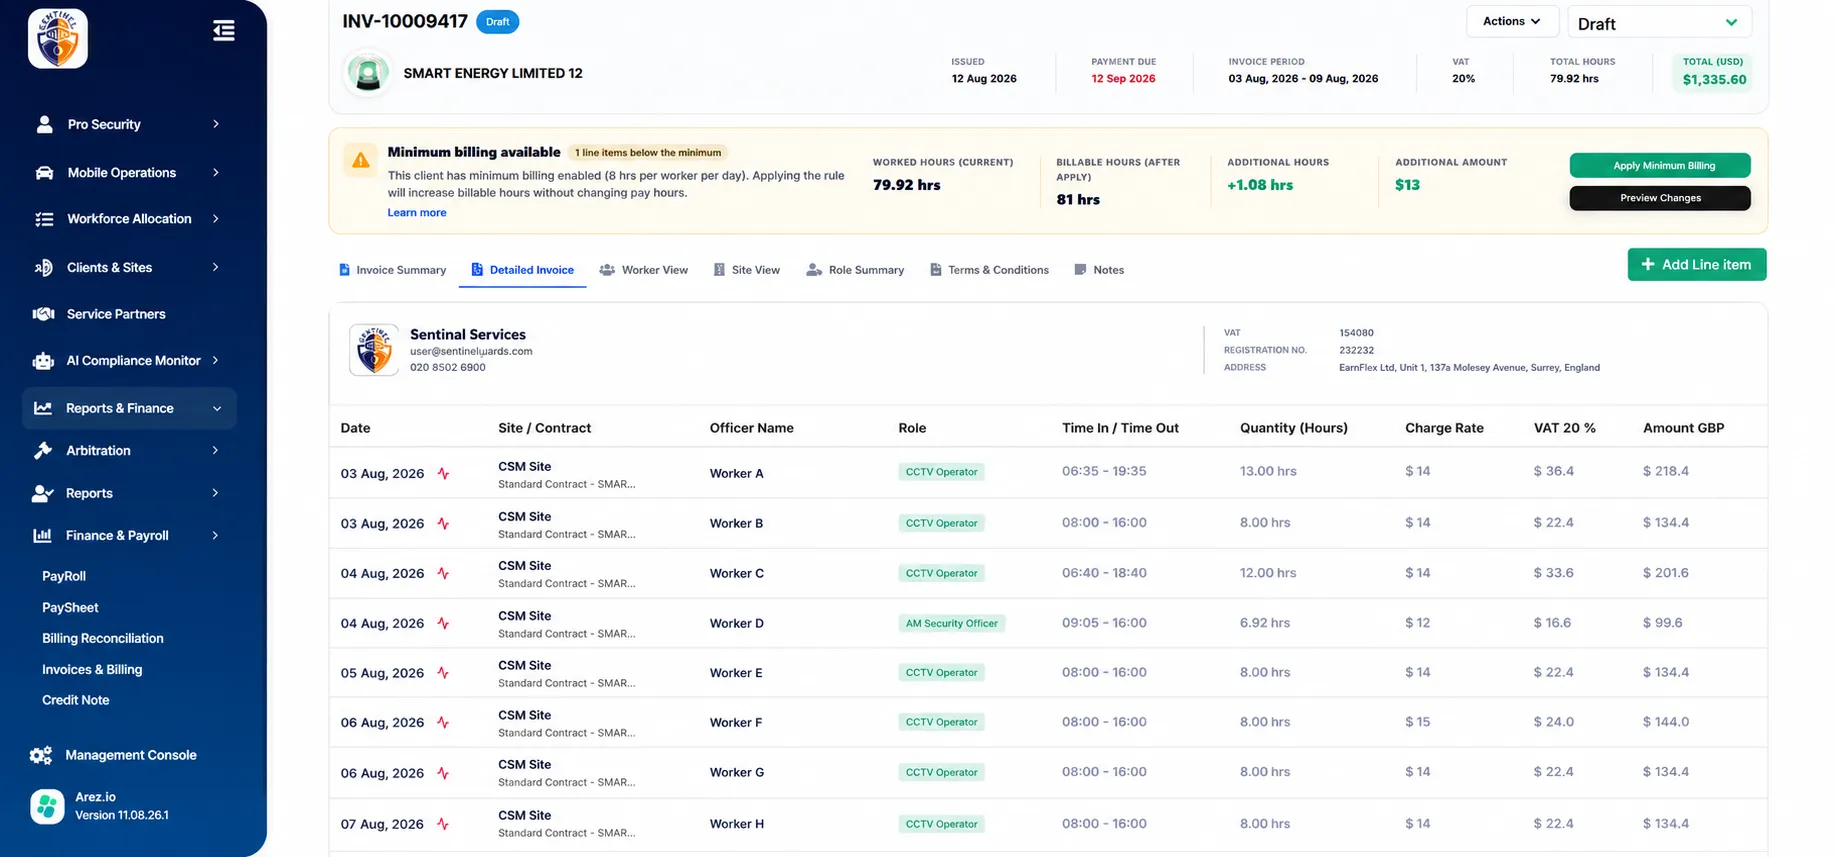
Open the newly created draft invoice.
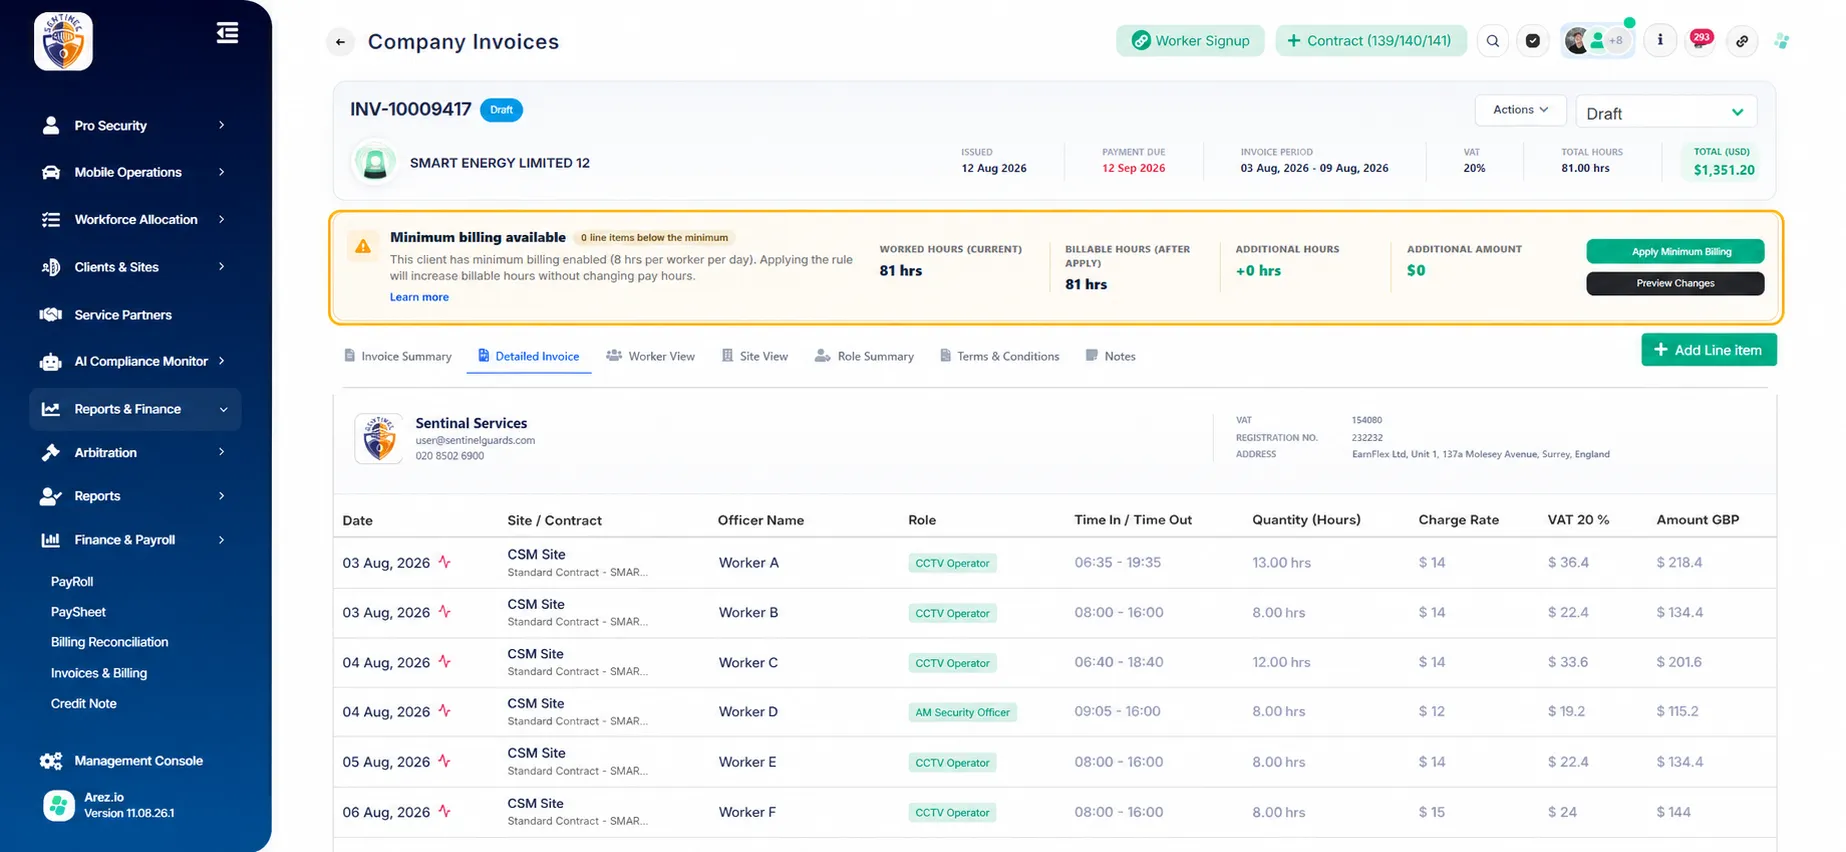
When Minimum Billing is enabled for that client, a Minimum billing available banner appears at the top of the invoice.
The banner displays information such as:
Current worked hours
Billable hours after application
Additional hours
Additional amount
It also provides two actions:
Preview Changes
Apply Minimum Billing
Step 15: Preview the Changes
Before applying the billing uplift, click Preview Changes.
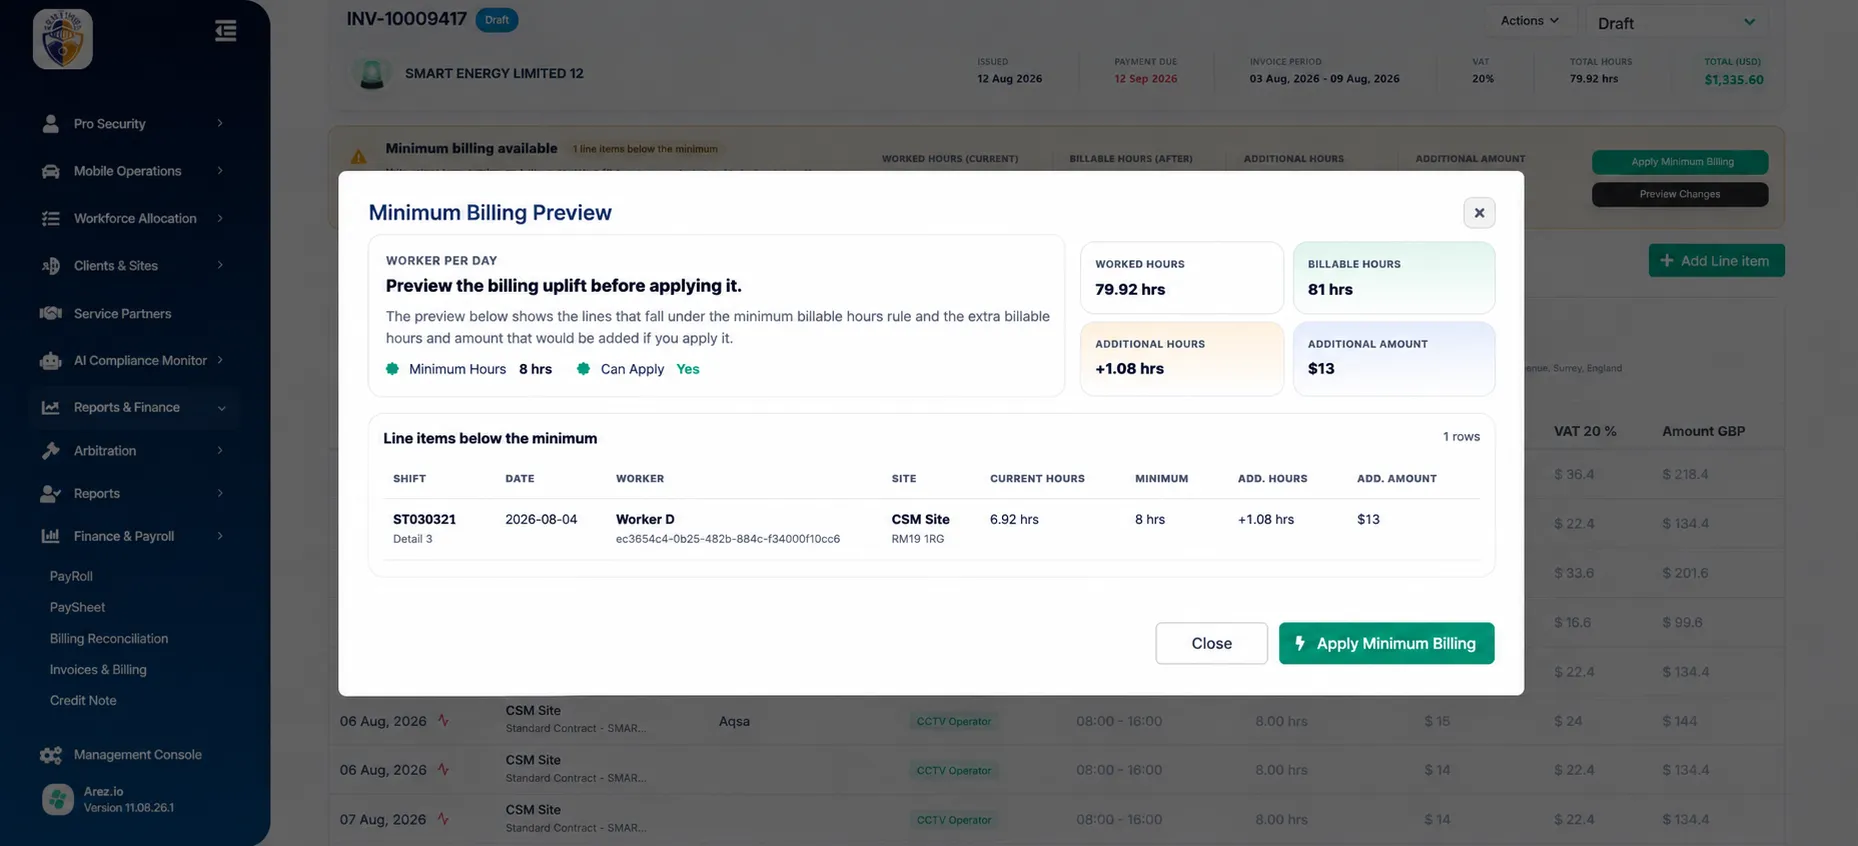
The Minimum Billing Preview window opens.
This allows you to review exactly what the system intends to add to the invoice before making any changes.
Understanding the Minimum Billing Preview
The preview displays a summary of the proposed adjustment, including:
Worked Hours
Billable Hours
Additional Hours
Additional Amount
It also identifies the specific invoice lines that fall below the configured minimum.
For each affected line, you can review:
Shift
Date
Worker
Site
Current Hours
Minimum Hours
Additional Hours
Additional Amount
Example
For a shift where:
Current hours = 6.92 hrs
Minimum = 8 hrs
the preview shows:
Additional Hours = +1.08 hrs
Additional Amount = the value calculated using the configured uplift rate.
This lets you verify the adjustment before it is applied to the invoice.
Part 4: Apply Minimum Billing
Step 16: Apply the Uplift
After reviewing the preview, click Apply Minimum Billing.
Arez updates the invoice using the configured Minimum Billing rule.
The additional billable hours are added only where required.
What Happens After Minimum Billing Is Applied?
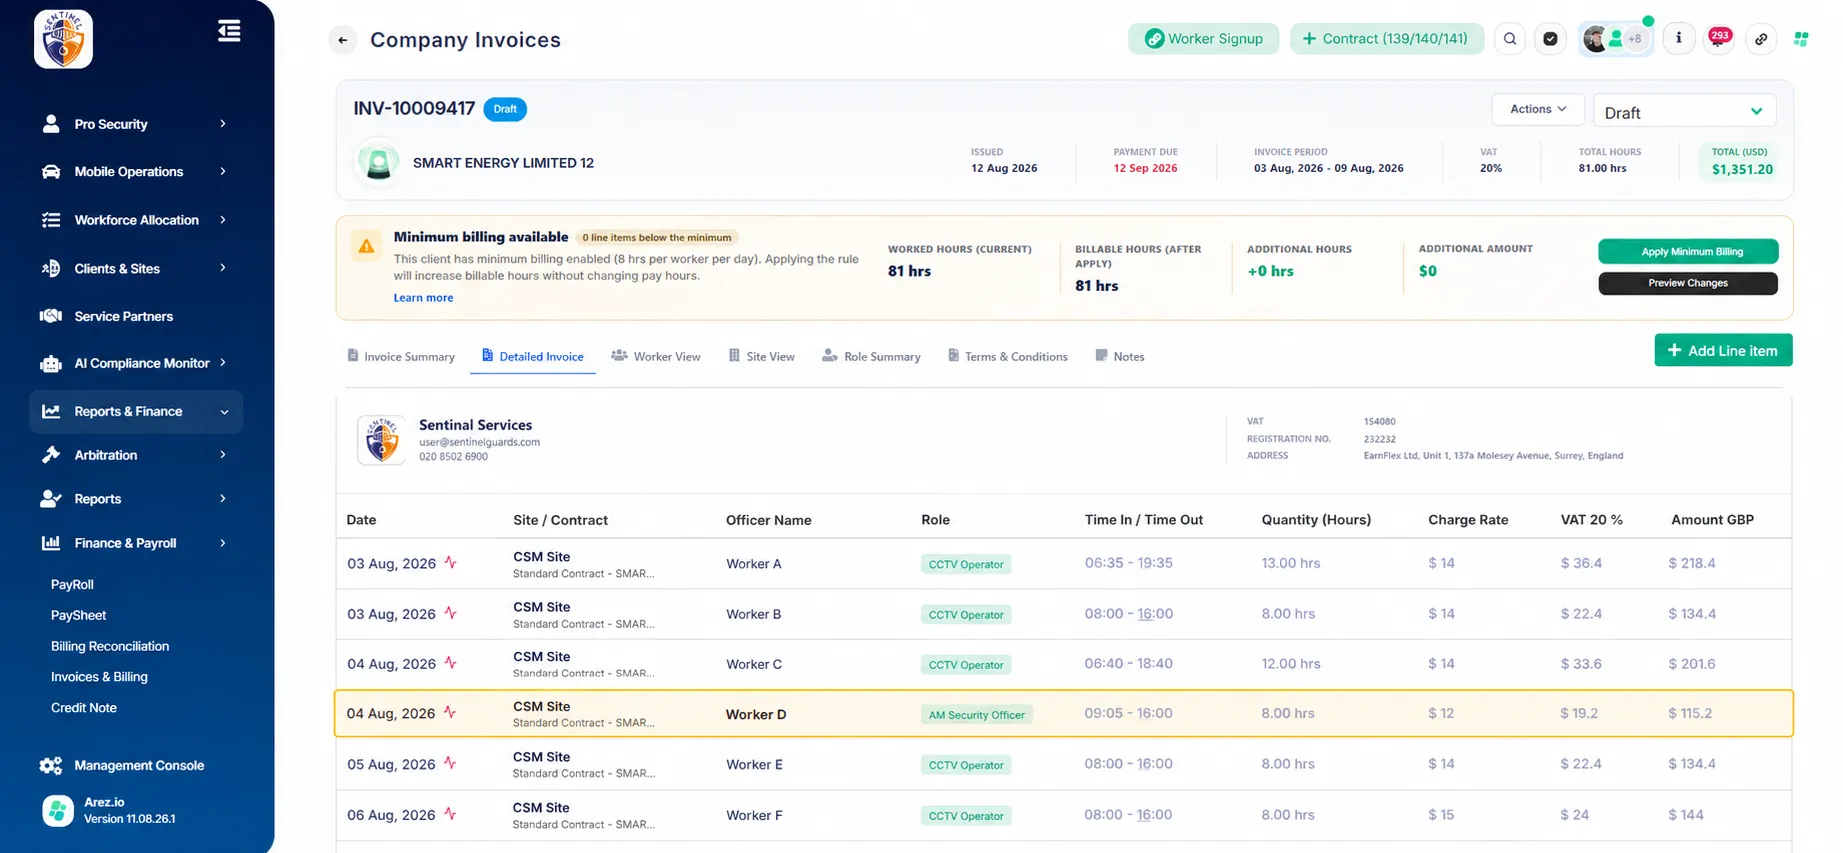
After you review the Minimum Billing Preview and click Apply Minimum Billing, Arez applies the required billing uplift to the draft invoice.
Where an uplift is required:
The required additional billable hours are added to the invoice.
The billable hours reflect the minimum billing requirement.
The corresponding additional amount is included based on the configured uplift rate.
The worker's actual worked hours are not changed by the billing uplift.
Example
Suppose the invoice initially shows:
Worked Hours: 79.92 hrs
Minimum Billing Rule: 8 hours per worker per day
Additional Hours Required: +1.08 hrs
Additional Amount: £13
The Minimum Billing calculation is:
79.92 Worked Hours + 1.08 Additional Hours = 81.00 Billable Hours
After the uplift is applied, the invoice reflects the additional billing required to meet the configured minimum.
Important Billing Behaviour
Worked Hours
Worked Hours represent the actual hours worked by the worker. Minimum Billing does not change these hours
Additional Hours
Additional Hours represent the billing uplift required to bring an eligible worker or site up to the configured minimum.
For example:
8.00 minimum − 6.92 worked = 1.08 additional hours
Billable Hours
Billable Hours represent the hours chargeable to the client after considering the Minimum Billing rule.
When uplift is required:
Worked Hours + Additional Hours = Billable Hours
Example:
79.92 + 1.08 = 81.00 hrs
When no uplift is required:
Worked Hours + 0 = Billable Hours
Example:
81 + 0 = 81 hrs
Key Points
Minimum Billing is configured individually for each client.
The minimum can be applied per worker per day or per site per day, depending on the client's billing agreement.
Arez only calculates an uplift when the applicable hours fall below the configured minimum.
Only the difference between the worked hours and minimum billable hours is added as uplift.
Worked Hours represent the actual hours worked and are not changed by Minimum Billing.
Additional Hours represent the billing uplift required to meet the configured minimum.
Billable Hours represent the total hours chargeable to the client after the applicable uplift.
Additional uplift hours can use either the applicable charge rate or a configured override rate.
Preview Changes allows you to review affected invoice lines, additional hours, and additional amounts before applying the adjustment.
If Additional Hours shows 0 hrs, no further Minimum Billing uplift is currently required.
Minimum Billing affects client billing only and does not alter the worker's actual worked hours.
Always review the Minimum Billing Preview before applying the adjustment to the draft invoice.
Conclusion
Minimum Billing Automation helps ensure that client invoices meet the configured minimum billing requirements without requiring users to manually adjust individual invoice lines.
Once configured, Arez identifies eligible hours that fall below the minimum and calculates the required billing uplift. Users can review the proposed adjustments through Preview Changes before applying them to the draft invoice.
This provides a more efficient and controlled billing process while keeping the original worked hours unchanged.