
 Facebook
  Twitter
  LinkedIn
 Manual Invoices – Arez Operate
Overview
The Manual Invoice feature in Arez Operate allows users to create invoices directly without relying on approved timesheets.
This is useful when you need to raise an invoice for specific client charges, assets, equipment, materials, or other billable items that need to be added manually.
You can select the client and site, add one or multiple line items, review the estimated invoice total, create the invoice, update its status, and then send it by email or save it as a PDF.
What is a Manual Invoice?
A Manual Invoice is an invoice created by manually adding the items or charges that need to be billed to a client.
Unlike the standard Create Invoice option, which generates invoices from approved timesheet data, the Manual Invoice option lets you define the invoice charges yourself.
This gives you flexibility to invoice for additional items or charges that are not generated through the normal timesheet-based billing process.
Part 1: Open Invoices & Billing
Step 1: Navigate to Invoices & Billing
From the left-side navigation menu:
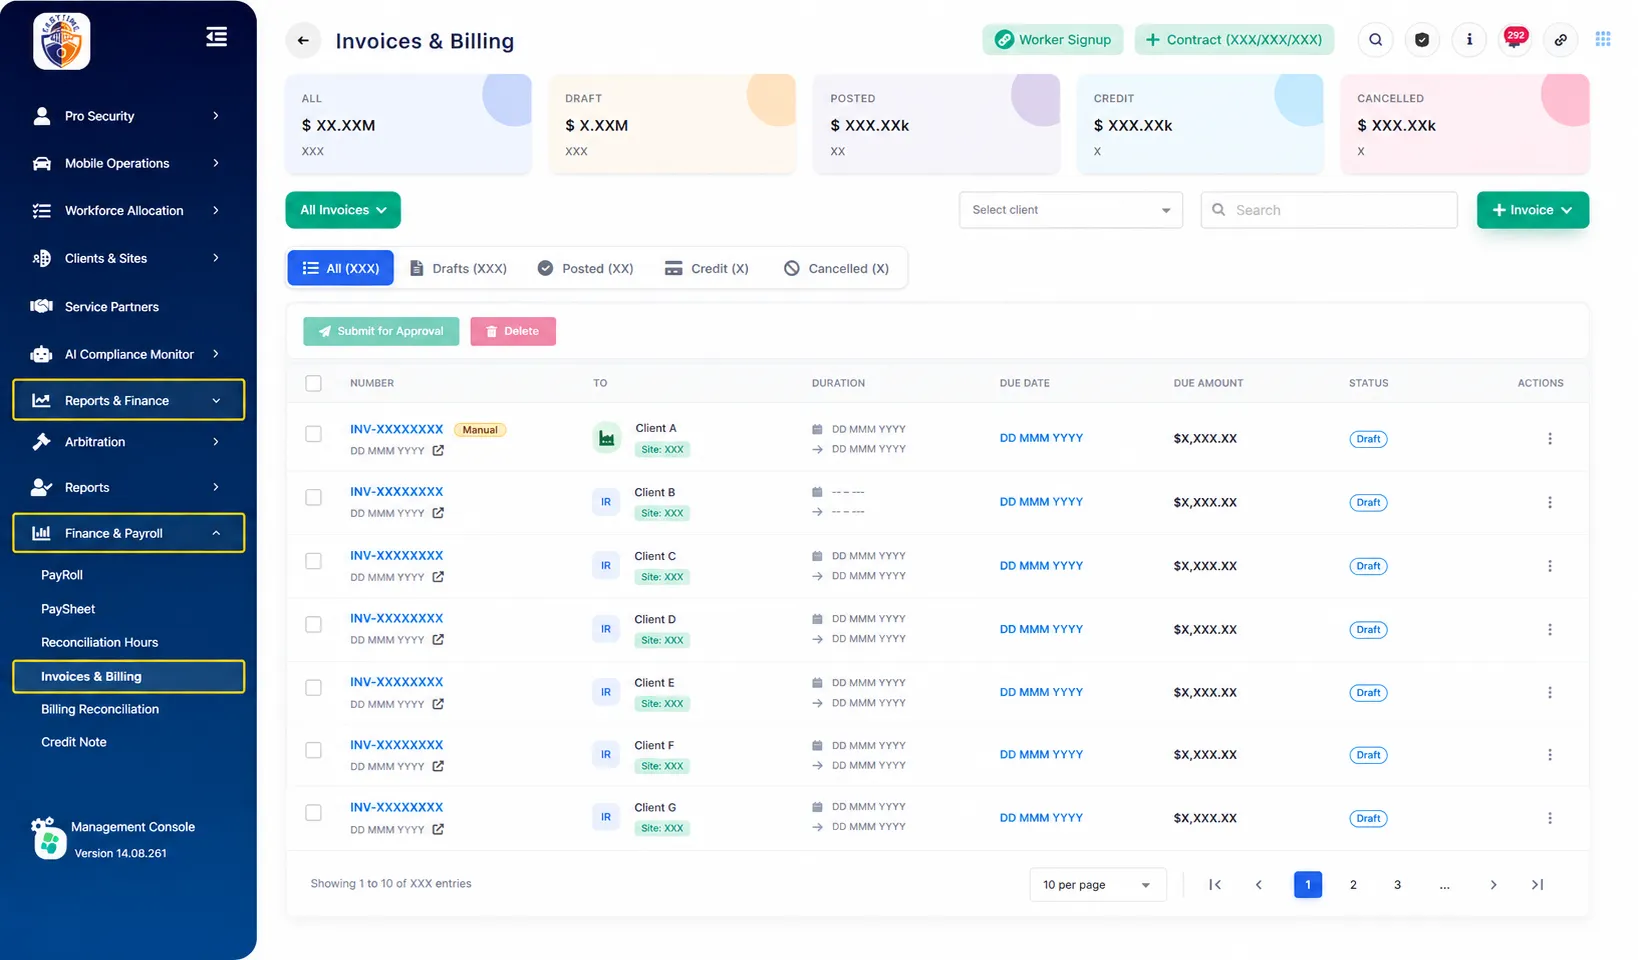
Click Reports & Finance.
Expand Finance & Payroll.
Click Invoices & Billing.
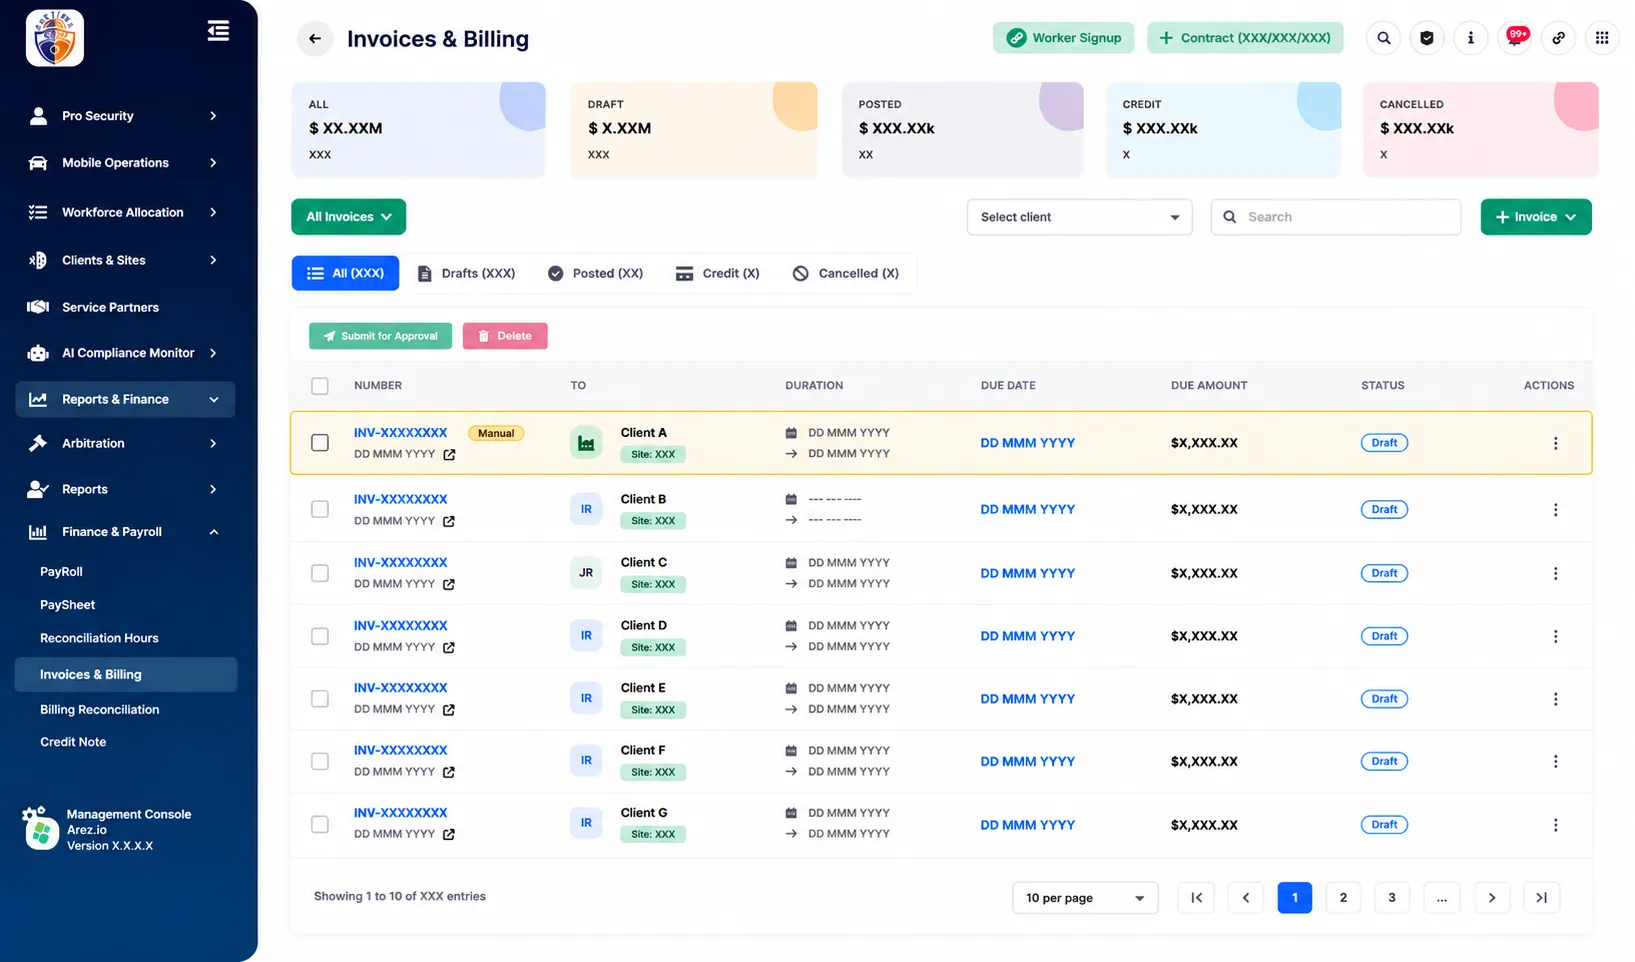
The Invoices & Billing page will open, displaying existing invoices and their current statuses.
You can also use the available tabs to view invoices by status, including:
All
Draft
Posted
Credit
Cancelled
Part 2: Start a Manual Invoice
Step 2: Open the Invoice Menu
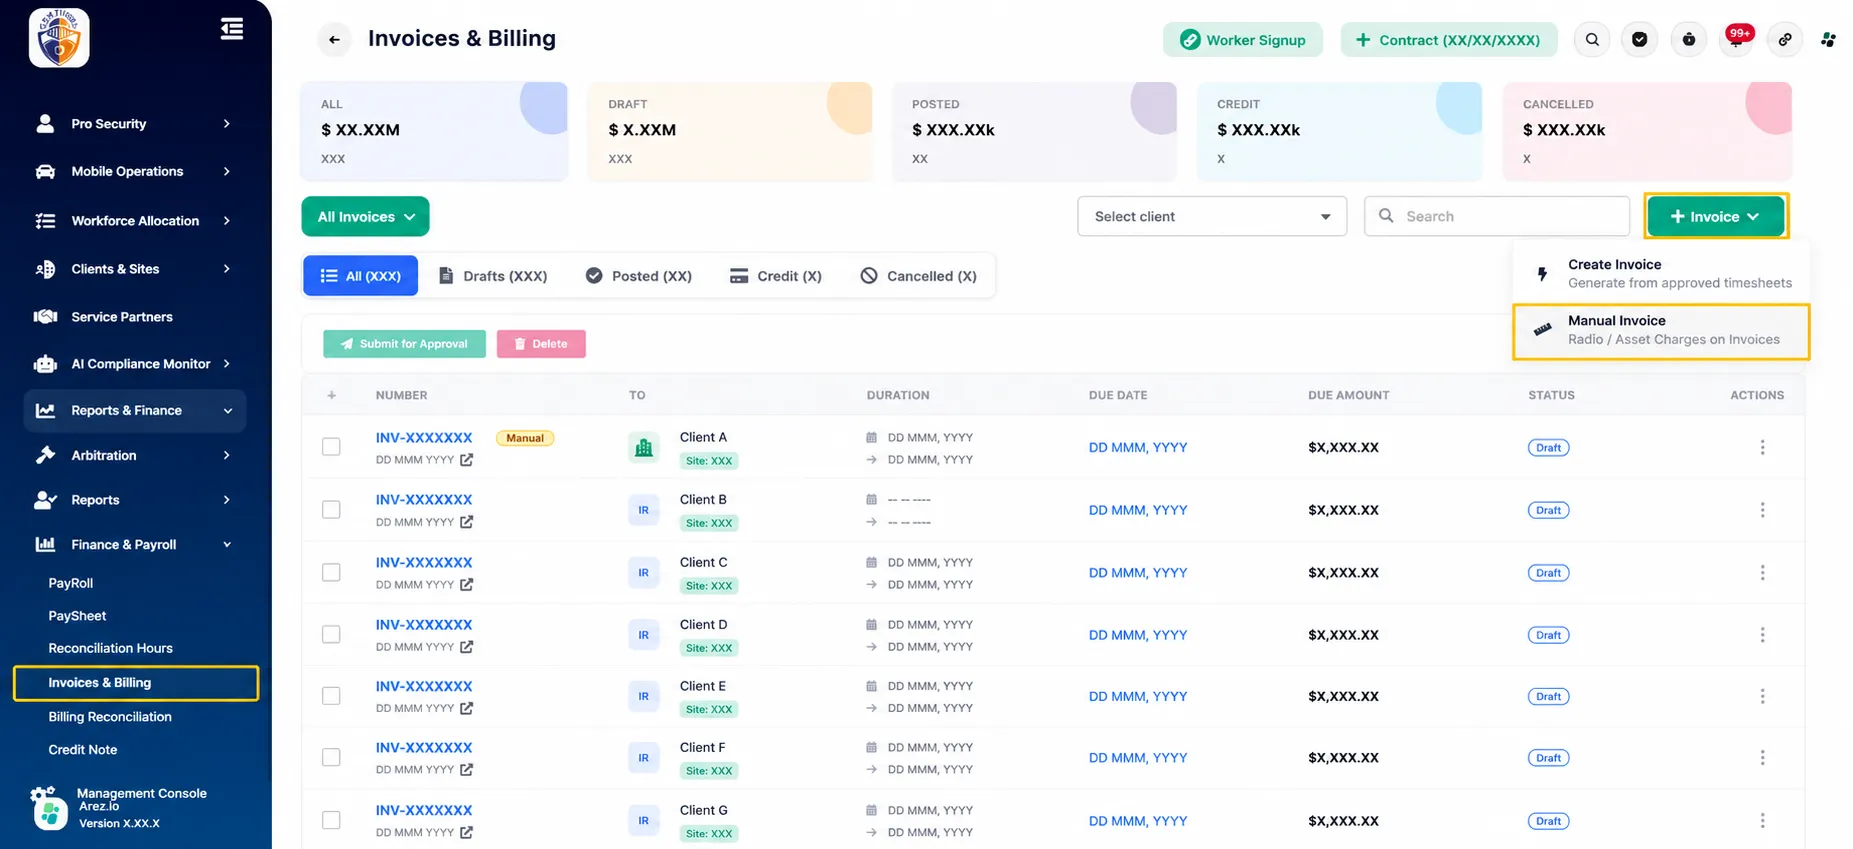
Click the + Invoice button in the top-right corner.
Two options are displayed:
Create Invoice – generates an invoice from approved timesheets.
Manual Invoice – allows you to manually add charges or assets to an invoice.
Select Manual Invoice.
Part 3: Enter the Invoice Details
The Manual Invoice window will open.
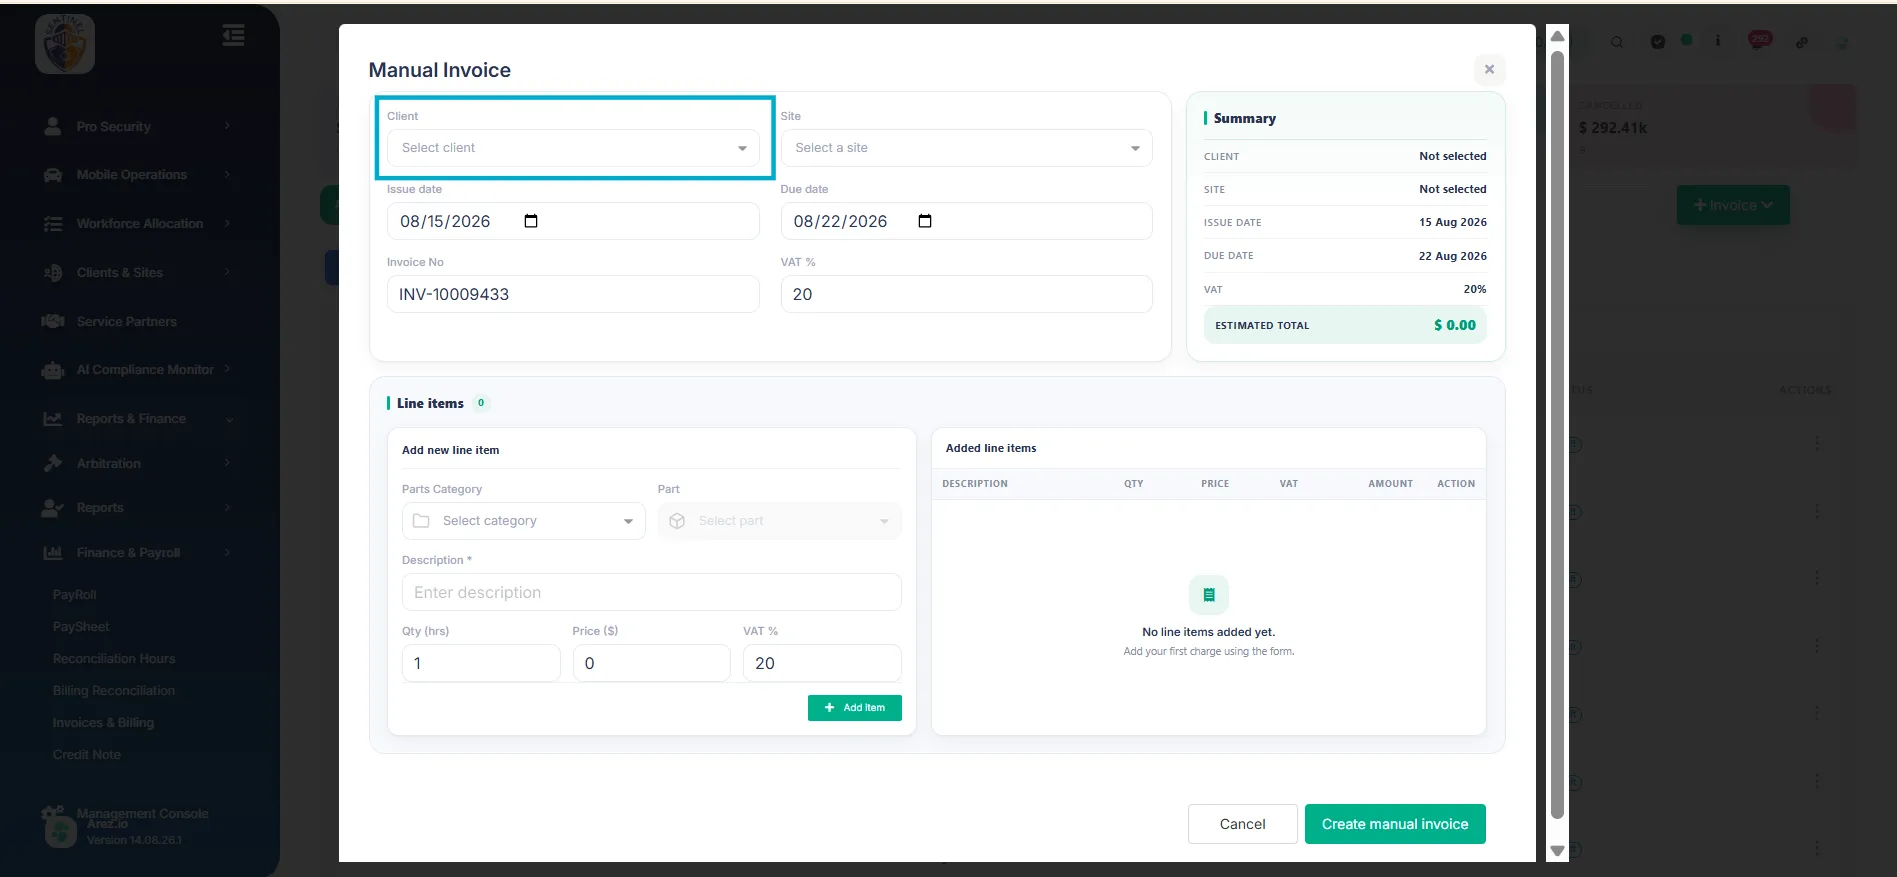
Step 3: Select the Client
Use the Client dropdown to select the client for whom you want to raise the invoice.
Once the client is selected, the invoice summary will update accordingly.
Step 4: Select the Site
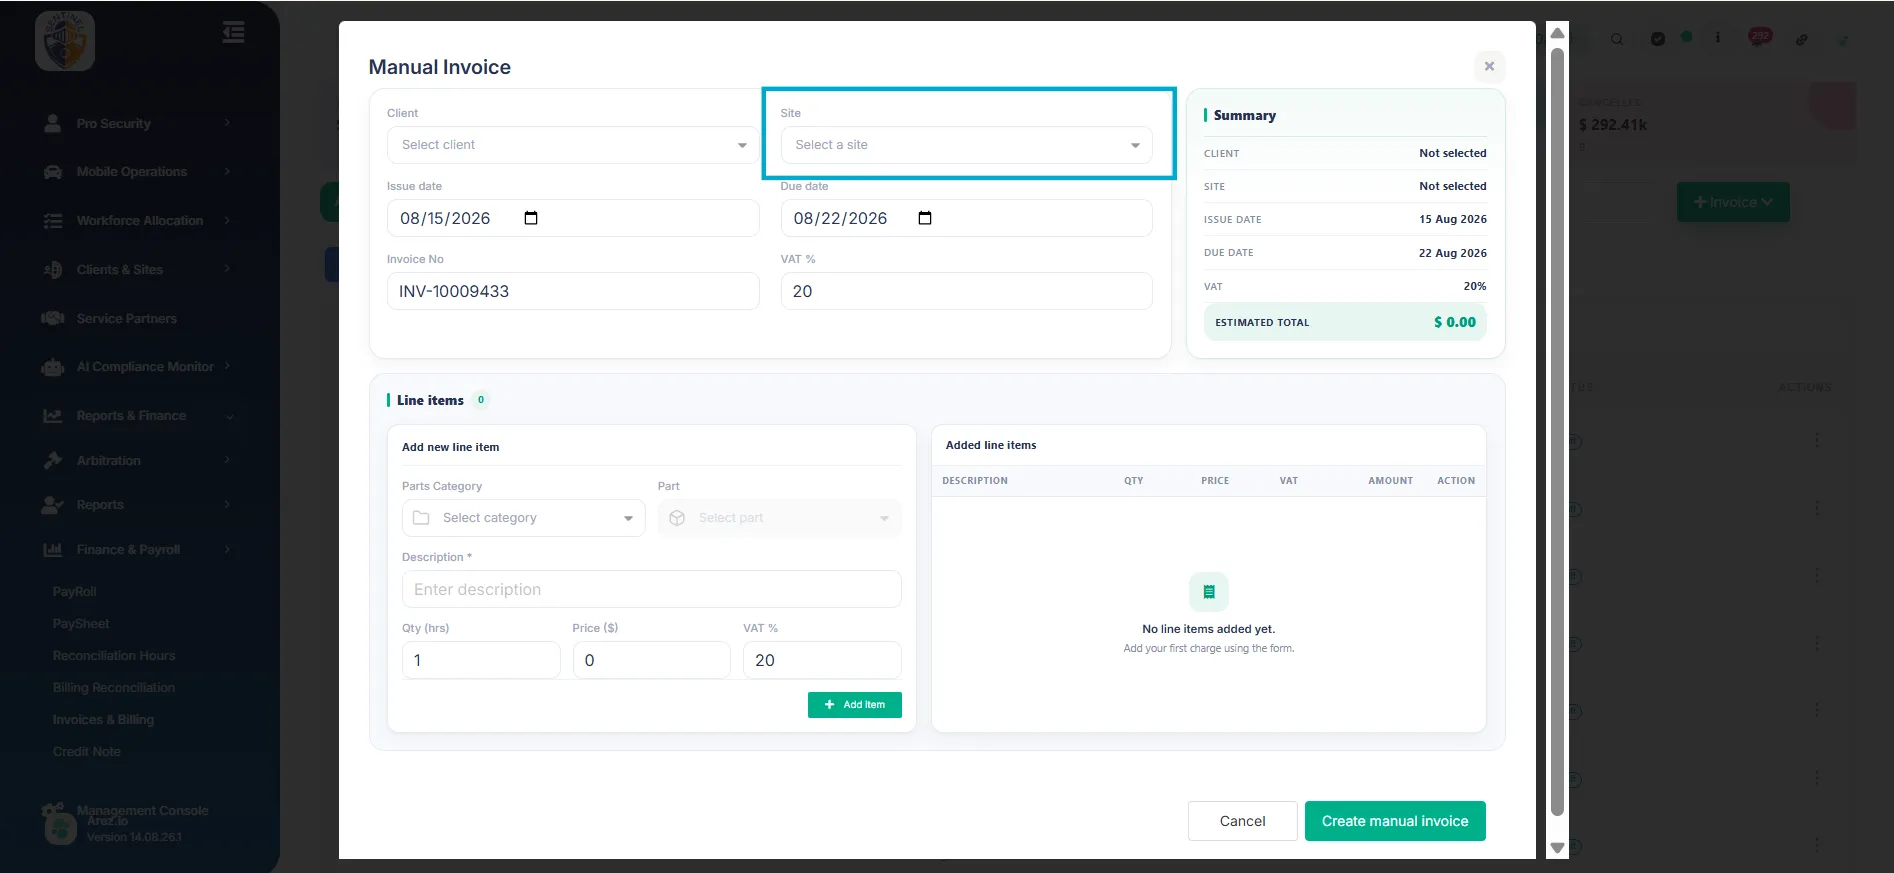
Use the Site dropdown to select the relevant client site.
This identifies the site the manual invoice relates to.
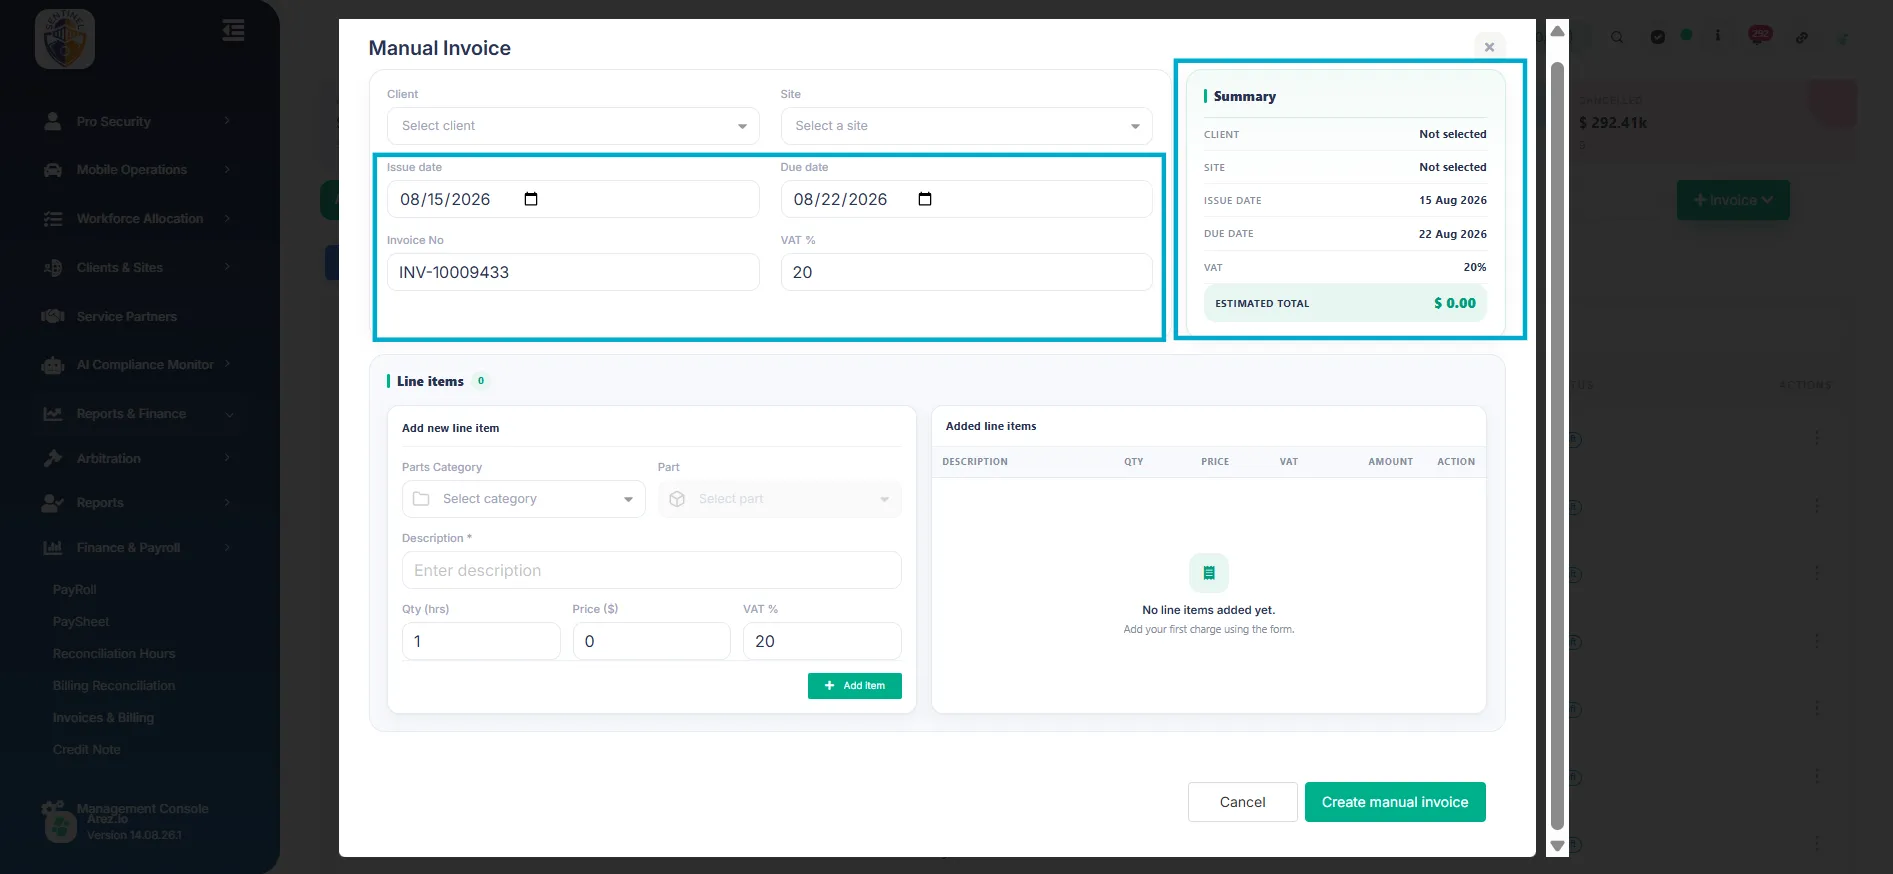
Step 5: Review the Invoice Information
Review or enter the invoice information displayed in the form, including:
Issue Date
Due Date
Invoice Number
VAT %
A Summary panel on the right displays the current invoice information, including:
Client
Site
Issue Date
Due Date
VAT
Estimated Total
The estimated total updates as line items are added.
Part 4: Add Line Items
Step 6: Add a New Line Item
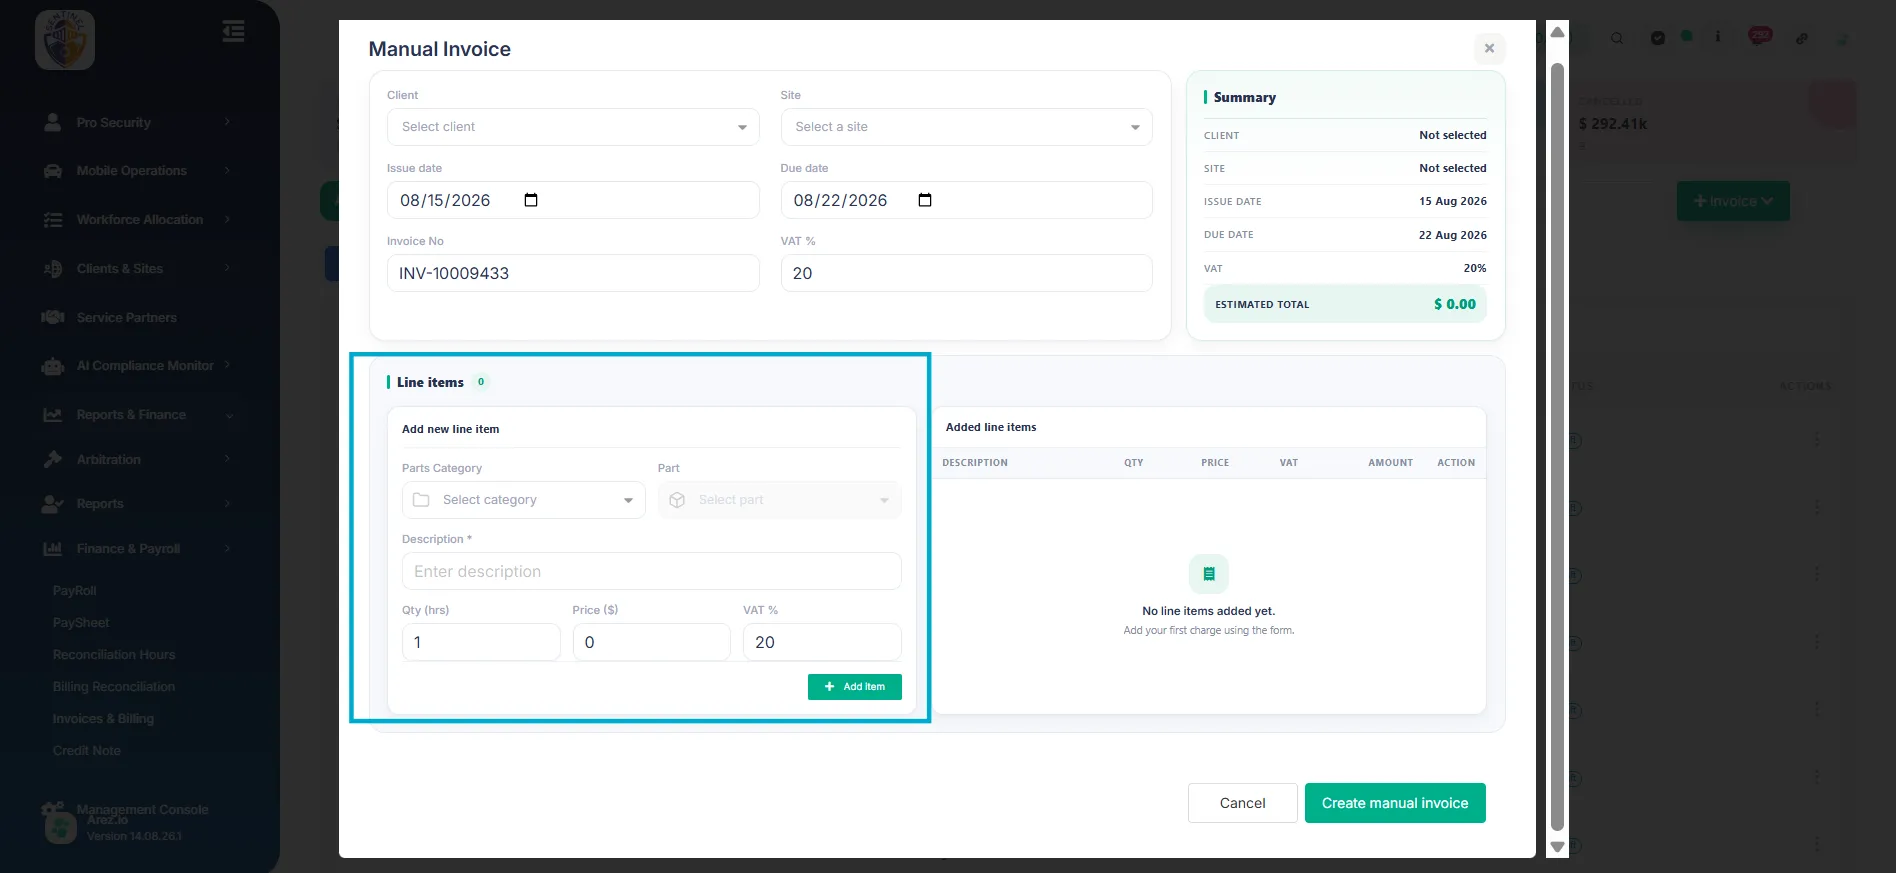
Under Line items, use the Add new line item section to enter the charge that should appear on the invoice.
Depending on the item being added, you can use fields such as:
Parts Category
Part
Description
Qty (hrs)
Price
VAT %
Enter the required information for the charge.
Step 7: Add the Item to the Invoice
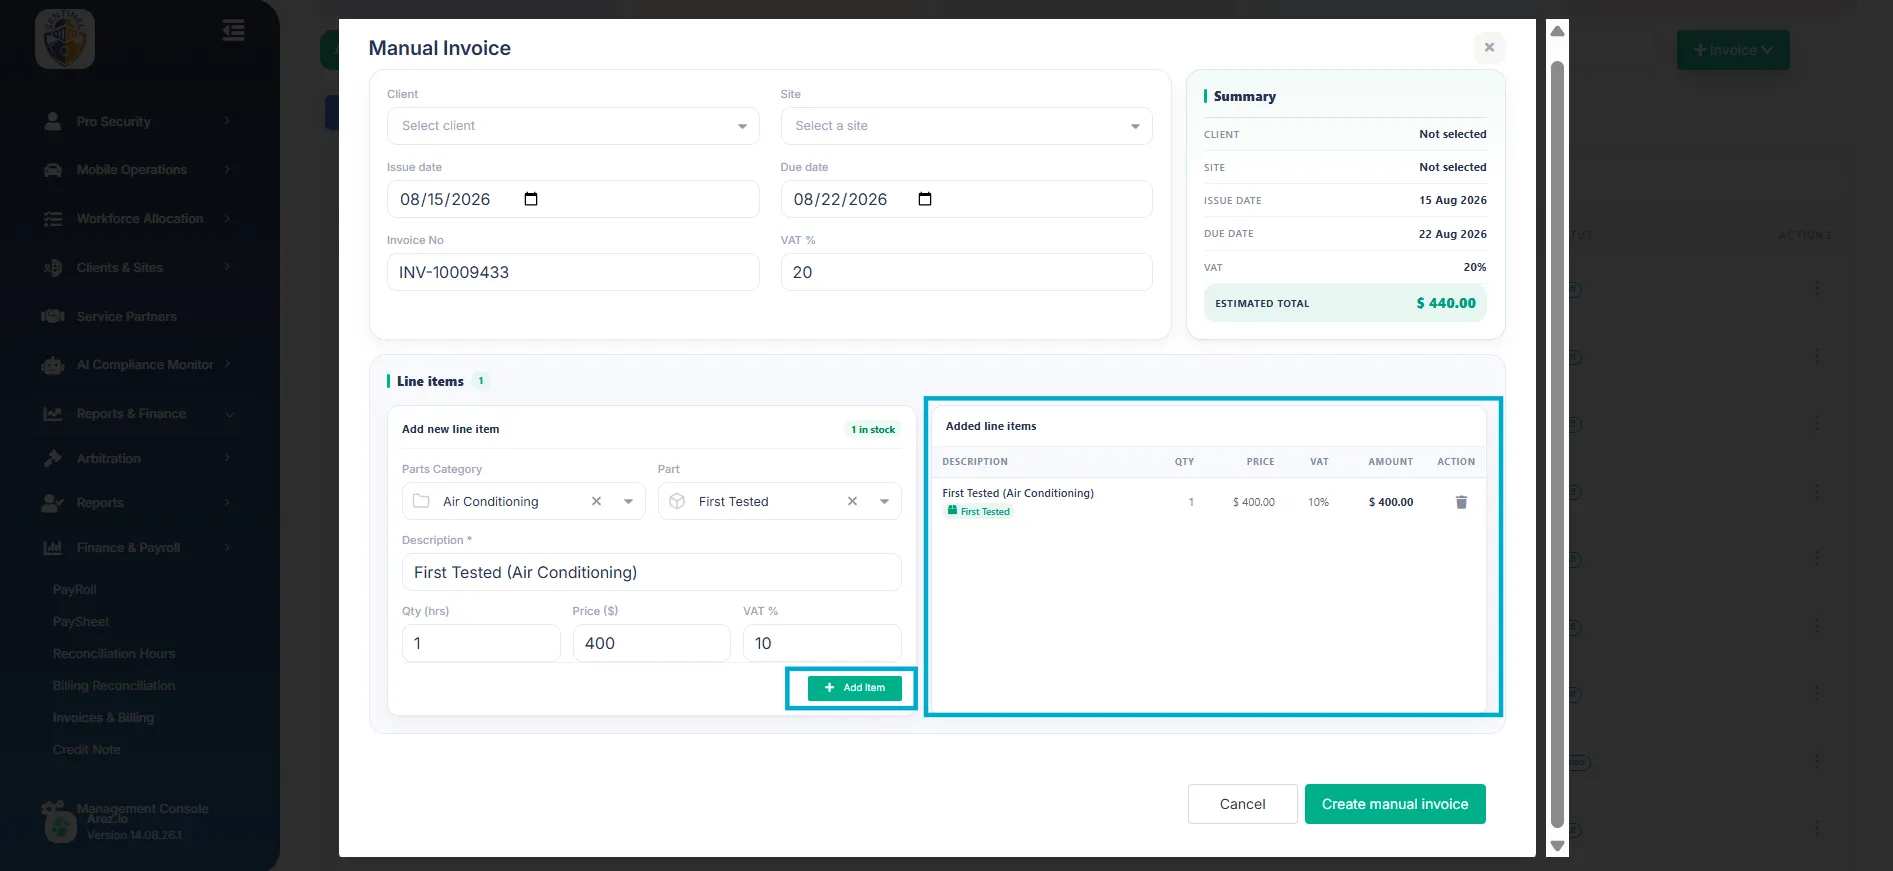
Once the details are entered, click + Add Item.
The item will appear under Added line items.
The added line displays information such as:
Description
Quantity
Price
VAT
Amount
The invoice Estimated Total is also updated.
Step 8: Add Multiple Line Items
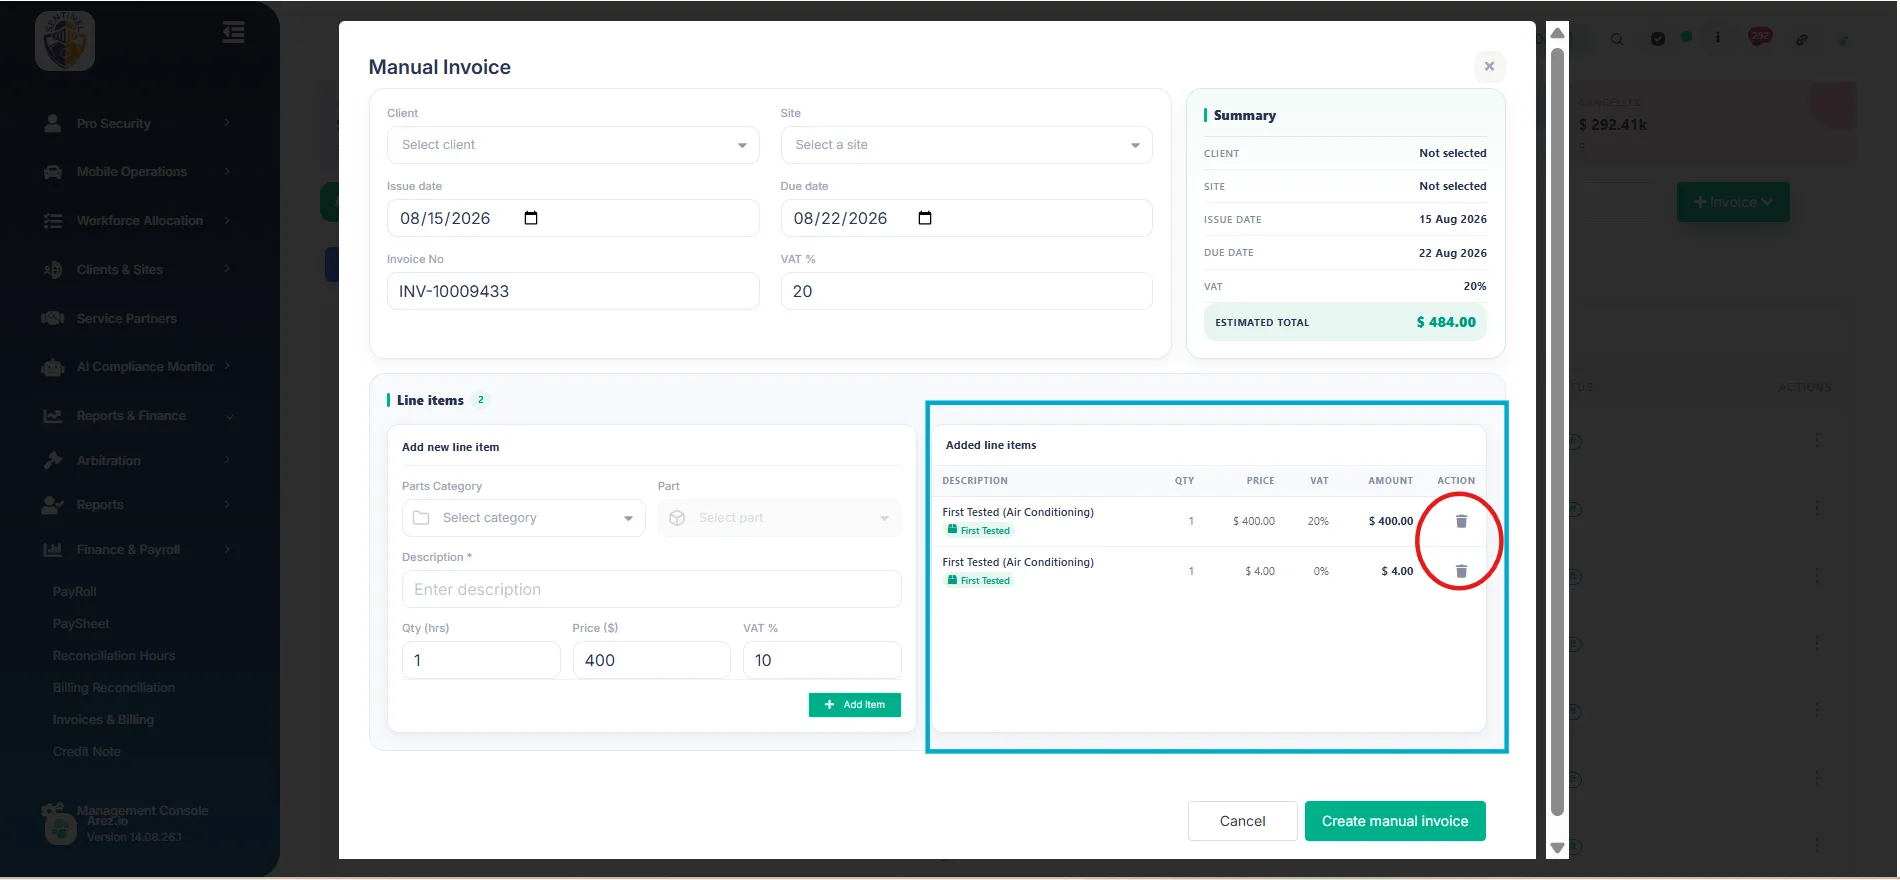
You can add more than one charge to the same manual invoice.
Repeat the line-item process for each additional item you need to include.
All added items will appear in the Added line items section.
If an item has been added incorrectly, use the Delete icon next to the relevant line to remove it before creating the invoice.
Part 5: Create the Manual Invoice
Step 9: Review the Invoice
Before creating the invoice, review:
Selected client
Selected site
Issue date
Due date
VAT
Added line items
Estimated total
Make sure all information is correct.
Step 10: Create the Invoice
Click Create manual invoice.
The invoice will be created and added to the Invoices & Billing list.
Manual invoices are identified with a Manual label, making them easy to distinguish from invoices generated through the standard timesheet workflow.
The newly created invoice will normally appear near the top of the invoice list.
Part 6: Open and Review the Invoice
Step 11: Open the Manual Invoice
Click the invoice number to open the newly created invoice.
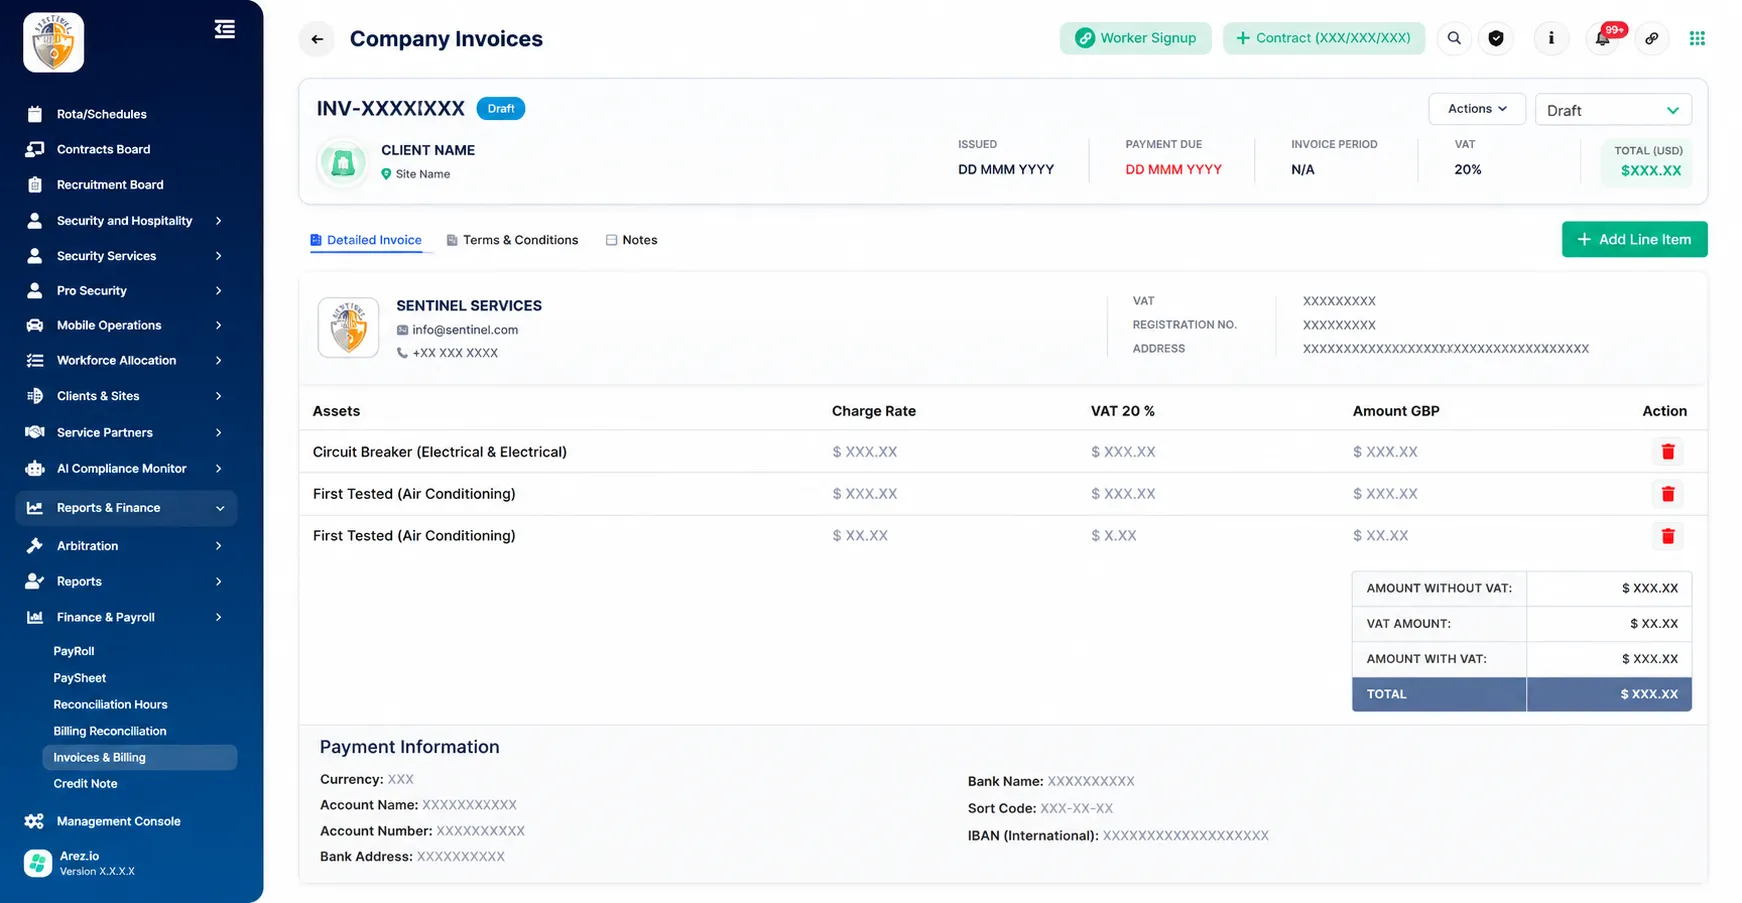
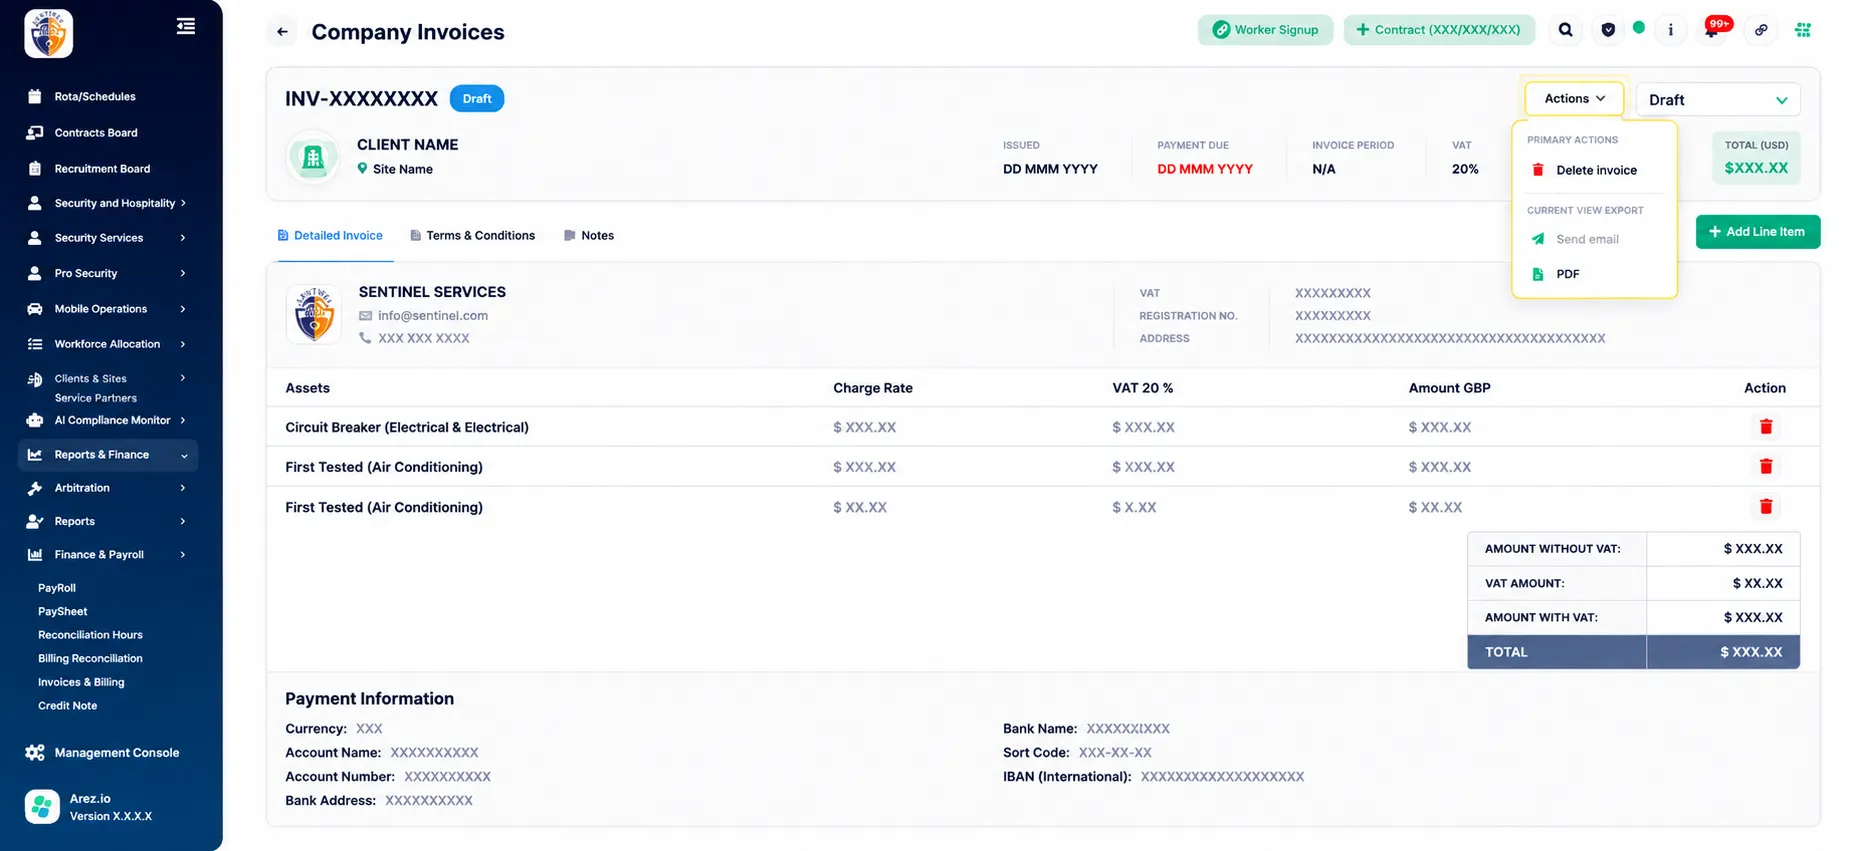
The Company Invoices page displays the invoice details.
You can review:
Invoice Number
Client
Site
Issue Date
Payment Due Date
VAT
Total Amount
Individual line items
Charge Rate
VAT Amount
Final Amount
Payment Information
The totals section shows the complete invoice calculation, including the amount before VAT, VAT amount, and total invoice value.
Part 7: Add or Remove Line Items After Creation
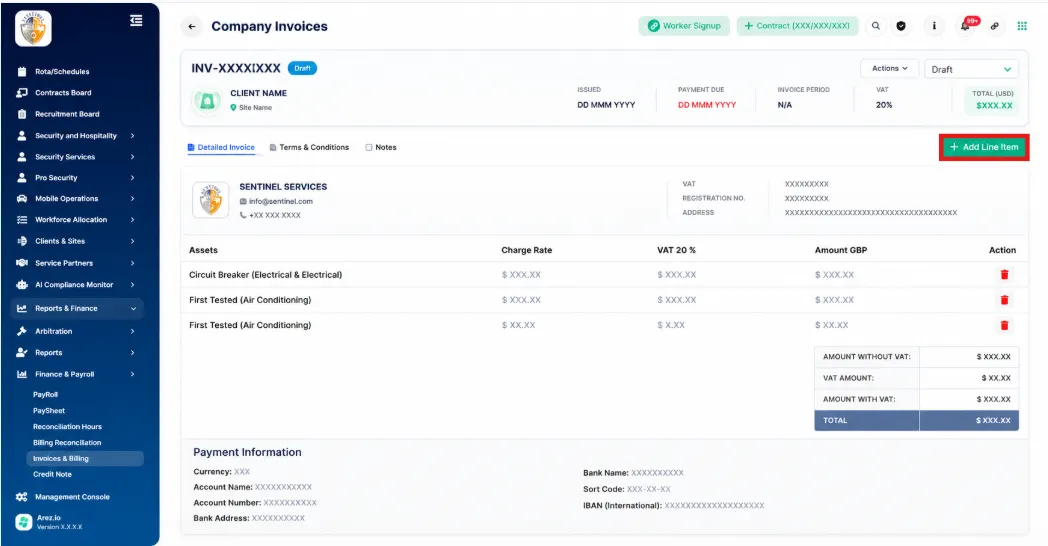
The invoice detail page includes a + Add Line Item button.
You can use this option if another manual charge needs to be added to the invoice.
Existing line items also include a delete option, allowing items to be removed where required.
Review the invoice totals again after making any changes.
Part 8: Update the Invoice Status
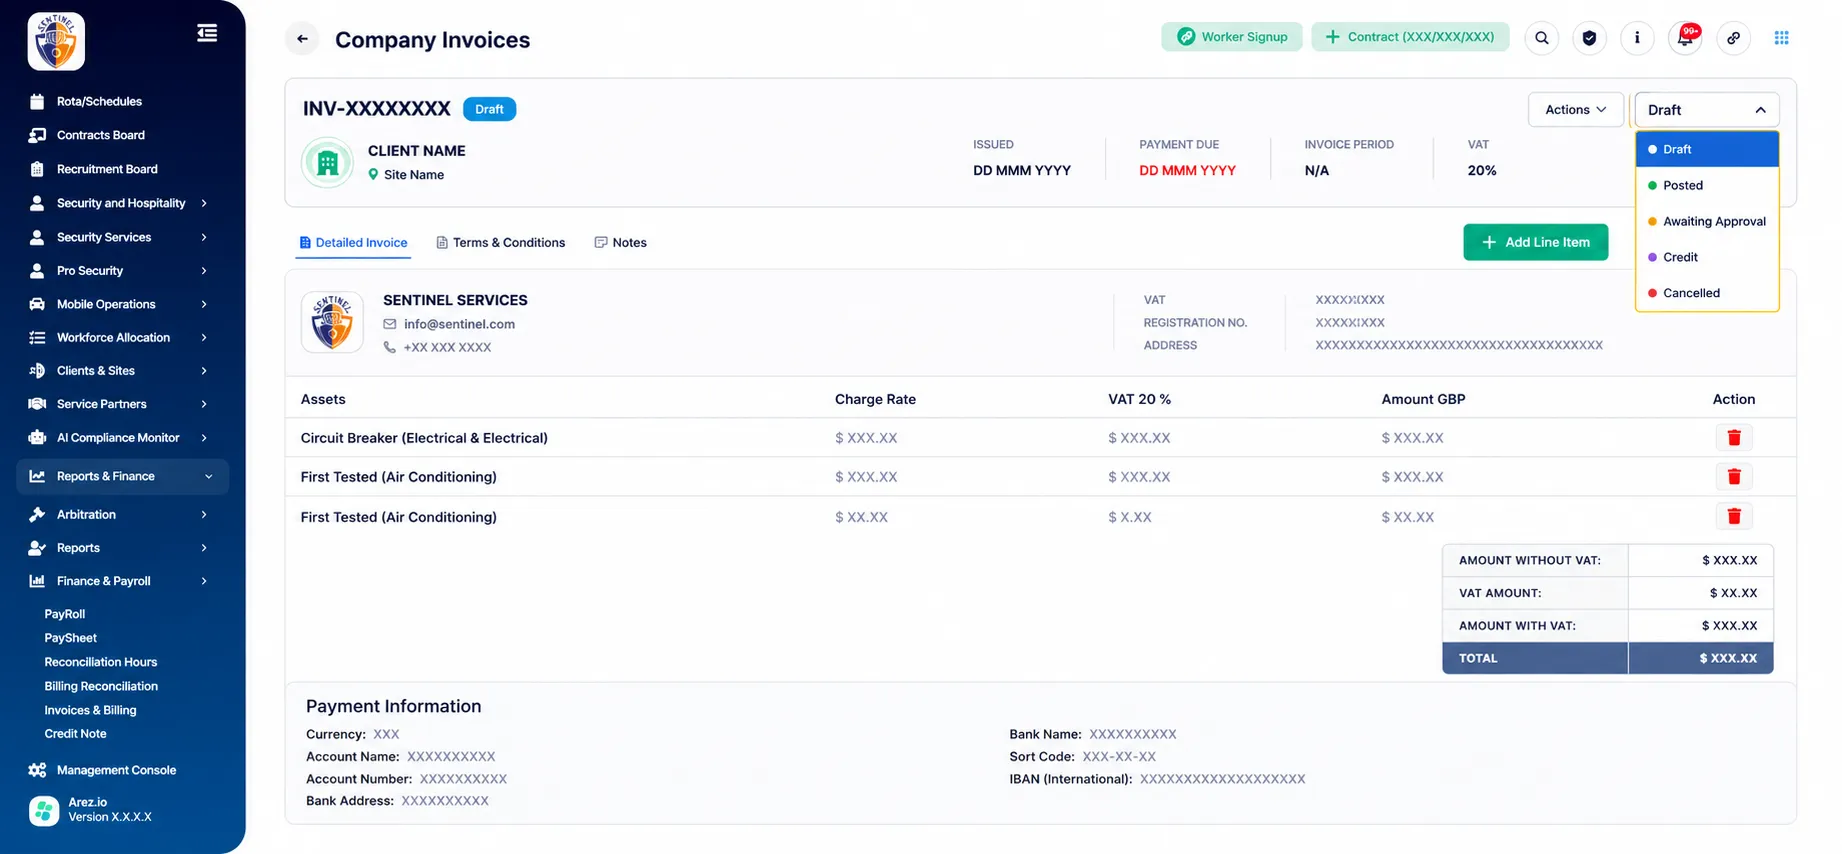
The current invoice status is displayed in the top-right corner of the invoice.
Use the status dropdown to update the invoice as it progresses through the billing process.
Available statuses shown in the system include:
Draft
Posted
Awaiting Approval
Credit
Cancelled
Select the appropriate status according to the invoice's current stage.
Note: Make sure the invoice has been reviewed before changing it from Draft to the next required status.
Part 9: Send or Export the Invoice
Step 12: Open Actions
Click the Actions dropdown at the top of the invoice.
Available options include:
Send email
PDF
Delete invoice
Send Email
Select Send email when the invoice is ready to be sent electronically.
Save as PDF
Select PDF to generate or save a PDF version of the invoice.
This can be useful if the invoice needs to be shared separately or stored outside the system.
Delete Invoice
Use Delete invoice only where the invoice should be removed.
Important Manual Invoice Behaviour
Manual Invoices are not generated from timesheets
A Manual Invoice is created from the line items you enter manually.
Multiple line items can be included
You can add multiple charges, assets, parts, or other billable items to the same invoice.
Invoice totals update automatically
As items are added, the estimated invoice total updates based on the quantity, price, and VAT entered.
Manual invoices are clearly identified
Invoices created through this process appear with a Manual label in the invoice list.
Status can be managed after creation
The invoice status can be updated from the invoice detail page as it moves through the billing process.
Invoices can be sent or exported
Once the invoice is ready, it can be sent by email or exported as a PDF.
Key Points
Navigate to Reports & Finance → Finance & Payroll → Invoices & Billing.
Click + Invoice → Manual Invoice.
Select the required Client and Site.
Review the issue date, due date, invoice number, and VAT.
Add one or more manual line items.
Click + Add Item for each charge.
Review the estimated total before creating the invoice.
Click Create manual invoice.
Open the invoice from the invoice list to review the full details.
Update the invoice status when required.
Use Actions to send the invoice by email or save it as a PDF.
Conclusion
Manual Invoices provide a flexible way to raise client invoices for charges that are not generated through the normal timesheet billing process.
Users can manually select the client and site, add the required billing items, review totals, create the invoice, manage its status, and send or export the completed invoice directly from Arez Operate.
Summary
Manual Invoices in Arez Operate allow users to create client invoices without using timesheet data. Select the client and site, add one or multiple billable line items, review VAT and totals, then create the invoice. Once created, the invoice can be reviewed, updated through its status workflow, sent by email, or exported as a PDF.