
 Facebook
  Twitter
  LinkedIn
 Rota Management in Arez Operate
Overview
The Rota module provides a centralized view of all scheduled shifts, enabling schedulers and managers to create, assign, monitor, and manage worker schedules across multiple sites. From a single screen, you can filter schedules, add shifts, approve holiday requests, perform bulk actions, review shift details, and export rota data.
Accessing the Rota
From the left navigation menu, click Rota/Schedules.
Select the Rota tab.
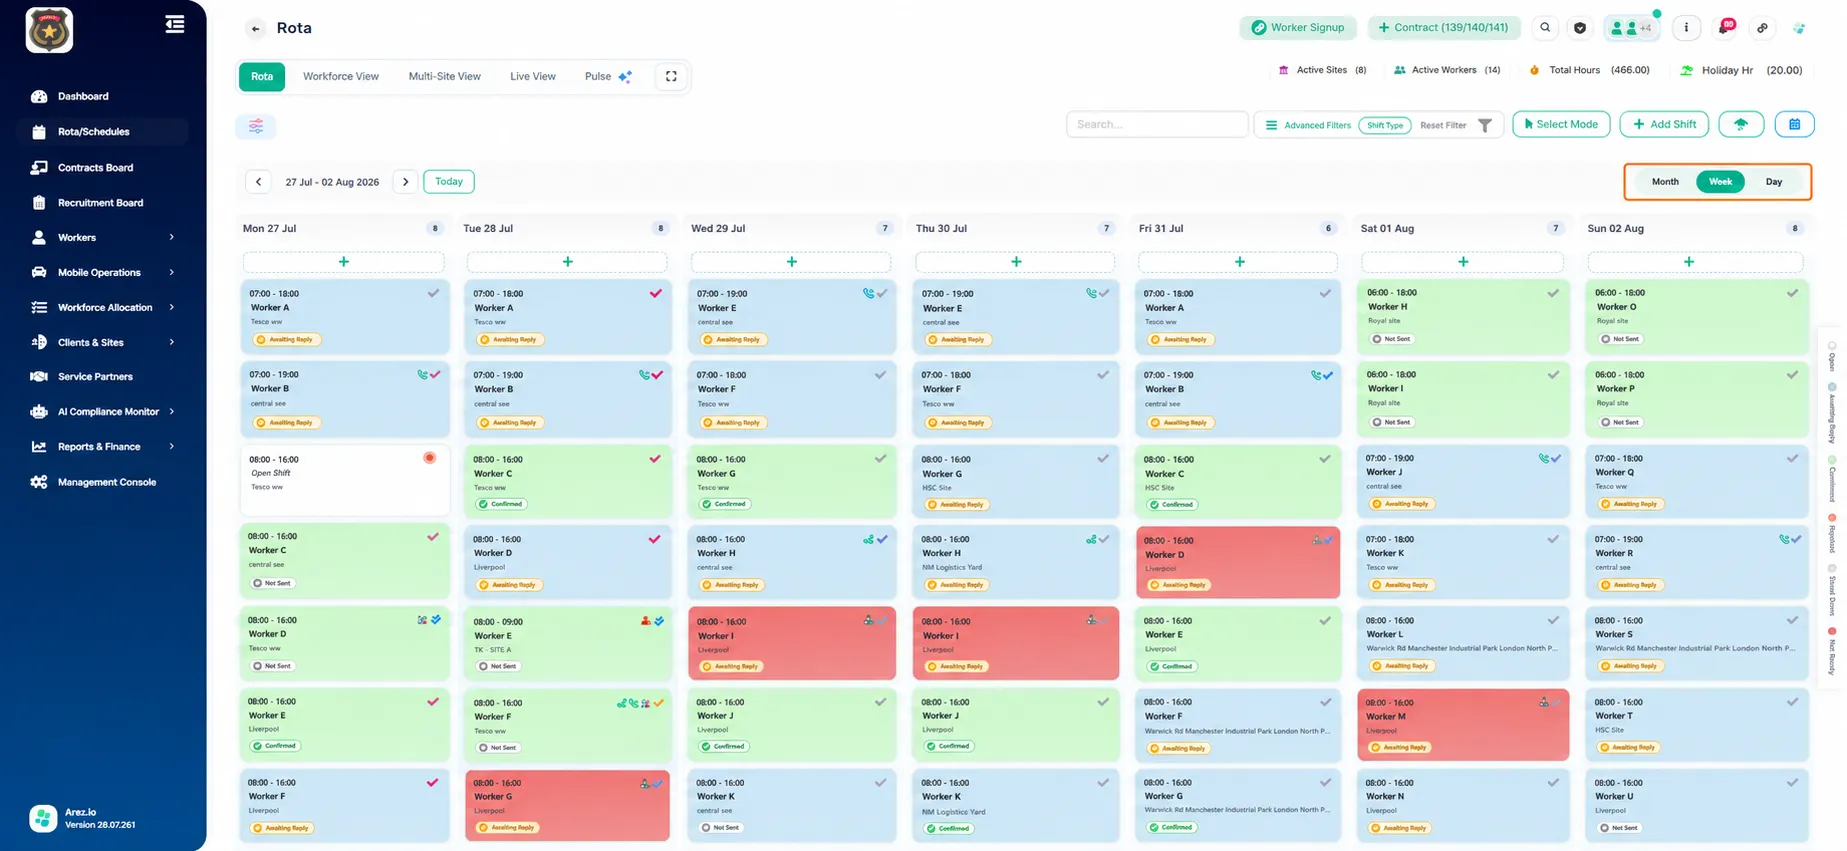
By default, the rota opens in the Week view, displaying all scheduled shifts for the current week. You can switch between Day, Week, and Month views using the view selector in the top-right corner of the page.
Understanding the Rota Layout
Each column represents a day within the selected period, while each card represents an individual shift.
Each shift card displays information such as:
Shift time
Assigned worker
Site name
Shift status
Worker response status
Check call indicators
Attendance icons
Additional operational indicators
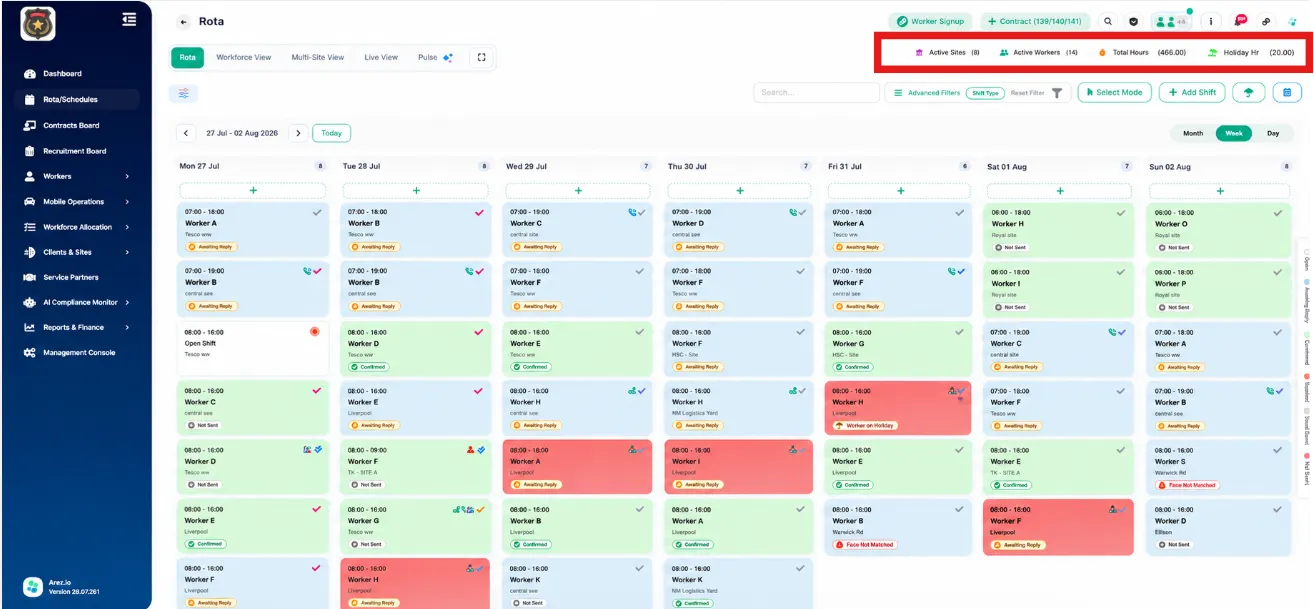
At the top of the page you'll also find summary information, including:
Active Sites
Active Workers
Total Hours
Navigating the Rota
Use the navigation controls at the top of the Rota to move between different date ranges and views.
You can:
Move to the previous or next date range.
Return to the current date by clicking Today.
Switch between Day, Week, and Month views.
Search for workers or shifts using the search bar.
Holiday Hours
Understanding Shift Colours
The rota uses colour-coded shift cards and status indicators to help you quickly identify the status of each shift.
Colour | Meaning |
White | Open Shift (Awaiting Assignment) |
Blue | Awaiting Reply |
Green | Confirmed |
Grey | Stood Down |
Red | Not Ready to work |
Yellow | Worker on Holiday |
Viewing the Rota Legend
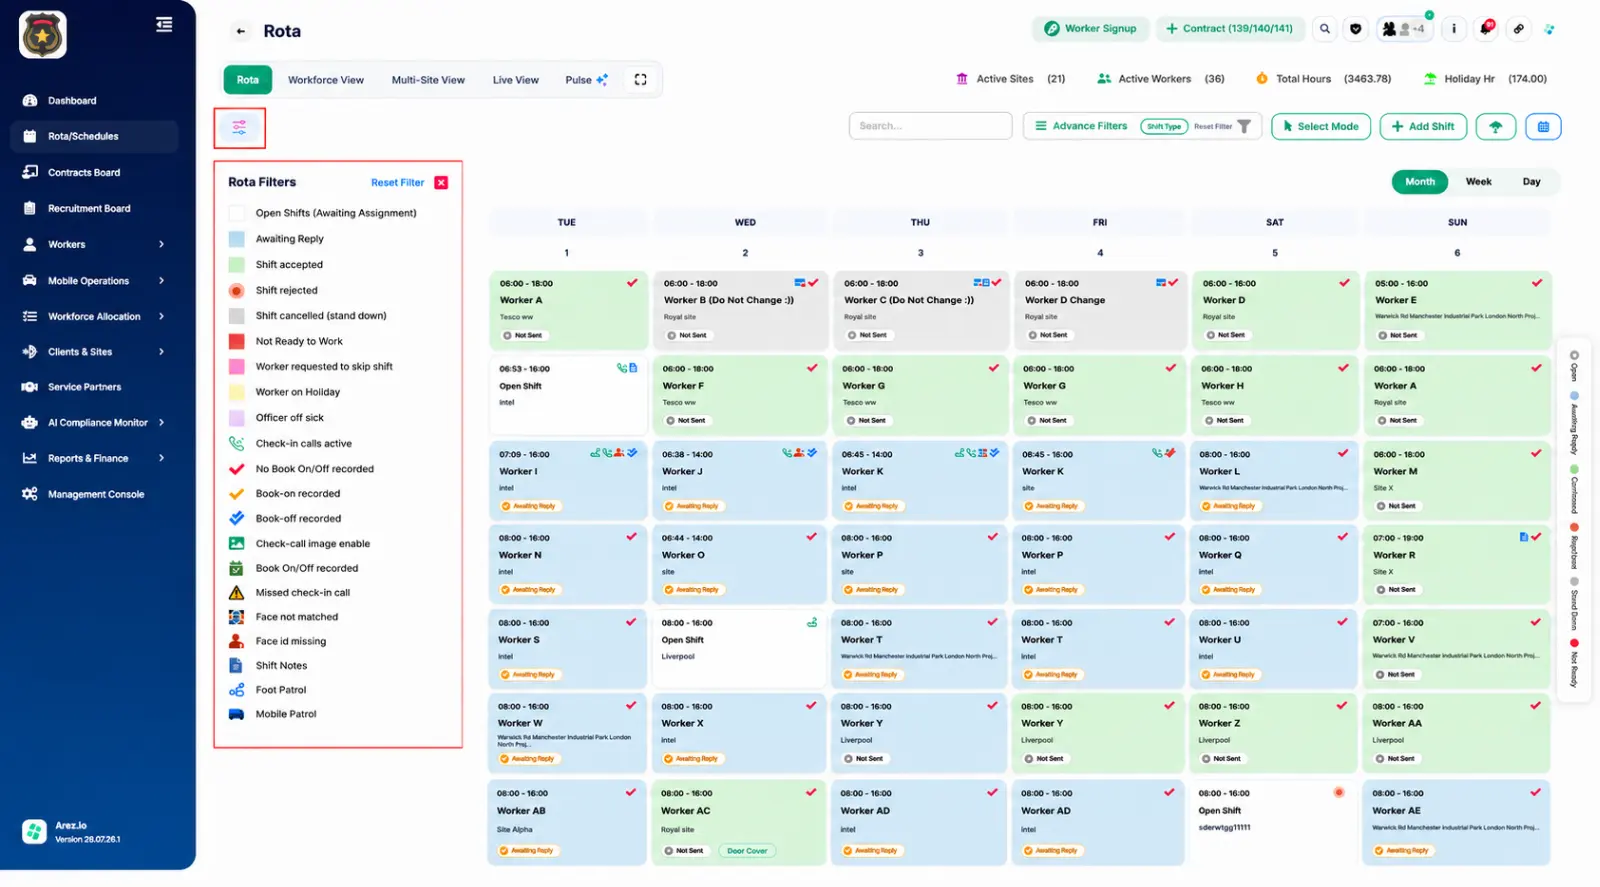
Click the Legend/Filter icon on the left side of the rota to display all available status indicators.
The legend includes:
Shift Status
Open Shifts (Awaiting Assignment)
Awaiting Reply
Shift Accepted
Shift Rejected
Shift Cancelled (Stand Down)
Not Ready to Work
Worker Requested to Skip Shift
Worker on Holiday
Officer Off Sick
Attendance & Check Calls
Check-in Calls Active
No Book On/Off Recorded
Book-on Recorded
Book-off Recorded
Book On/Off Recorded
Missed Check-in Call
Compliance
Face Not Matched
Face ID Missing
Additional Indicators
Shift Notes
Foot Patrol
Mobile Patrol
Check-call Image Enabled
Use this legend whenever you need clarification on a colour or icon displayed within the rota.
Using Advanced Filters
Click Advanced Filters to expand the filter panel.
Available filters include:
Sort Order
Shift Type
Industry
Service Partner
Region
Client
Area Manager
Sites
Roles
Shift Positions
Worker Type (All / Student)
Use these filters to display only the shifts relevant to your search.
Click Reset Filter to remove all applied filters.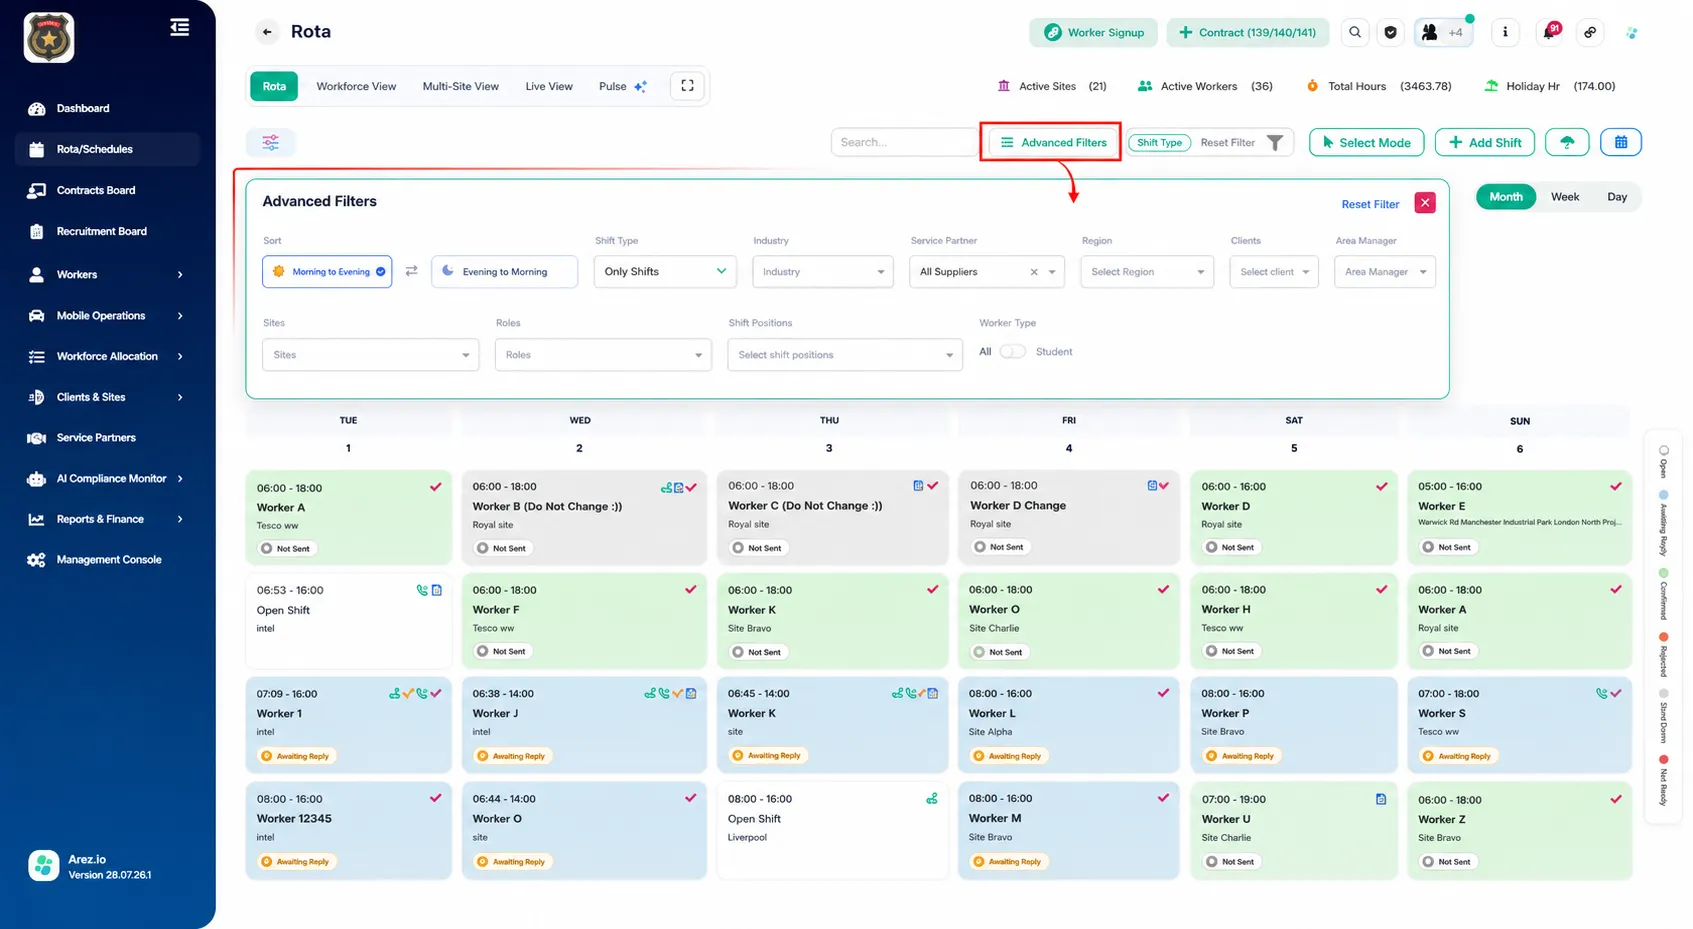
Managing Holidays
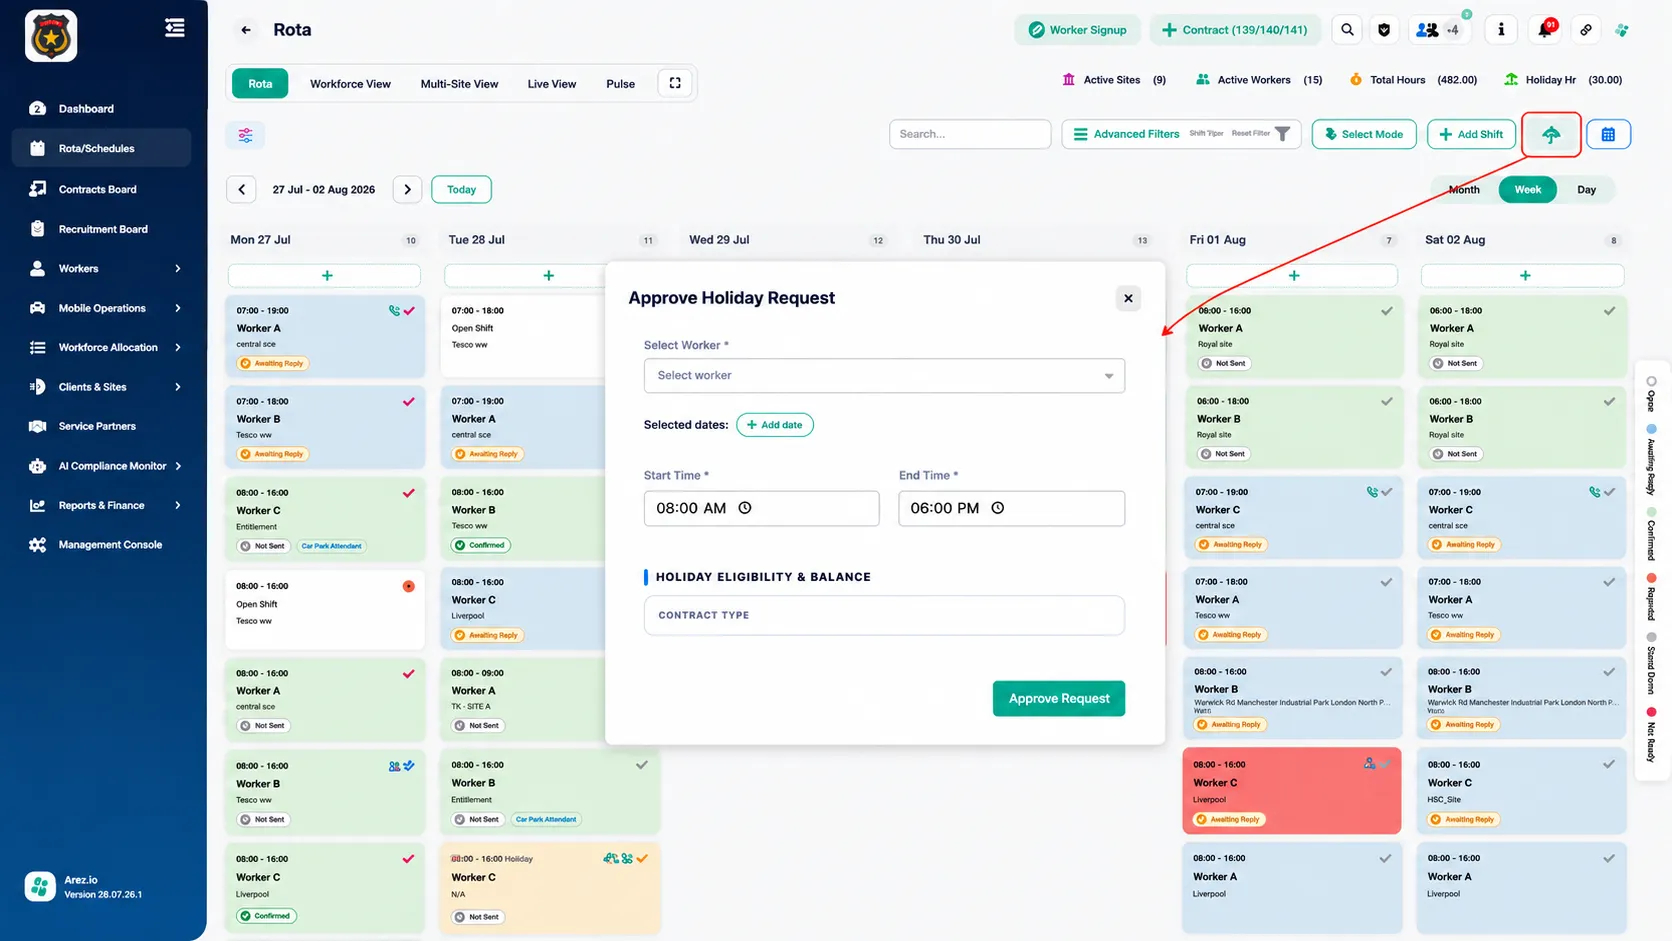
Click the Holiday button in the top-right corner to create or approve holiday requests.
Approving a Holiday Request
Click Holiday.
Select the worker.
Click Add Date and choose one or more holiday dates.
Specify the Start Time and End Time.
Review the worker's holiday eligibility and balance.
Click Approve Request.
Approved holidays are reflected within the rota and contribute to the Holiday Hours summary.
Adding a Shift
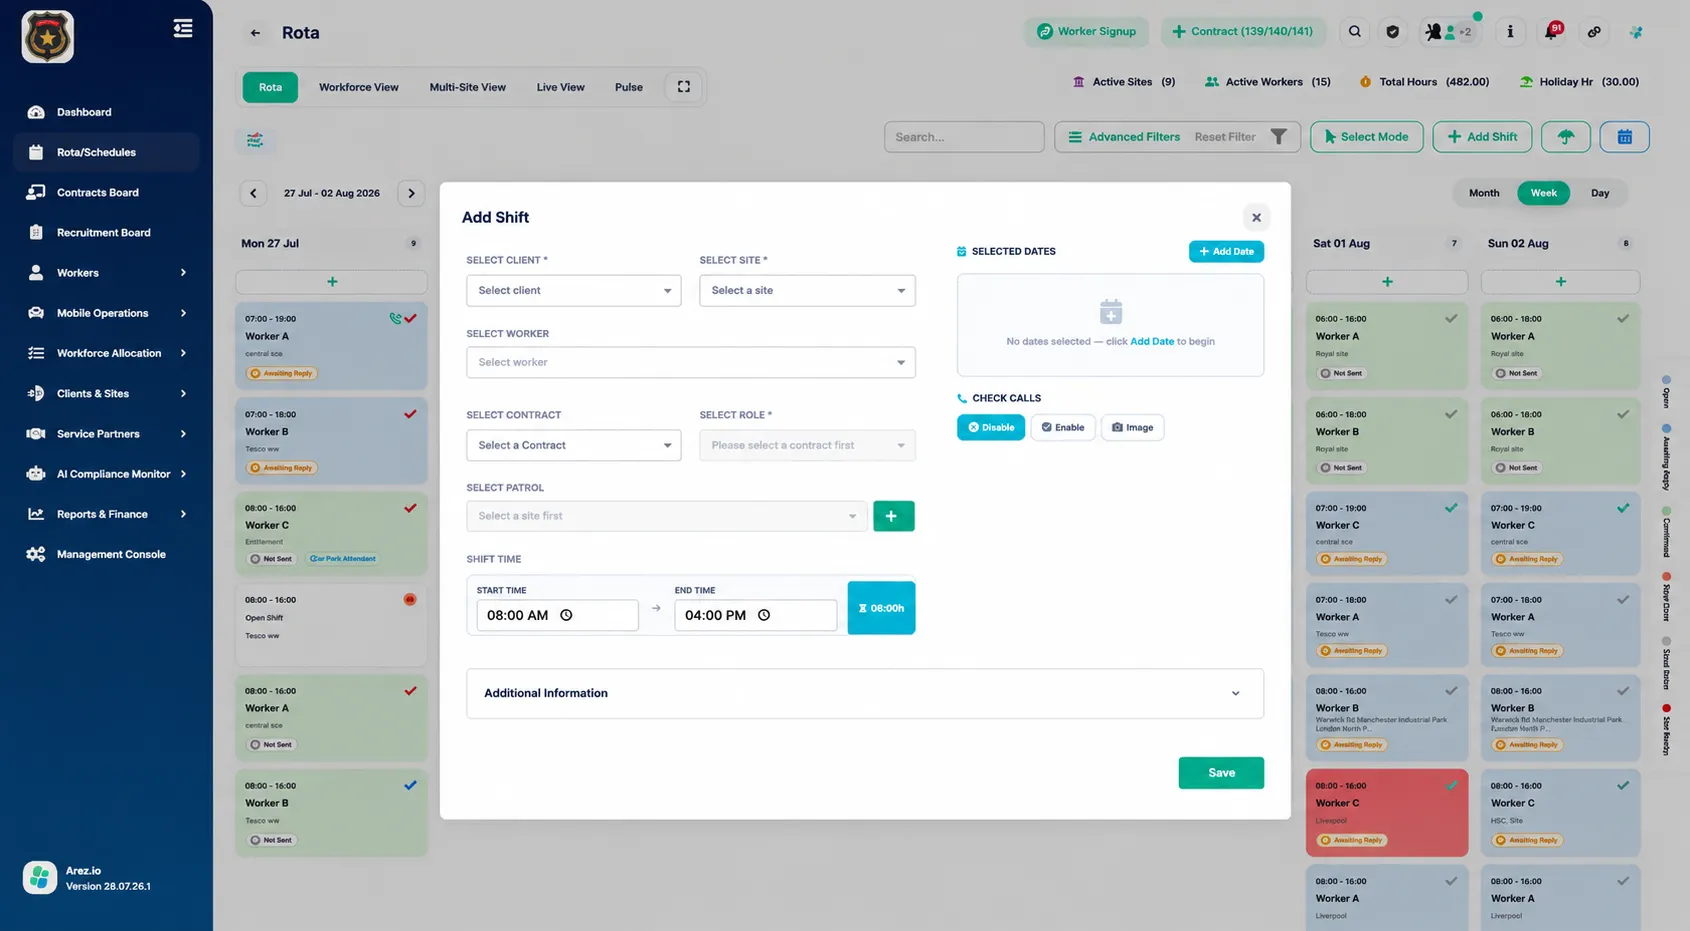
To create a new shift:
Click Add Shift.
Complete the required information:
Client
Site
Worker (optional for open shifts)
Contract
Role
Patrol (if applicable)
Click Add Date and select the shift date(s).
Configure Check Call settings:
Disable
Enable
Image Verification
Enter the shift start and end times.
Expand Additional Information if required.
Click Save.
The new shift will appear immediately in the rota.
Using Select Mode
Select Mode allows you to select and manage multiple shifts simultaneously.
You can enable Select Mode by either:
Clicking Select Mode from the toolbar, or
Pressing the Ctrl key to activate Select Mode.
To use Select Mode:
Click Select Mode or press the Ctrl key.
Select one or more shifts using the checkboxes.
The number of selected shifts is displayed at the top of the page.
Click Action to perform bulk operations on the selected shifts.
Click Exit Select Mode when you have finished.
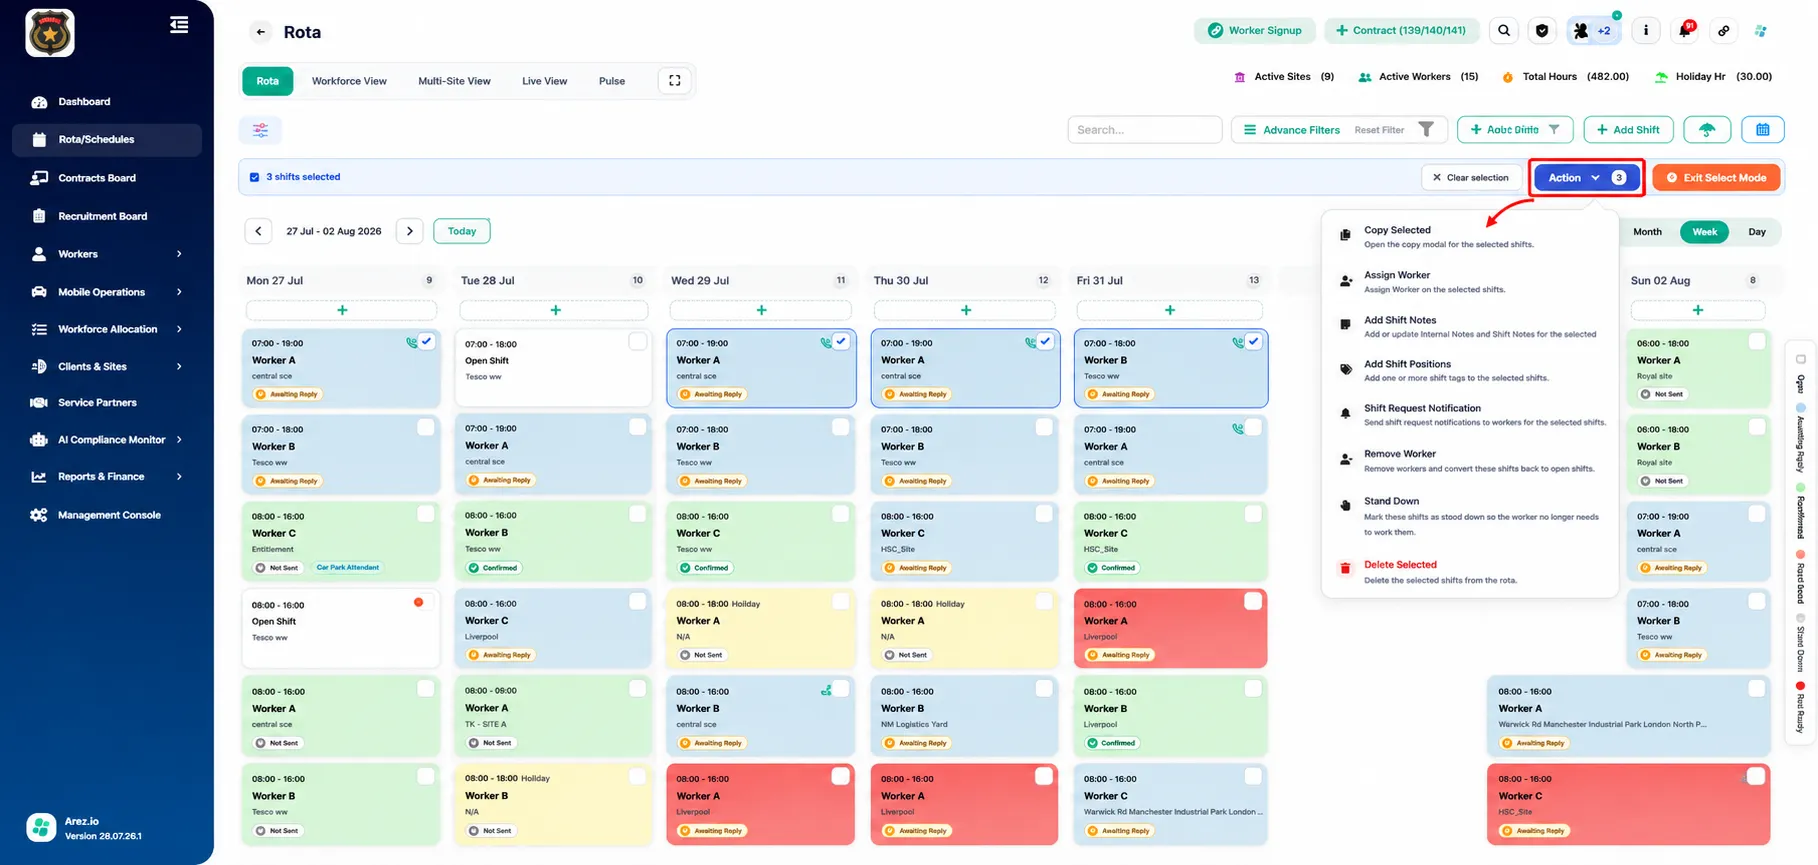
Bulk Actions
After selecting multiple shifts, click Action to access the available bulk operations.
Copy Selected
Duplicate the selected shifts while preserving their configuration.
Assign Worker
Assign a worker to all selected shifts in a single action.
Add Shift Notes
Add internal notes or shift-specific information to every selected shift.
Add Shift Positions
Assign one or more shift position tags to the selected shifts.
Shift Request Notification
Send shift request notifications directly to workers assigned to the selected shifts.
Remove Worker
Remove workers from the selected shifts and convert them back into open shifts.
Stand Down
Mark selected shifts as stood down when they are no longer required.
Delete Selected
Delete selected shifts from the rota.
Actions Menu
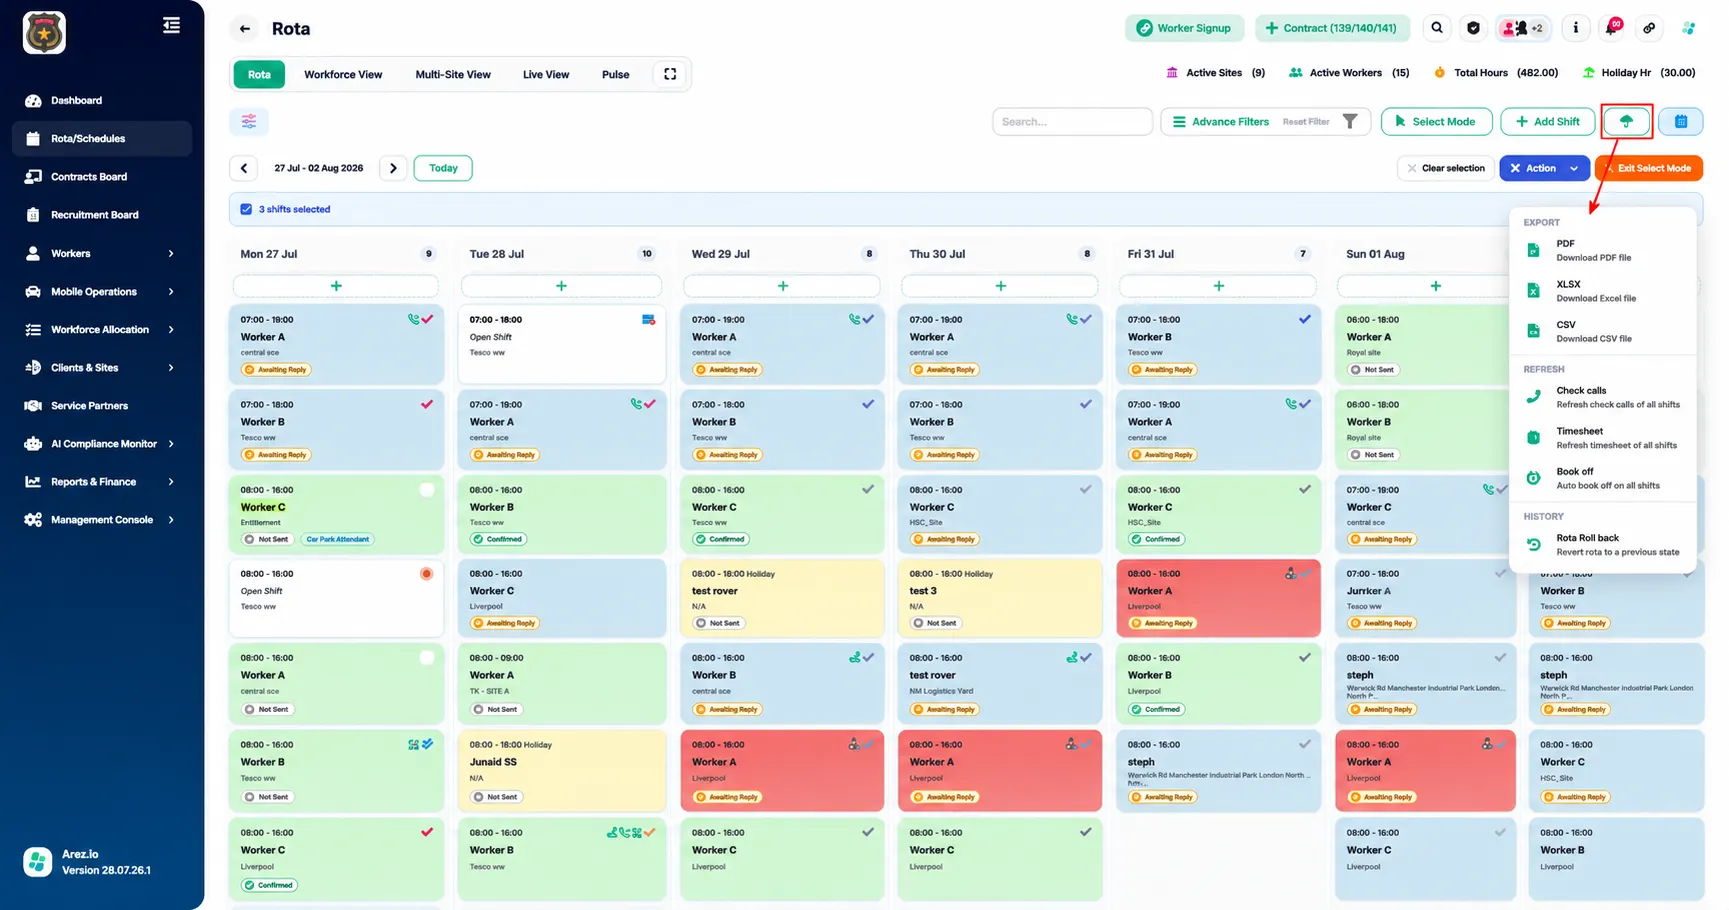
Click the Actions menu to access additional rota management tools.
Export
Export the rota in one of the following formats:
PDF
XLSX (Excel)
CSV
These exports are useful for reporting, auditing, or sharing schedules externally.
Refresh
The Refresh section includes maintenance tools.
Check Calls
Refreshes check-call information across all shifts.
Timesheet
Refreshes timesheet data for all shifts.
Book Off
Refreshes Book Off records across all scheduled shifts.
History
Rota Roll Back
Restore the rota to a previous version.
This is useful when recent scheduling changes need to be reversed.
Viewing Shift Details
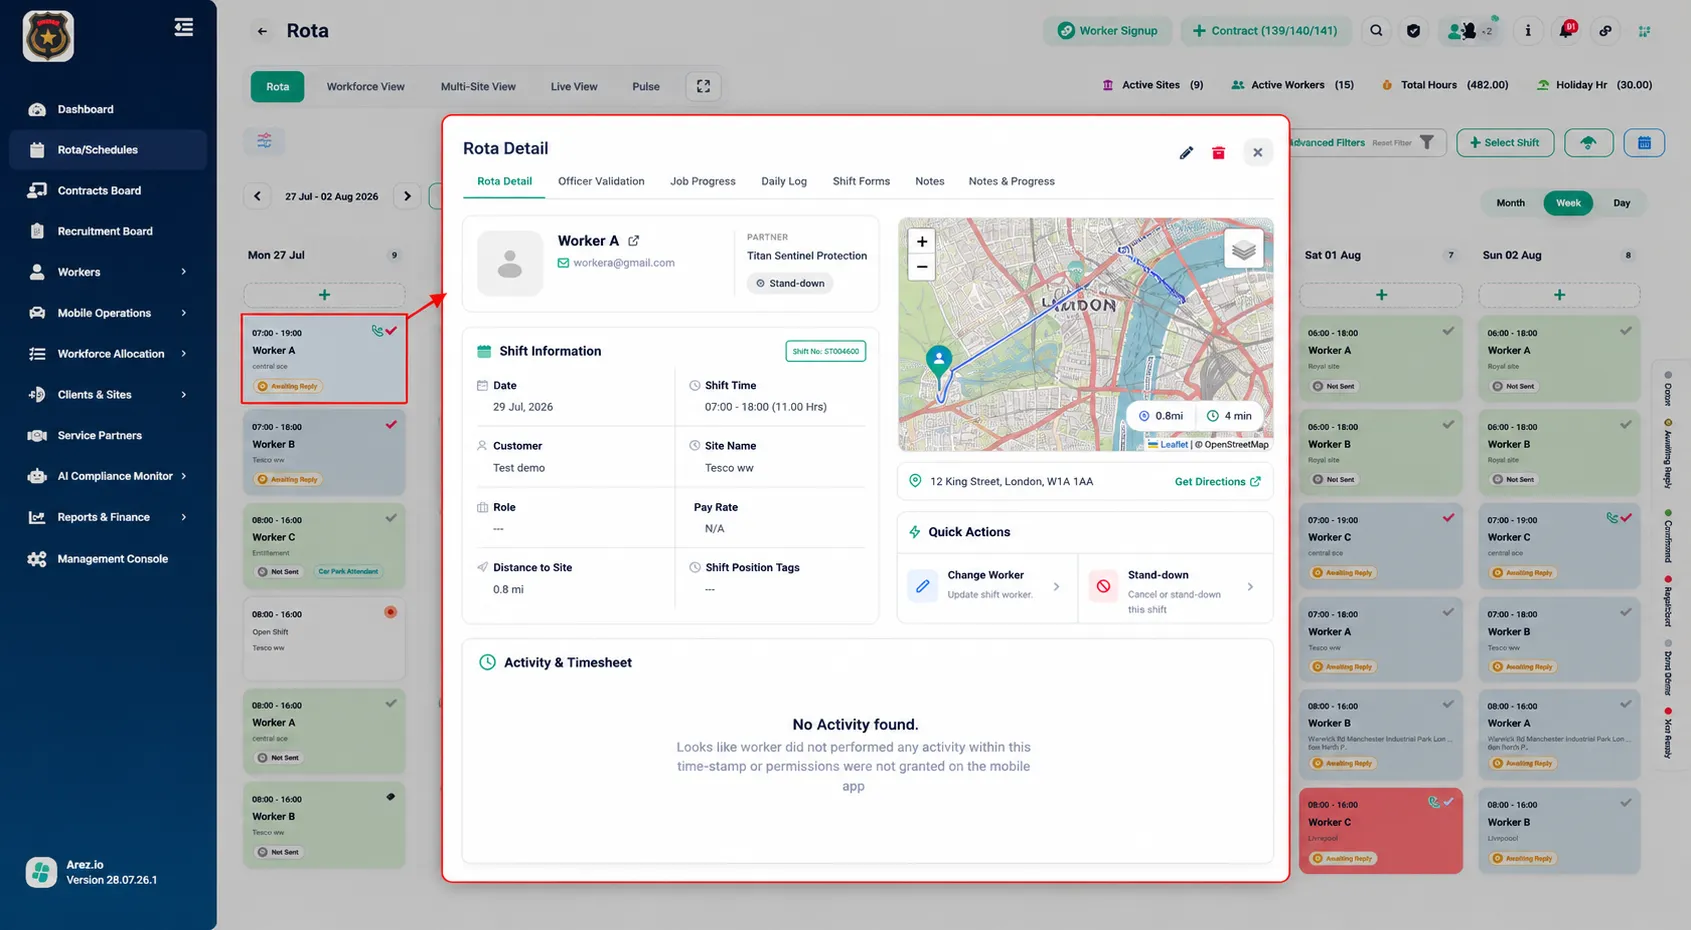
Click any shift card in the rota to open the Rota Detail window.
The Rota Detail window provides comprehensive information about the selected shift through multiple tabs, allowing you to review worker details, validation status, forms, notes, and other shift-related information.
Rota Detail
The Rota Detail tab provides an overview of the selected shift, including:
Worker information
Partner
Shift Information
Date
Shift Time
Customer
Site Name
Role
Pay Rate
Distance to Site
Shift Position Tags
A map is also displayed showing the worker's travel route and the assigned site location.
The Quick Actions section allows you to:
Change Worker
Stand Down
Officer Validation
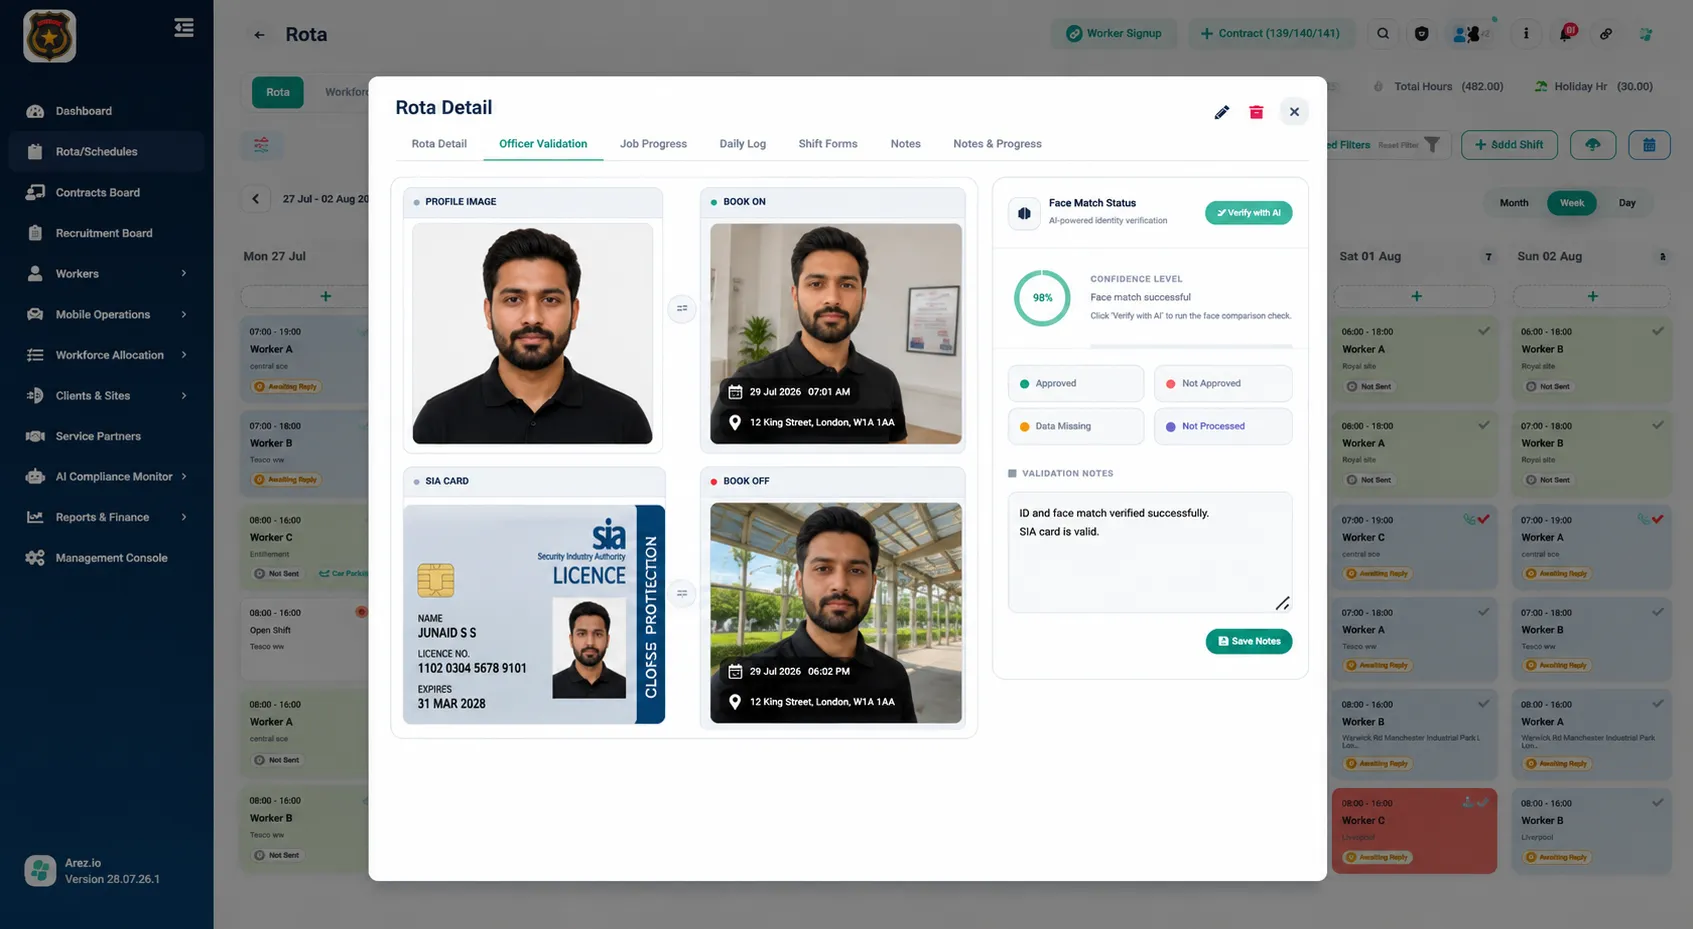
The Officer Validation tab displays identity verification and compliance information for the worker, including:
Profile Image
SIA Card
Book On image
Book Off image
Face Match Status
AI confidence level
Validation notes
You can also run Verify with AI to perform an AI-powered face comparison and save validation notes.
Job Progress
The Job Progress tab displays any progress updates or job attachments submitted during the shift.
If no progress information has been recorded, an informational message is displayed.
Daily Log
The Daily Log tab provides a chronological record of activities performed during the shift.
If no activity has been recorded, the page will indicate that no logs are available.
Shift Forms
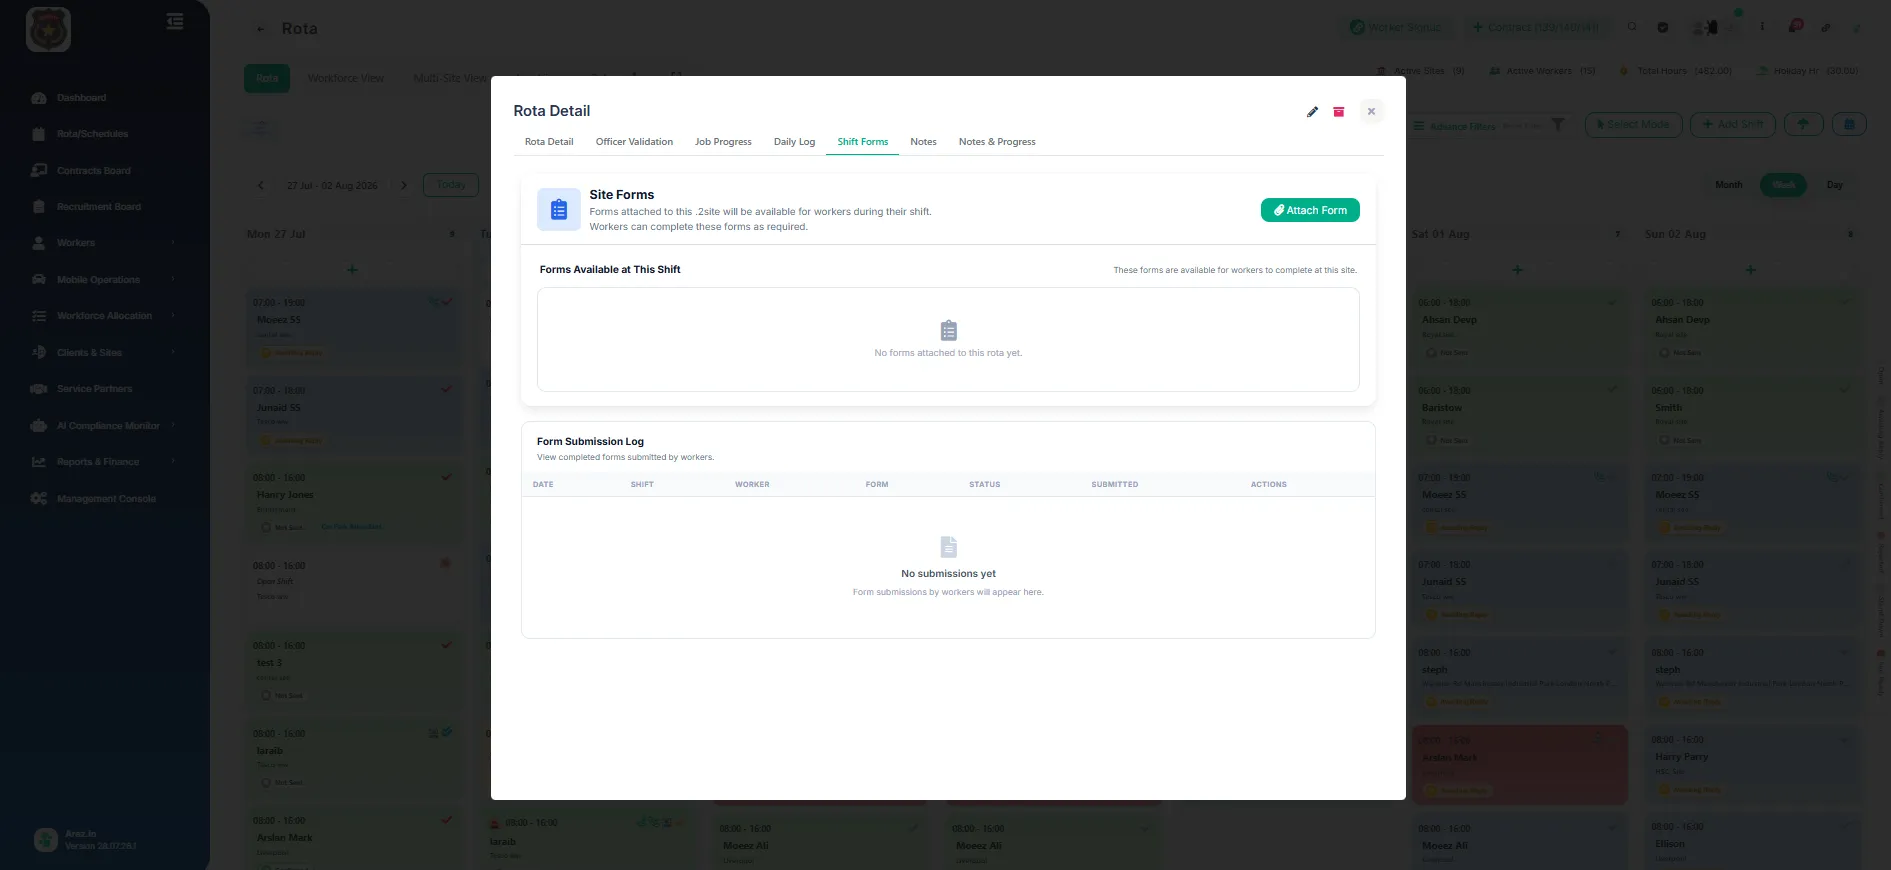
The Shift Forms tab allows you to manage forms associated with the selected shift.
From this page you can:
View forms attached to the shift
Attach additional forms using Attach Form
Review submitted worker forms
View the Form Submission Log
Notes
The Notes tab allows administrators to record additional information related to the shift.
You can add:
Shift Notes
Internal Notes
Click Save to store your changes.
Notes & Progress
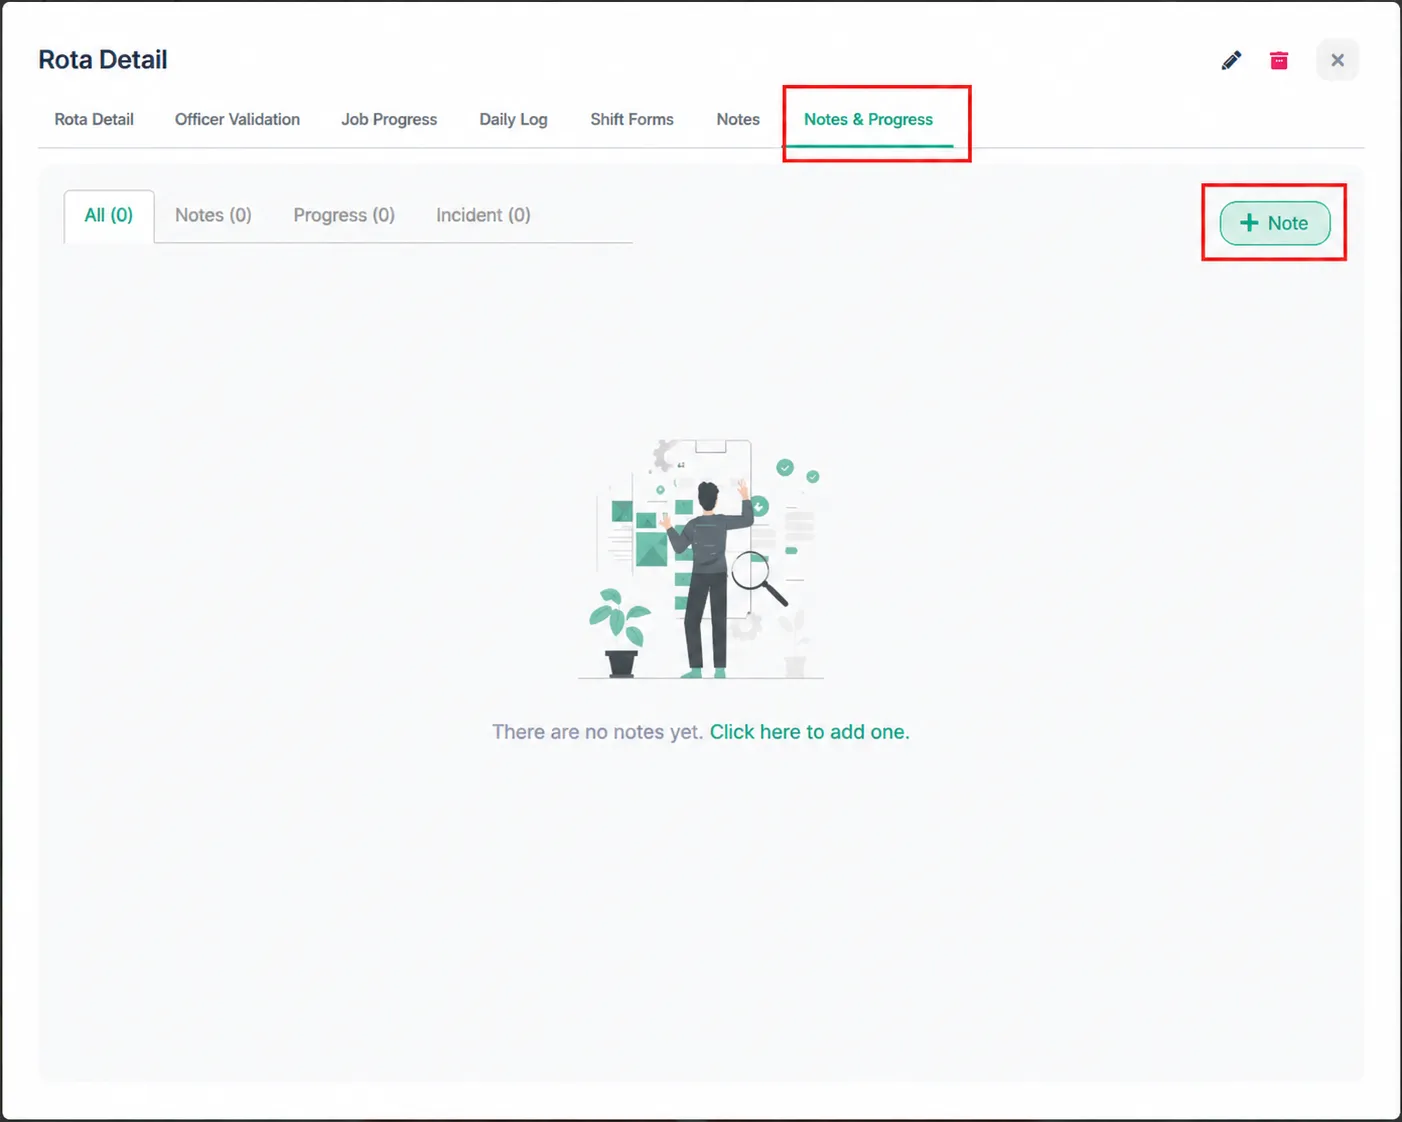
The Notes & Progress tab provides a consolidated view of all recorded information, including:
All entries
Notes
Progress updates
Incidents
Use the + Note button to create a new note or incident for the selected shift.
Check Calls & Activity Timeline
The bottom section displays hourly check-call intervals throughout the shift.
Below the timeline, the Activity & Timesheet panel displays worker activity recorded during the shift.
If no activity has been recorded, the system displays a No Activity Found message.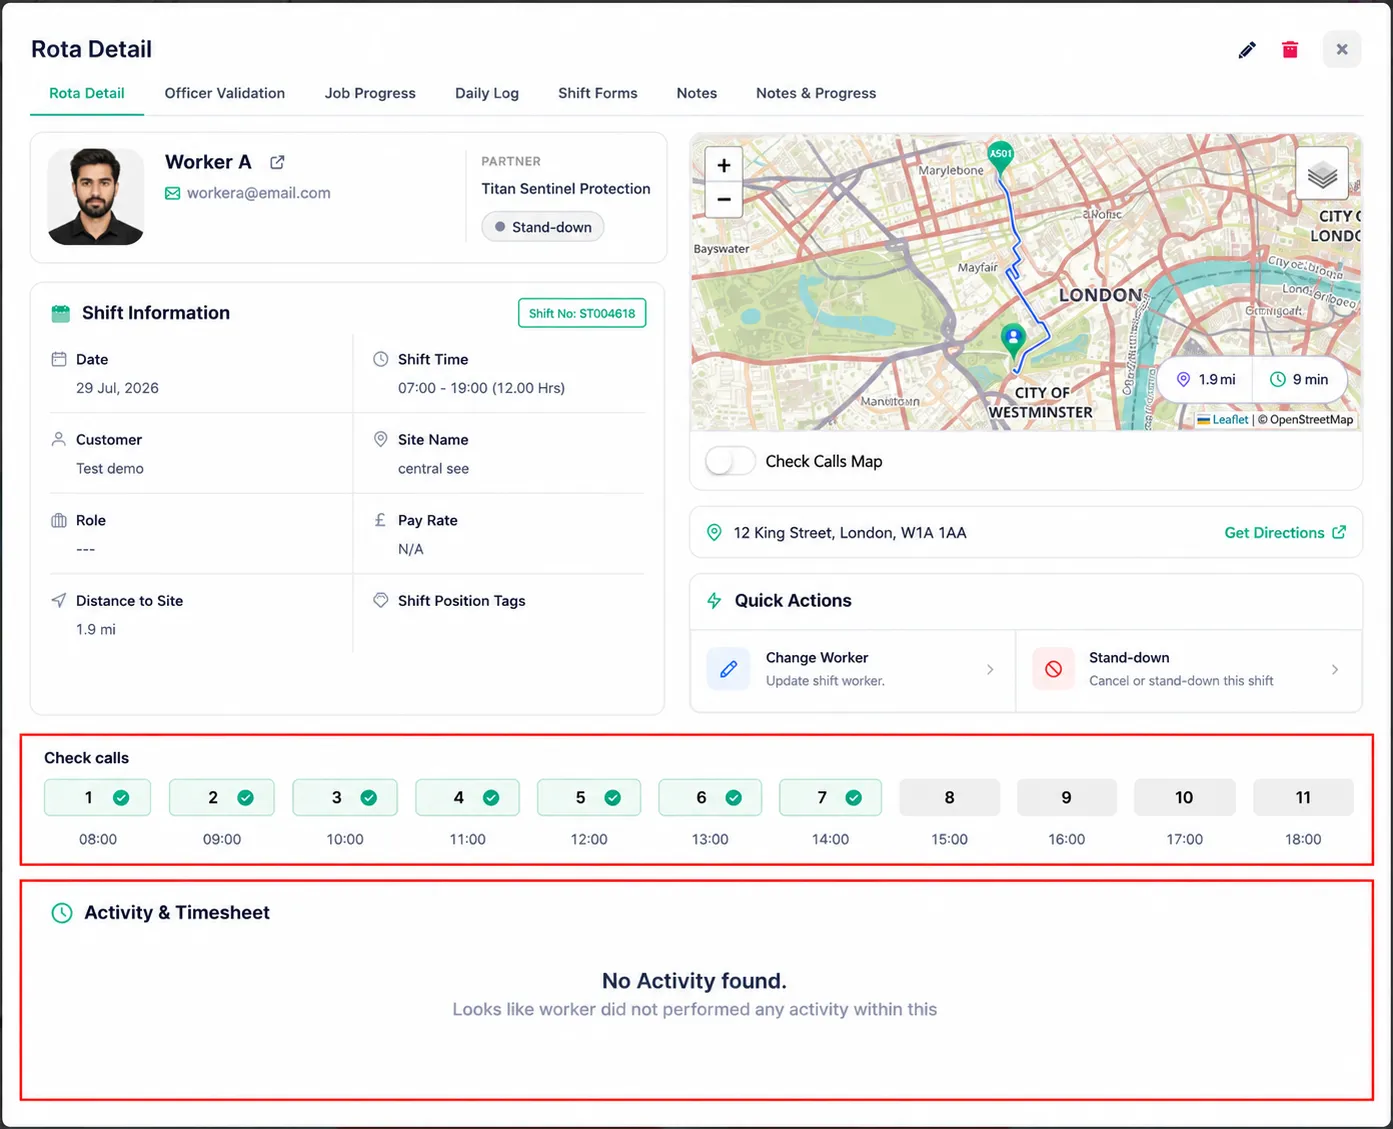
Best Practices
Apply Advanced Filters before searching large rotas.
Use the Legend to understand shift colours and icons.
Export the rota before making significant scheduling changes.
Use Select Mode for efficient bulk management.
Review Rota Detail before editing or standing down a shift.
Use Rota Roll Back only when it is necessary to restore a previous rota version.