
 Facebook
  Twitter
  LinkedIn
 AREZ HELP CENTRE • MOBILE OPERATIONS
Foot Patrol in Arez Operate
Create patrol routes, configure checkpoints, assign workers and monitor patrol delivery
WHO IT’S FOR Admins, Operations and Security Managers | WHERE Mobile Operations → Foot Patrol | READING TIME 5–7 minutes |
Foot Patrol lets you build a patrol route for a site, add checkpoint locations, choose how each checkpoint is completed, and assign the patrol directly to a worker shift. Patrol History then gives operations teams a clear view of patrol delivery and compliance.
Quick flow Mobile Operations → Foot Patrol → Patrol Routes → Create Patrol → Add Checkpoints → Assign Shifts → Add Shift → Save |
At a glance
Step | What you do |
1 | Open Foot Patrol and review Patrol History or existing Patrol Routes. |
2 | Create a patrol and select its client, site and frequency. |
3 | Add checkpoint locations to the route map. |
4 | Configure each checkpoint as QR Code, NFC Tag or GPS Only. |
5 | Open Assign shifts and create or select a worker shift. |
6 | Save the shift. The worker is now assigned to the patrol. |
1. Access Foot Patrol
From the left-hand navigation menu, go to Mobile Operations → Foot Patrol.
The Foot Patrol area contains two main tabs: Patrol History and Patrol Routes.
Patrol History
Patrol History gives a live operational view of patrol delivery for the selected period. It includes Total Shifts, Required Patrols, In Progress, Today’s Pending and Patrol Compliance. The Needs attention panel separates Missed, Pending, Completed and In Progress patrols.
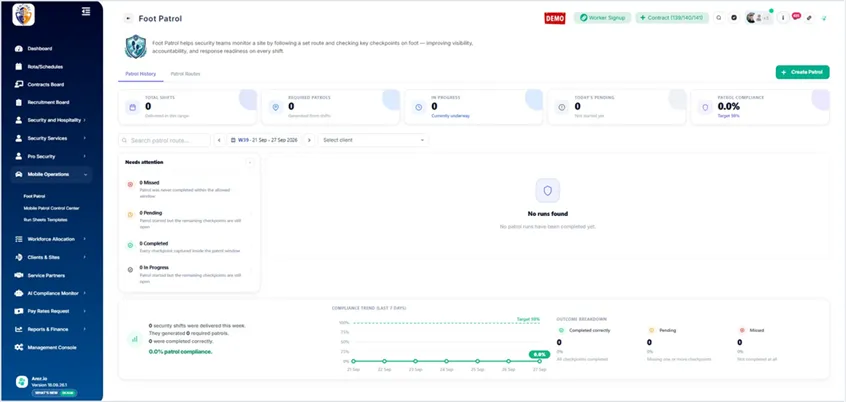
Figure 1. Foot Patrol opens on the Patrol History dashboard, showing delivery and compliance information.
Patrol Routes
Open Patrol Routes to view existing patrols. You can search by patrol route and filter by client or status. Each row shows the linked client/site, checkpoint count, schedule, status and last update.
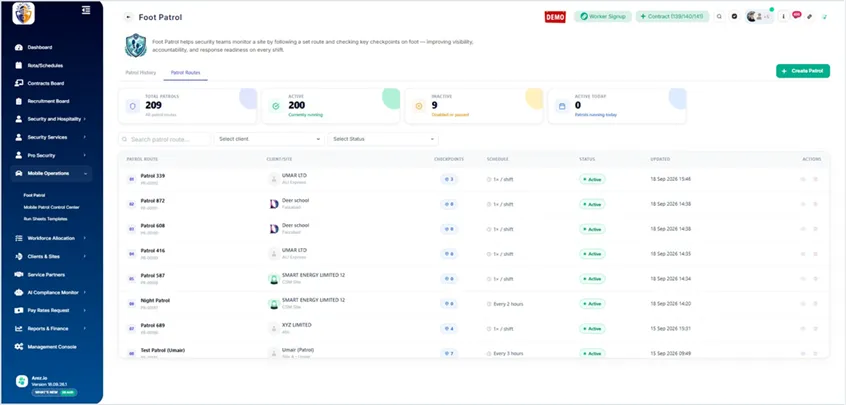
Figure 2. The Patrol Routes tab lists existing patrols and their current status.
2. Create a New Patrol
From either Foot Patrol tab, click + Create Patrol in the top-right corner.
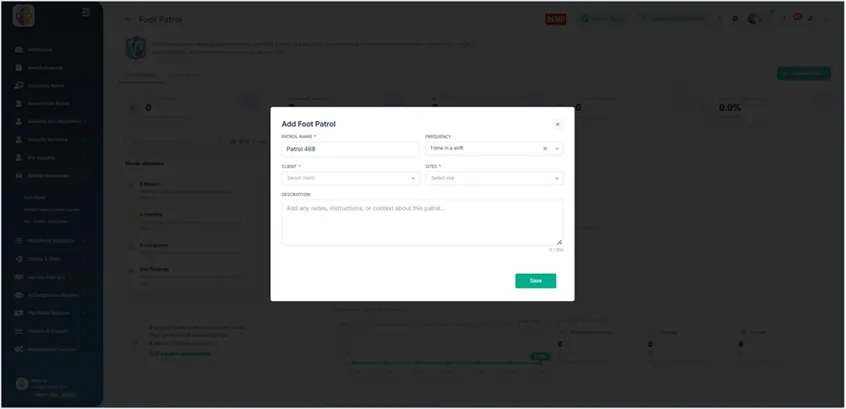
Figure 3. Use + Create Patrol to open the Add Foot Patrol form.
Complete the patrol details:
· Patrol Name – enter a clear name for the route.
· Frequency – choose how often the patrol should run, for example once in a shift or every 3 hours.
· Client – select the client responsible for the site.
· Sites – select the site where the patrol will be carried out.
· Description – add notes or instructions if required.
Click Save when the required information is complete.
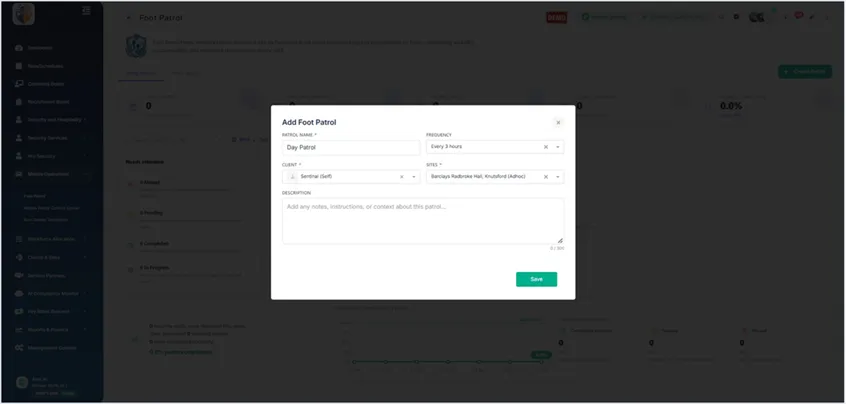
Figure 4. Enter the patrol name, frequency, client, site and optional description, then save.
3. Add Checkpoints to the Patrol Route
After saving the patrol, Arez opens the Foot Patrol Detail screen. The setup is split into two stages:
1) Add checkpoints and 2) Assign shifts.
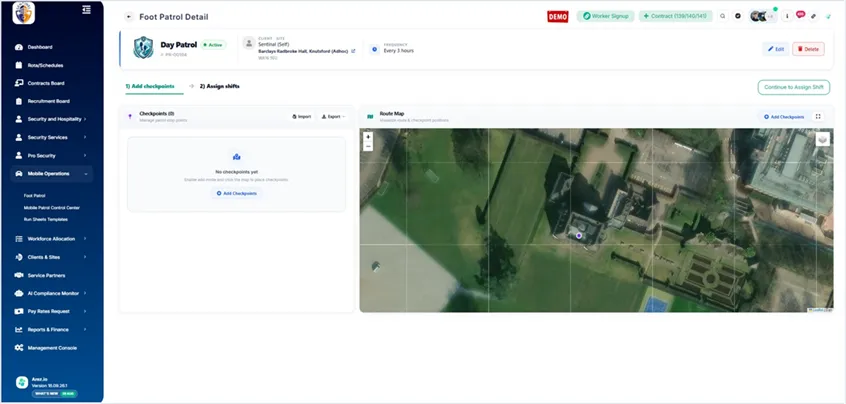
Figure 5. After saving, the Foot Patrol Detail screen opens on Add checkpoints.
To start building the route, click Add Checkpoints. The map switches into checkpoint placement mode.
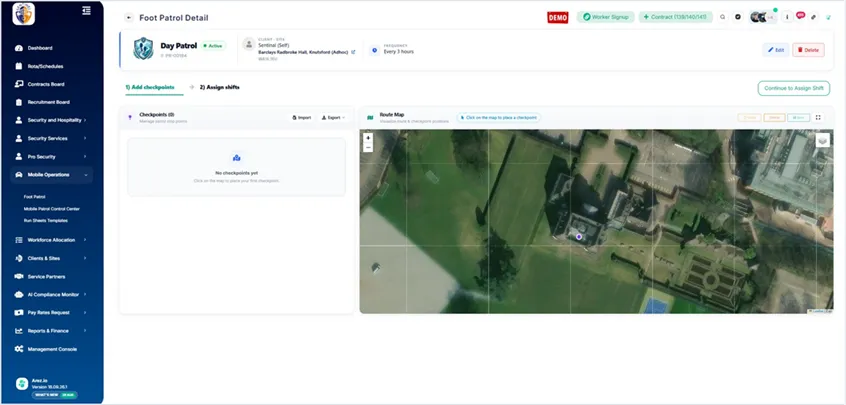
Figure 6. Click Add Checkpoints, then select positions directly on the route map.
1. Click the required position on the map to place the first checkpoint.
2. Continue selecting positions until the route contains all required checkpoints.
3. Save the checkpoint positions when the route is complete.
Once saved, the checkpoints appear in sequence in the Checkpoints panel and are plotted on the route map.
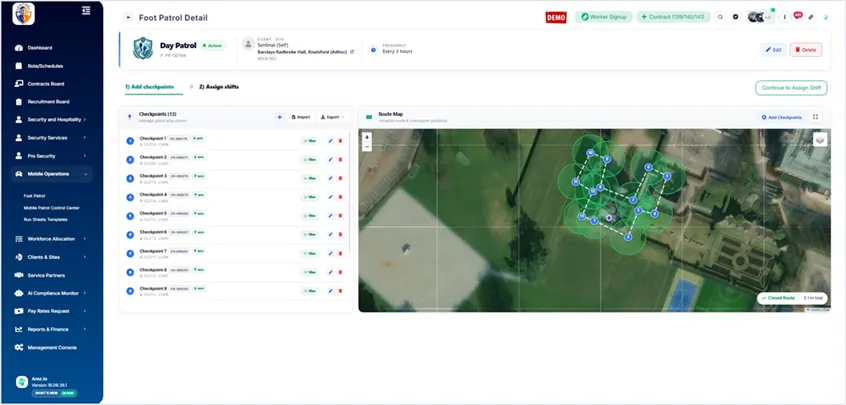
Figure 7. Saved checkpoints appear in sequence on the left and on the route map.
4. Configure Checkpoint Completion Type
Each checkpoint can be edited individually. Click the edit icon beside the checkpoint to open its settings.
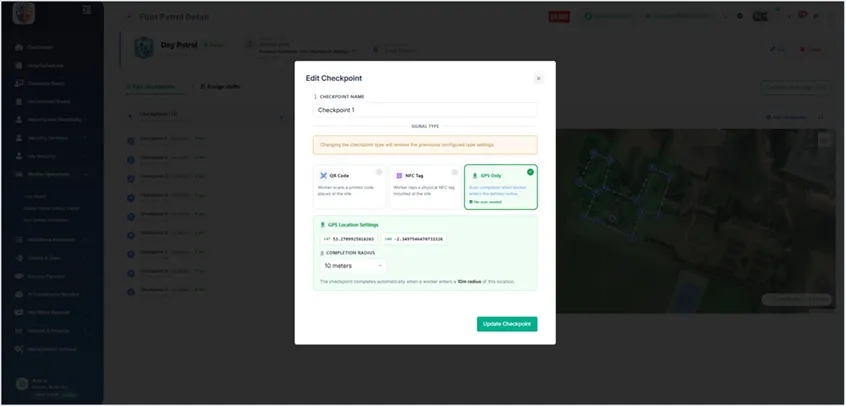
Figure 8. Edit an individual checkpoint to choose QR Code, NFC Tag or GPS Only.
Choose the signal type that workers will use to complete the checkpoint:
· QR Code – the worker completes the checkpoint using a QR code.
· NFC Tag – the worker completes the checkpoint using an NFC tag.
· GPS Only – the checkpoint completes when the worker enters the configured location radius.
For GPS checkpoints, confirm the GPS location and select the Completion Radius. In the example above, the checkpoint completes when the worker enters a 10 metre radius.
Important: Changing the checkpoint type removes the settings previously configured for that checkpoint type.
5. Assign the Patrol to a Worker Shift
Once the checkpoint route is ready, click Continue to Assign Shift or open the 2) Assign shifts step.
The Site Shifts tab shows the rota for the selected site. You can also use Assigned Shifts to review shifts already linked to this patrol.
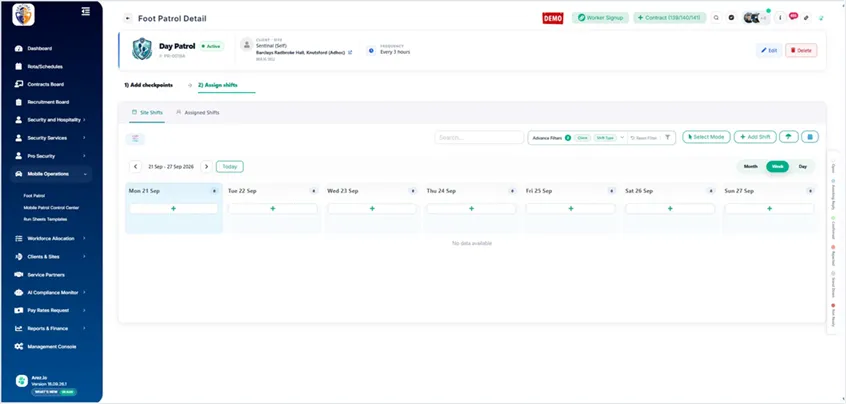
Figure 9. Use Assign shifts to view the site rota and link workers to the patrol.
Add a shift
Click + Add Shift, or use the + button under the required date, to create a shift for the worker.
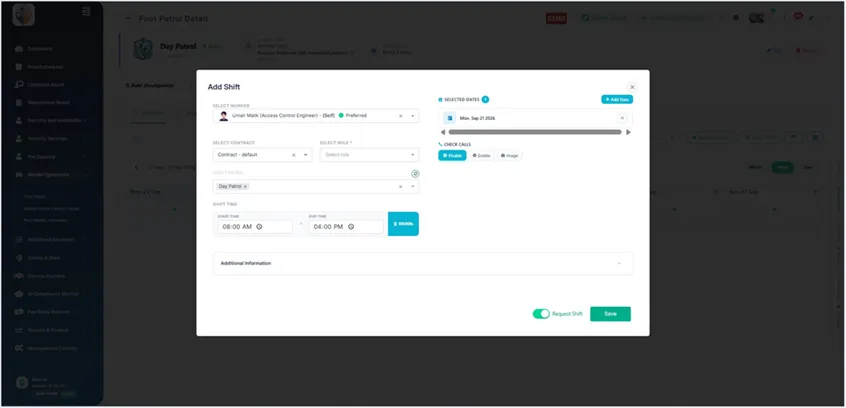
Figure 10. Create a shift for the worker. The patrol is selected automatically when the shift is added from the patrol.
Complete the shift information, including:
· Worker
· Contract
· Role
· Shift date and start/end time
· Check Calls, where required
· Request Shift setting, according to your normal rota workflow
When the shift is created from the Foot Patrol screen, the patrol you are working on is selected automatically. Check the details and click Save.
6. Confirm the Worker Is Assigned
After saving, the new shift appears on the patrol calendar. The patrol is now linked to the worker for that shift.
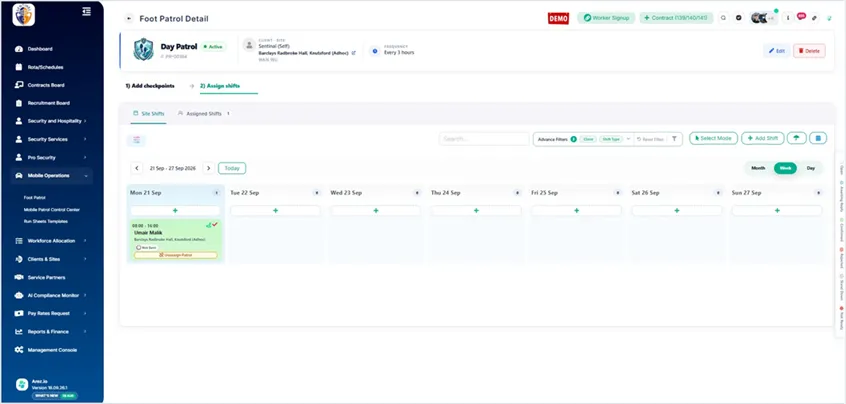
Figure 11. After saving, the worker shift appears on the patrol calendar and is linked to the patrol.
You can click the shift card to open its details. If the patrol was assigned in error, use Unassign Patrol on the shift card.
7. Monitor Patrol Delivery
Return to the Patrol History tab to monitor how patrols are being delivered. The dashboard brings the operational status into one view so supervisors can identify patrols that need attention.
Use the dashboard to review:
· Required patrols generated from shifts
· Patrols currently in progress
· Patrols still pending
· Completed and missed patrols
· Overall patrol compliance and the recent compliance trend
Use the search, date range and client filters to focus the dashboard on the patrols you need to review.
Key points
Remember Create the patrol against the correct client and site, complete the checkpoint route first, then assign the patrol to the worker shift. When adding the shift from inside the patrol, Arez preselects that patrol for you. |
Quick reference
Action | Where to do it |
Open Foot Patrol | Mobile Operations → Foot Patrol |
Review existing routes | Patrol Routes |
Create a route | + Create Patrol |
Build the route | Foot Patrol Detail → Add checkpoints |
Configure a checkpoint | Checkpoint edit icon |
Assign a worker | Assign shifts → + Add Shift |
Monitor delivery | Patrol History |
Need help?
If you need help setting up a Foot Patrol or assigning it to a shift, contact the Arez Support Team.