
 Facebook
  Twitter
  LinkedIn
 Understanding the Reactive Job Lifecycle
Last updated: 03 August 2026 · 6-minute read
Overview
Reactive jobs are used when work is required unexpectedly — for example, equipment failures, client callouts, breakdowns, or issues identified during another visit. Unlike planned maintenance, reactive work usually begins with incomplete information and develops as it progresses. Additional visits, parts, approvals and costs may be added before the work is completed.
This guide describes the complete lifecycle of a reactive job in Arez FieldIQ, from the point at which an issue is reported through to completion, invoicing and closure. It also explains the purpose of each stage, so that users understand not only how to perform each action but why it is necessary.
Following this workflow helps work move smoothly between office staff, engineers, suppliers and customers, while maintaining a complete and accurate audit trail.
Why the lifecycle matters
Planned maintenance is predictable: the site, asset, task and cost are known before work begins. Reactive work differs in that it typically starts with limited information — often no more than a brief description of the fault.
A reactive job also develops over time. An engineer may attend, diagnose the issue, and be unable to complete the work because a part is unavailable or approval is required. A second visit may follow, along with supplier invoices and additional costs. As a result, a single reactive job can involve multiple visits, several cost lines, and coordination across office staff, engineers, suppliers and the customer.
Because of this, following a consistent lifecycle is important. Incomplete or inconsistent handling of reactive jobs is a common cause of missed SLAs, unrecovered costs and gaps in the audit trail.
The lifecycle at a glance
The diagram below summarises the standard sequence that every reactive job follows.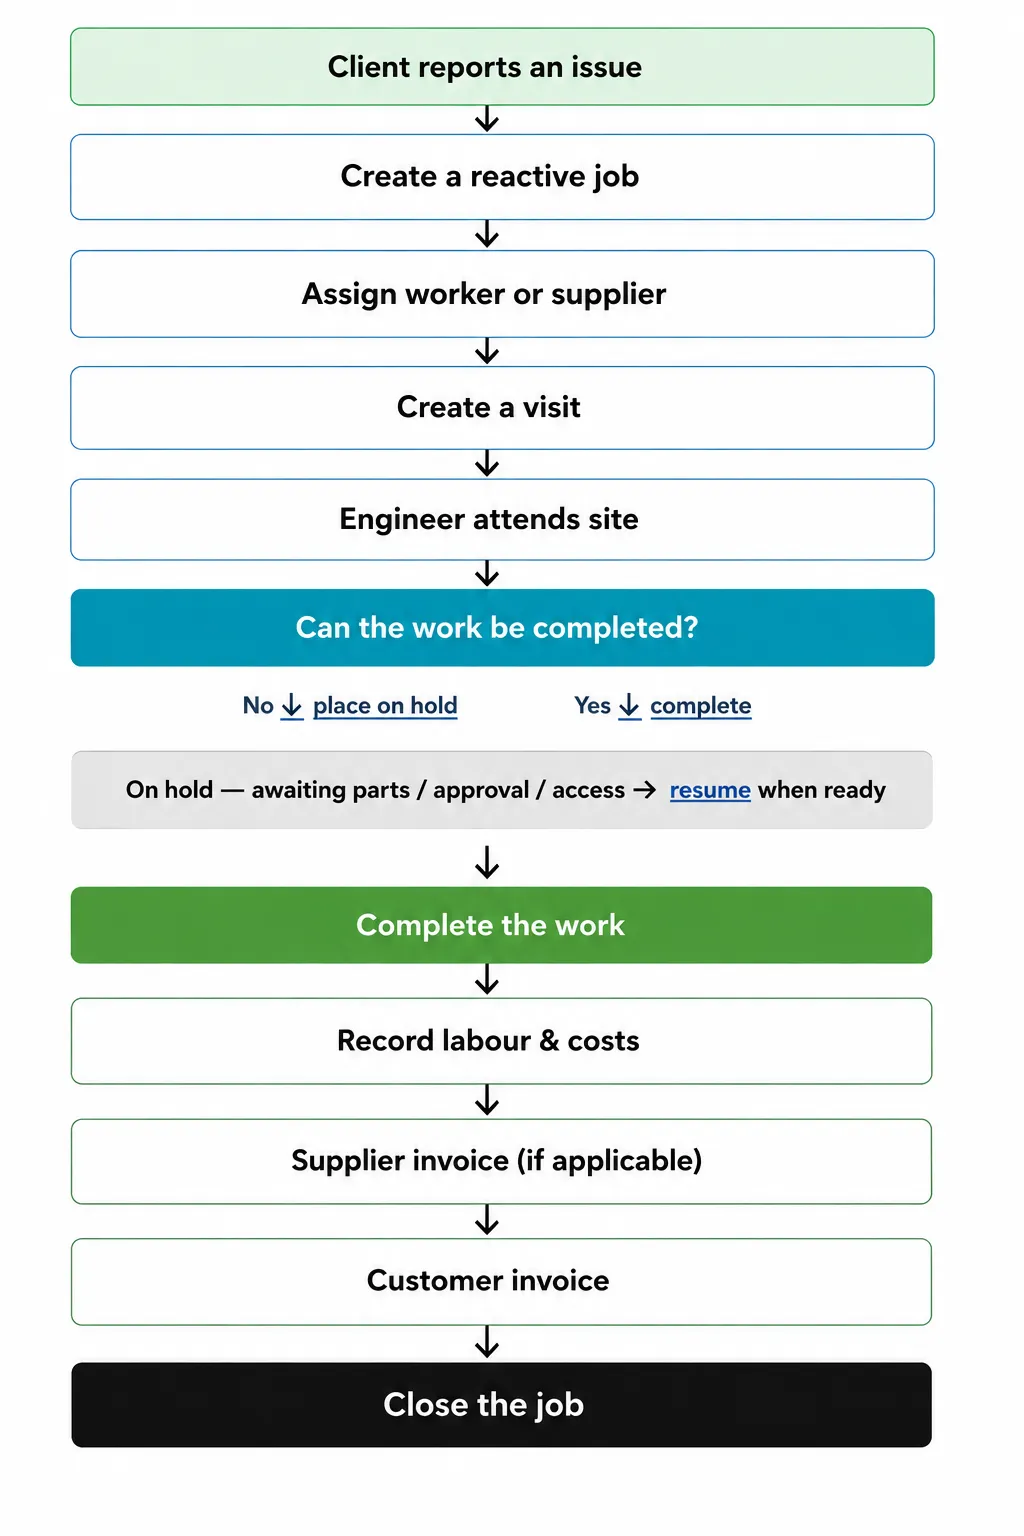
The reactive job lifecycle in detail
Step 1 — Log the reactive job
Record the essential details: a clear description, the client, the site, the priority, any attachments, access information and safety considerations. Auto Fill can suggest values based on the information entered; these should be reviewed before saving.
Why this matters. The job record is the foundation for every subsequent stage. A precise description — for example, “Walk-in freezer not maintaining temperature; unit located at the rear of the kitchen; keyholder is the duty manager; allergen-critical area” — enables the engineer to attend prepared and increases the likelihood of a first-time fix. A vague description has the opposite effect.
OPERATING PRINCIPLE If it is not logged, it does not exist. Work that is not recorded as a job cannot be scheduled, tracked or invoiced. |
Related article: Create a Reactive Job & Assign a worker or Service Partner
Step 2 — Assign the work
Assign the job to the appropriate engineer, subcontractor or service partner, taking into account skills, availability, location and SLA commitments.
Why this matters. The nearest available resource is not always the correct one. A refrigeration fault, for example, requires an F-Gas–qualified engineer. Assigning the correct resource at the outset reduces the risk of repeat visits and wasted SLA time.
BEST PRACTICE Review the SLA response time before assigning. For short response windows, availability and location are particularly important, as the correct skill set is of little value if attendance is late. |
Step 3 — Create a visit
Schedule attendance by creating a visit. Once published, the visit becomes available in the engineer’s mobile application, together with the job description, site details and access information.
Why this matters. The visit converts the office record into scheduled activity on site. Publishing it ensures the engineer has all relevant information without the need for further communication. A single job may include several visits, each of which is recorded individually.
Step 4 — Attend site
The engineer inspects the issue and records their findings — including labour, notes, forms, photographs and materials used — before determining whether the work can be completed.
Why this matters. This stage builds the majority of the audit trail. Photographs, notes and time on site provide the evidence that supports the invoice and demonstrates proof of work to the customer. Work that is completed but not recorded is only partially complete from a business perspective.
Step 5 — Complete the work, or place the job on hold
If the work can be completed, complete it. If it cannot — for example, when awaiting parts, approvals, access, permits or specialist attendance — place the job On Hold and record the reason. The job remains active, and SLA timers pause until it is resumed.
Why this matters. Placing a job on hold, with a recorded reason, serves three purposes: it prevents the SLA clock from running unfairly against the contractor; it keeps the job visible and active rather than overlooked; and it provides a clear basis for updating the customer.
OPERATING PRINCIPLE Customers should never have to chase Arez before Arez updates them. An On Hold status with a clear reason should prompt a proactive update to the customer. |
Related article: Putting a Job On Hold.
Step 6 — Record labour, parts and costs
Record all costs incurred, including labour, travel, materials, parts and subcontractor costs.
Why this matters. Costs that are not recorded against the job cannot be recovered through invoicing. Incomplete cost records are a leading cause of under-billing on reactive work.
BEST PRACTICE Record costs as they are incurred rather than at the invoicing stage, to avoid omissions. |
Step 7 — Process supplier invoices
Where a supplier or subcontractor has been involved, link the relevant supplier invoice to the job.
Why this matters. Linking supplier invoices to the job reconciles expenditure with billing, allows verification that suppliers have charged the agreed amounts, and ensures associated costs are reflected in the customer invoice at the correct margin.
Step 8 — Raise the customer invoice
Once the work and associated costs have been reviewed, raise the customer invoice.
Why this matters. Accurate records from the earlier stages allow the invoice to be produced quickly, with each cost line supported by evidence. Incomplete records delay invoicing and may result in customer queries.
Step 9 — Close the job
Close the job only once all visits, documentation, costs and invoicing are complete.
Why this matters. Completion of the physical work does not, by itself, complete the job. A job is finished only when the associated records — proof of work, costs and invoicing — are also complete. Closing a job prematurely can result in unrecovered costs and an incomplete audit trail.
IMPORTANT Resolved is not closed. Resolving the fault and closing the job are distinct stages. Closure requires that all records and invoicing are also complete. |
Key principles
The following principles apply throughout the reactive job lifecycle and support accurate, auditable record-keeping.
1. If it is not logged, it does not exist. Jobs, visits, attachments and costs must be recorded in Arez in order to be scheduled, evidenced or invoiced.
2. Resolved is not closed. Completing the work is an intermediate stage; costs and invoicing must be completed before the job is closed.
3. Customers should never have to chase Arez before Arez updates them. Each status change provides an opportunity to update the customer proactively.
Frequently asked questions
Do SLA timers continue while a job is on hold?
No. SLA timers pause when a job is placed On Hold and resume when the job is resumed. For this reason, the hold and its reason must be recorded.
Can a single reactive job include multiple visits?
Yes. Reactive jobs frequently require a diagnostic visit followed by one or more return visits. Each visit is recorded against the same job.
What happens if the engineer completes the work on the first visit?
The visit records should still be completed and costs captured before the job proceeds to invoicing and closure. Resolution does not remove the requirement to close the job correctly.
Is every reactive job invoiced?
Only chargeable jobs are invoiced. However, costs and documentation should be recorded for all jobs, whether billed to the customer or absorbed under a contract.
Summary
A reactive job should be treated as a sequence of connected stages rather than a single task. Consistent record-keeping — beginning with a clear description and ending with complete documentation and invoicing — reduces delays, supports accurate billing, and maintains a full audit trail. Effective reactive job management depends less on the speed of resolution than on the completeness and accuracy of the record at each stage.
Related articles
• Create a Reactive Job & Assign a worker or Service Partner